An Eyepiece Storage Case
Personalize An Aluminum Storage Case For Your Eyepieces
John D. UptonMarch 15, 20004
Very durable padded aluminum cases are available for storing your eyepieces these days. In many instances, these cases are quite reasonably priced. This project shows how I personalized one such inexpensive case to hold my eyepiece collection.
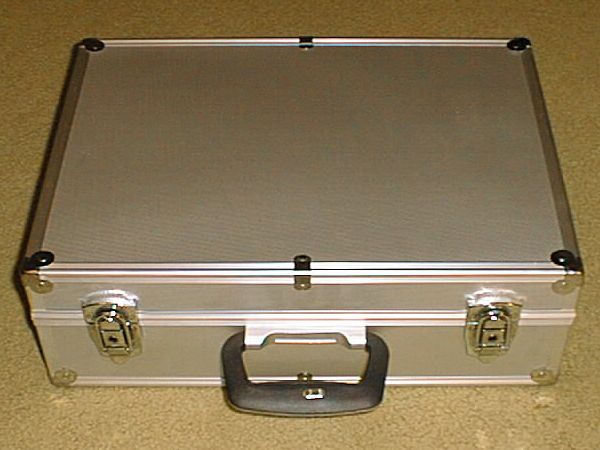
Last Fall, I purchased two aluminum utility cases from the local Wal-Mart department store. These cases are similar to those sold by Orion Telescopes and Binoculars for storing eyepieces. The cases are made in China and imported by a number of different companies. The cases measure 17" wide by 12" deep by 5" high. They feature reinforced corner braces, two keyed locks, sturdy hinges, a carrying handle, and a shoulder strap. The cases Wal-Mart sold, like those from Orion, are remarkably well made. The key advantage of the Wal-Mart cases was their low price. They were sold for $17.96 each. Unfortunately, the cases are not an item Wal-Mart normally stocks. They are a seasonal item available only occasionally, so you must check often for them to appear. Orion, on the other hand, regularly stocks the cases for immediate shipment.
The cases are supplied with two layers of die-cut foam in the base and an egg-crate style foam insert in the lid. In addition, all inside walls of the case are lined with a 1/16" thick resilient rubber material. The die-cut foam is easily personalized for most uses. You need only tear out sections where you want to fit an eyepiece or other accessory. While this technique works well for large eyepieces accessories with a rectangular form factor, it doesn't work as well when applied to smaller 1.25" eyepieces which would fit more compactly in a vertical position. I decided to try making a second foam insert to hold my 1.25" eyepieces upright. The result turned out to be very satisfactory and is described here.
I also purchased a sheet of dense foam which is commonly used as a sleeping pad for camping. This was also purchased from Wal-Mart for $5.88. Such pads are easy to find wherever sporting goods or camping equipment are sold. It was 0.625" thick and measured 24" wide by 60" long. It comes rolled and tends not to want to stay flat, so I left it unrolled a few days to allow it to straighten out a bit before attempting to work with it.

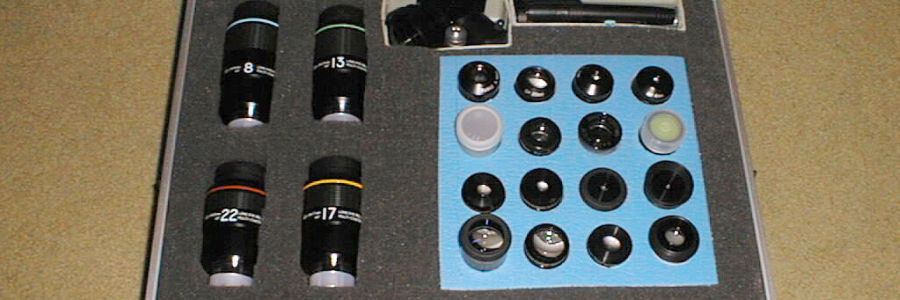
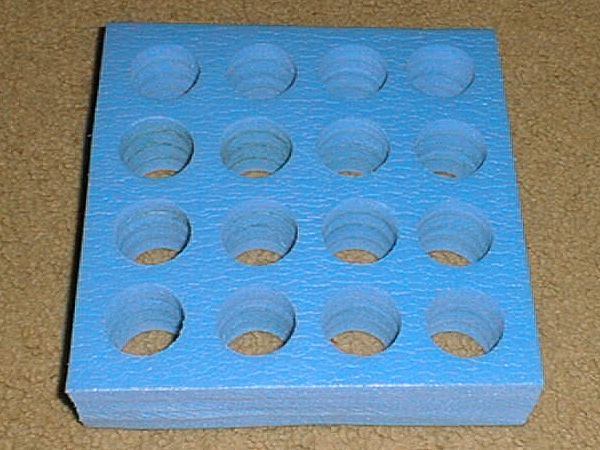
I have fifteen 1.25" eyepieces that I have collected over the years. I wanted to allow room for each of these in the eyepiece case even though some are seldom used anymore. I decided on a 4 by 4 array of eyepiece holes in the new foam insert. I decided to allow 0.5" space between each of the eyepieces and also allow 0.5" space around the edges of the foam holder. This worked out to an 8" by 8" storage area for the 1.25" eyepieces after allowing for a 1.375" hole to accommodate each. After seeing the results, I think leaving a 0.375" space between eyepieces would be more than ample and would save some space. You might consider this modification if you have additional items to store and need the extra room afforded by tighter packing of the 1.25" parts.
Four stacked layers of the camping pad foam were of just the right height to match the thickness of the case's die-cut foam insert. I cut four pieces of the camping pad to about 9" by 9" to allow for final sizing. I then glued these together to form one piece of the dense foam. Since the foam was still slightly curled, when gluing the sections together, I ensured that the concave surfaces were glued up in pairs and then I glued the two resulting thicker pieces together. I used household white glue very sparingly to build up the foam eyepiece holder pieces. A small amount of glue was applied to the foam and the excess was squeegeed away leaving a very thin coating. This was allowed to dry until it became tacky before mating the foam sheets. If I decide to make another foam insert using this material, I think I will use some spray-on contact adhesive. It should be much easier to get a very thin uniform layer of glue.
After allowing the glue two days to dry, I trimmed the foam to its final 8" by 8" dimensions. This was easy to do using a long seriated-edge knife to slice through the layered foam. A bread knife is perfect for this operation. The cut is made with a gentle sawing action just as you would use to cut soft, fresh-baked bread. The only remaining problem was to cut the openings for the individual eyepieces.
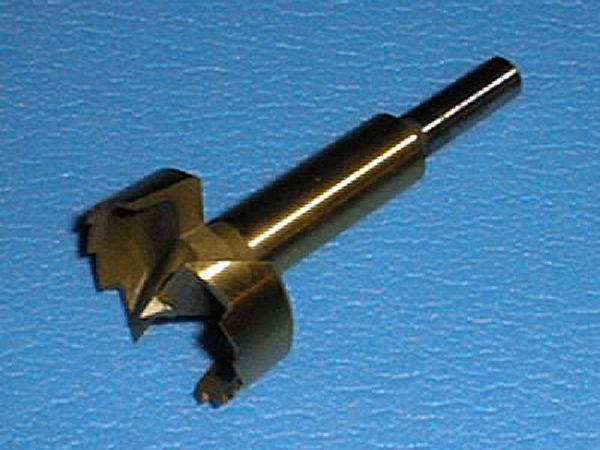
This turned out to be easier than I first thought. Through experimentation, I found the dense camping pad foam could be cleanly drilled using a woodworking Forstner bit running at very high speed. The locations of the holes were marked on the foam and then drilled on my drill press. I used a 1.375" Forstner bit running at 3900 RPM. By using a slow down feed in the drill press, I was able to drill the holes cleanly. The foam did tend to foul the drill bit a little, so I removed and carefully cleaned it after every four holes. The results were quite impressive given my previous attempts to cleanly cut or drill foam products. I think the density of the foam used in these camping pads helps in this regard.
Similar results might be obtained with a hole saw (without the center drill bit) running at very high speed. I did not try that method. Do not attempt drilling foam with a twist or spade drill. It will just wrap the foam onto the drill bit and could cause injury if your are holding the work by hand.
Take your time in drilling the holes. Always let the Forstner drill bit do its work without compressing the foam. If you use enough pressure to compress the foam, the holes will not drill cleanly. The bit will pull and distort the foam, tearing chunks out in the process. This will leave a ragged, over-sized hole and could become a hazard to your own personal safety. Make sure the drill bit is clean. Any residue from the foam or build-up from previous woodworking uses of the bit will result in a tendency for the bit to bind in the foam.
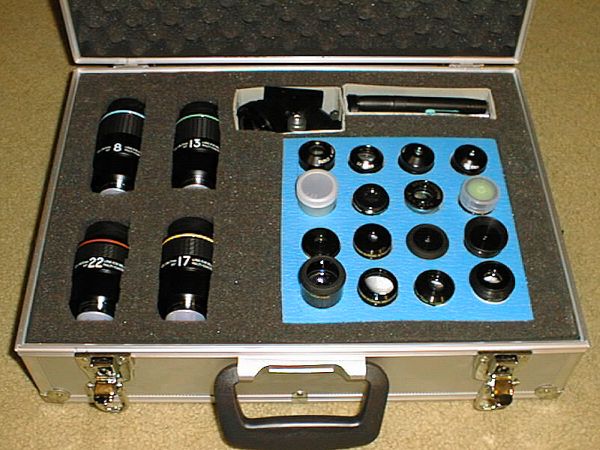
The final step was to install the drilled 1.25" eyepiece holder insert into the case. I removed an 8" by 8" section of the die-cut foam and slipped the drilled foam in its place. As an added precaution against any residual foam dust from the drilled holes getting into the eyepieces, I cut out paper liners for the holes and slipped them into place. The case is now complete. I think it looks good and provides very secure protection for all my eyepieces. The dense foam insert works well in this application.
I may now attempt to see if the dense camping foam can be milled with a sharp end mill tool running at high speed. If that also works, I will then be able to use the same technique to make custom shaped inserts for other accessories in the future.