Fast Mirror Grinding and Polishing
Miscellaneous Tips and Techniques
John D. UptonNovember 15, 2001 (Updated July 15, 2002)
Many ATMs, by their very nature, are experimenters. This article discusses some of the odd techniques I have used in grinding and polishing mirrors. Some were successful, others were tried and discarded for one reason or another. Most of these may be old hat to you, but you may find something new and useful here.
Like many ATMs, I am always searching for faster, easier, better ways of doing things. There are numerous techniques that have been described over the years for grinding and polishing mirrors. Some of these techniques have been devised for the specific purpose of making the mirror grinding and polishing operations easier or faster. I have tried out many of these ideas and techniques at one time or another. Some worked for me; others didn't. The same will undoubtedly be true of what I present here. Some of you will try a few of these techniques and continue to use them. Others of you may try them and vow to never attempt it again. Such is the nature of experimentation in ATMing.
I should note that these techniques are not generally used for normal grinding and polishing. Most are specialized techniques to be used only when specific problems are being faced. For the most part, I do not recommend these for the beginner who is working on a six or eight inch mirror. First time mirror makers will be better served by following the more traditional methods that are documented in the ATM texts. Some of these techniques may not work at all on smaller mirrors, and can actually cause you problems disproportionate to any advantages.
Mirror Hogging Techniques
Earlier this year, I finally completed hogging the deep curve of a 17.5" F/3.2 mirror. The blank was not curve generated (though it probably should have been,) and all work was done by hand. This turned out to be a monumental manual effort. In all, over 40 cubic inches of glass were removed and turned to dust. (That is about equal to the total volume of a 7" by 1" mirror blank.) I had an opportunity to try out a number of hogging techniques during all this grinding.
First, I used a traditional metal ring tool. This was a ring of cast iron about six inches in diameter with a three inch hole in the center. This tool worked fairly well, but progress was slow nonetheless, and I didn't like all the rust stains on everything. As the mirror and tool were slowly pulverized by the grinding process, the iron in the resulting grinding "mud" instantly oxidized. This rust colored mud stained almost everything it came into contact with. Cleanup became too much trouble, so I ceased using this technique. (Stainless steel would have been very useful in this application.)
The next idea I had seemed good at first, but failed in action. I tried using a six inch diameter Silicon Carbide grinding wheel as a ring tool. (This is the type of abrasive wheel used on small bench grinders used for metalworking.) The thought was that the SiC in the grinding wheel would automatically replenish the #60 grit I was using in the hogging. The idea didn't work well at all. The loose SiC grit under the wheel quickly broke down. The SiC in the wheel then simply scraped across the surface. New SiC particles were not released by the grinding wheel as I thought they would. Overall progress was slower than just using the #60 SiC grit with a metal ring.
I believe the reason this didn't work well is twofold. Rough grinding operations are most effective when the coarse grit rolls between the tool and the glass causing a fracturing of the surface. My grinding wheel method kept the grit from easily rolling under the rough textured tool. Secondly, the SiC embedded in the wheel didn't seem to be harsh enough to work well when used in a scraping action. The sharp grain corners just break off and you end up simply rubbing two coarse surfaces against one another to little effect.
The failure of the grinding wheel method led me to another. I reasoned that if the SiC grain corners in the wheel fractured too easily, perhaps I just needed a harder, more durable substance. Following this line of reasoning, I purchased some 2" by 6" diamond hones from Harbor Freight Tools. These consist of a thin perforated metal sheet to which diamond grit is nickel bonded. The metal is then attached to a slightly flexible plastic substrate. I was able to bend the diamond hone to the shape of the shallow curve already present on the mirror.
I used these with plenty of water to just scrape the glass surface. This process worked fairly well. I made greater progress than when using either the cast iron ring tool or the grinding wheel. Above all, the process was very clean. Since no SiC grit was used at all, the grinding mud was a pure white milky color, consisting of only ground (scraped) glass. I continued to use this process for much of the raw glass removal involved in hogging the mirror.
The main drawback of this approach was that I had to check my progress often and change the strokes used to remove the glass. Not doing so meant that the glass removal was not very uniform across the surface of the blank. For the most part, I didn't worry much about the shape until I was about 0.040" from my target sagitta. At that point, I decided to play it safe an go back to more traditional grinding methods.
To finish up the hogging, I made a six inch tile tool. I underestimated the amount of glass left to remove to get that last 0.040" of sagitta even using #60 grit. After several hours, I had ground through the hard porcelain tiles. I epoxied a second layer on top and continued grinding. Several hours later, I ground though that layer and once again found that I needed to rebuild the tool.
Not knowing how many more times I would have to remake the tool, I decided that I needed to go back to a metal grinding tool. I was determined not to use iron or steel due to the messy rusting problems I had previously encountered. Since the tile tool I was using was already mated with the shape of the mirror, I decided to try a "washer" tool as has been recommended by many. My disdain for normal steel washers, though, led me to the nearest hardware store to purchase a supply of stainless steel washers.
My enthusiasm soon vanished when I noticed the price of the stainless steel washers. The price was about $0.25 (US $) for the 3/4 inch washers I wanted. Since stainless steel contains iron, nickel, and other metals, I began to consider alternatives. The answer was found in my pocket. Rather than paying for each 25 cent washer with five nickels (US 5 cent pieces,) I decided to try simply grinding with the nickel coins instead -- a five to one cost advantage.
I epoxied the coins to the old tile tool and began grinding. The grinding action was everything I would have expected from using a washer tool. The coins wore down relatively slowly and the grinding proceeded without any problems. There was no rusty grinding mud to clean up. As the coins became paper thin, they would finally pop off the tool. After I had lost about half the coins, I pried the remaining ones off the tool and epoxied another batch in place. These lasted for the remainder of the initial hogging task.
All told, the hogging process was completed using only three pounds of #60 SiC grit. Much of the grit reduction was due to use of the diamond hones for grinding more than half of the 0.340 inch sagitta. I think next time I attempt something involving this much glass removal, I will take the time to built a curve generator. For an intermediate project, I might consider using the diamond hone method again followed by the coin tool. The decision point is probably reached when you have between 5 and 15 cubic inches of glass to remove. More than that range warrants curve generation, less is adequately handled with the normal ring tool grinding methods.
Mirror Polishing Techniques
After grinding the back of my 17.5" blank flat, I decided to polish it to make the detection of pits on the front surface easier. Since the optical quality of the back was not an issue, I decided try out some quick polishing techniques I have read about. I ordered some polishing pads from Salem Distributing. These are widely used in many parts of the optics industry and are often discussed in the amateur ranks. Many amateurs swear by polishing pads, while many others have been known to swear at them.
In addition to using the polishing pads, I also wanted to try out a technique I first read about in Neale Howard's Standard Handbook for Telescope Making, my favorite ATM text. That book describes a fast polishing method using grinding abrasives. I tried out this combination of abrasives on polishing pads. After applying seven pads to the 12 inch tile grinding tool, I used a suspension of the same 9u abrasive I used in the final stage of fine grinding.
This combination of abrasives on pads worked very fast. Within one hour of beginning polishing with this method, the whole surface of the 17.5" mirror was nearly polished. Only a very slight haze was visible to unaided eye in strong room light. At that point, I switched to using cerium oxide (CeO) with the polishing pads. I used the same pads and did not bother to do any special clean up from the abrasive.
After two hours of of polishing with the CeO on the pads, the surface passed the so-called "laser test" for degree of polish. This test consists of shining a laser onto the surface of the glass. If the surface is truly polished, the point of entrance of the beam will not be visible. Any pits or incomplete polish on the surface will become visible. A slightly more stringent test for polish utilizing the same principle is to attempt to focus the image of the sun onto the surface using a magnifier or "burning glass." After four hours of polishing using the pads with abrasive followed by CeO, the mirror's rear surface just failed this "sun test."
Had this been an optical surface, my next step would be to make a pitch lap and continue polishing with CeO on pitch. I estimate that only another hour with CeO on pitch would have brought the surface to a full polish that would pass all tests. Since this was a flat surface, I also did not have a convenient way to check its figure. I would expect to find a surface in relatively good shape, albeit rough from the use of pads and very aggressive techniques. An hour with CeO on pitch should have smoothed things out nicely. I like to do all my figuring with rouge, so that would be the final stage for a mirror surface.
A fellow ATM nearby used these same fast polishing techniques on his 8" mirror recently. The results were excellent. At my urging, he polished with 5u abrasive on pads for one hour, followed by CeO on pads for two hours, followed by CeO on pitch for two hours. The results were spectacular. The mirror passes both the laser test and sun test with absolutely no hint of any specular reflection at the mirror's surface. He also switched to rouge for a half hour before beginning figuring. The mirror ended up with a very smooth, zone free, nearly spherical figure ready for final figuring.
Another local ATM has also tried the polishing pads with abrasive and CeO. His own 17.5" mirror took about nine hours to polish out completely. He experienced some minor zoning with the pads, but these polished out after switching to pitch. The use of these techniques seems to be worthwhile on larger mirrors and can be used to advantage on smaller amateur mirrors also.
This same ATM also used a very unorthodox polishing method for the back of his 17.5" mirror. He, like I, only wanted a polished back surface to facilitate easy inspection for pits on the front surface. Rather than using normal or even accelerated polishing techniques, he used an inventive brute force approach. He used a rotary automotive power polisher with automotive buffing compound. Using this high speed method, he was able to polish the back in about fifteen minutes. There were some pits and scratches, but the degree of polish was more than sufficient for the purpose.
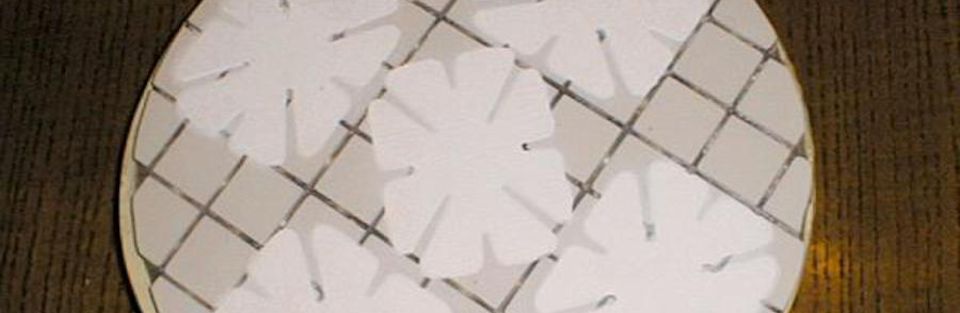
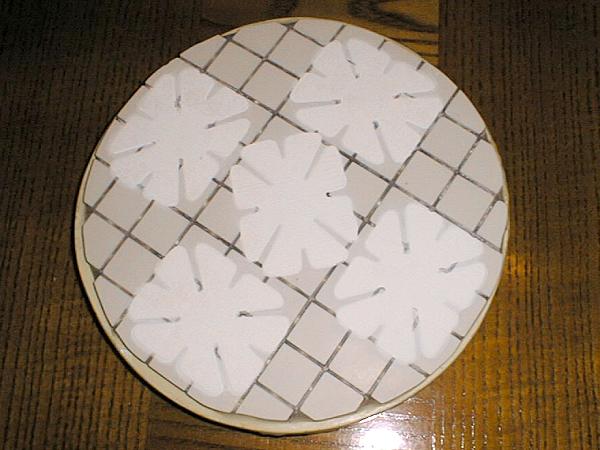
My most recent use of polishing pads was on a 14" F/4.5 mirror. For this mirror, I skipped the pre-polish step and simply used pads and CeO for initial polish. I used five pads on the 9" grinding tool during the polishing phase. A photograph of the tool appears in Figure 1 at left. (This tool was made in my usual manner using tiles attached with paraffin wax.) It took about an hour and a half of polishing on the pads for the surface to completely clear to the naked eye. At the end of three hours, only the outer half inch of the mirror failed the laser test. It took another hour for the whole mirror to completely pass the laser test when conducted in a totally dark room.
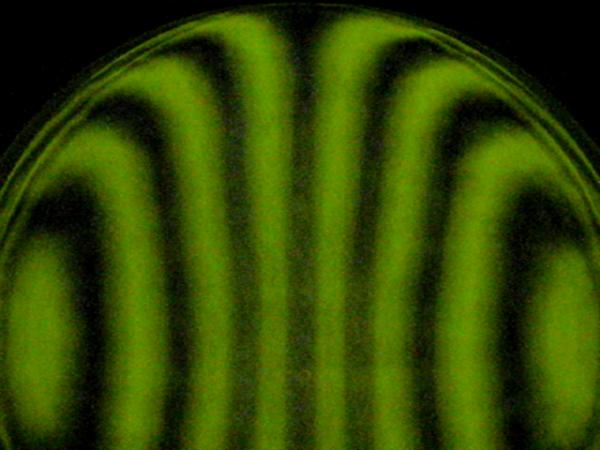
I was surprised when I put the polished mirror on a test stand. It was much smoother than I expected. It was also free of significant zoning. This is probably due to the use of a sub-diameter tool. The "W" strokes require to work the surface with the sub-diameter tool must have prevented the formation of irregular zones. The Ronchigram shown in Figure 2 depicts the state of the mirror after four hours polishing with the pads. The outer half inch is turned down and the remainder of the surface shows about 20% of the required final correction.
Some of these grinding and polishing techniques may be of interest to other amateurs. They should be used with caution at first preferably on a non-critical application. After playing with the methods, you should be able to determine if they will work for you. I like the polishing pads and abrasive method as it can greatly speed up polishing. Care must be taken to finish up with adequate time using conventional pitch lap polishing, but very nice surface quality can be produced. I see these methods as an analog to the grinding process itself. You start out with with aggressive, brute force action and follow it with less aggressive methods to refine the surface to the final product.