Making A Pitch Lap
Making A Pitch Lap Using The Hot Channel Cutter Method
John D. UptonMay 15, 2003
The best method of making pitch laps for polishing optical surfaces is an area where few ATMs agree. There are a great number of methods, all of which work in the end. Which is best is often in the eye of the beholder. Described here is one of many variations of the Hot Channel Cutter method I use. It has evolved from a number of methods I have seen and my own experiences in making quite a few laps. I, like most ATMs, am very opinionated when it comes to lap making and find this method relatively quick, very easy, and above all, not at all messy.
When I made my first pitch lap to polish a mirror many years ago, I followed the general directions which are repeated in many of the older ATM texts. I constructed a dam around the tool, poured in the pitch, and tried to mate it to the mirror after a short set-up time. The texts I referred to directed me to get the lap into good contact with the mirror and then cut the channels. Try as I might, I could not get the pitch to make good contact with the mirror even after repeated heating and pressing cycles. Finally, after much struggle, I established enough contact that I proceeded to cut the channels with a razor blade as called out in the instructions. It was not a pretty sight. The lap was a mess, the work area was a mess, and I was a mess.
By the time that lap was finally ready to use, the outermost 1/2" of the 6" mirror was already polished from all the pressing and stroking to get contact. Yes, I had created one monster of a rolled and turned edge trying for hours to get the curved mirror to fit onto a flat slab of pitch. I decided that there must be other, better ways and vowed to never use the "classical" method again. Trying to push a concave mirror onto a flat surface just traps air in the middle preventing good contact and leads to much frustration. Cutting channels with a razor blade or carpenters saw (!) just ensures that you will have many pitch chips around to remind you of the experience for many years to come. I concluded that the written methods I had seen for making a pitch lap were some sort of cruel joke or right of passage perpetrated on new unknowing ATMs.
By the time I was ready to polish my second (8") mirror, I had read an article in Sky and Telescope magazine regarding the use of a "Hot Channel Pitch Cutter". This looked like just the method to address many of the problems I had encountered in my first lap making escapade. I tried the method and found it worked great. It solved the problems I had encountered in making the lap for my first mirror. I continued to use the method and add additional nuances that I picked up from other sources over the years.
The complete lap making process using my version of the hot cutter method may be summarized with the following steps. These steps will be explained in more detail as I describe the method.
- Melt, temper, and test the pitch for proper hardness.
- Slowly warm both the mirror and the tool (lap base). (Use great caution with plate glass mirrors and tools.)
- Make sure the mirror and tool are quite dry.
- Build a dam around the mirror to contain the pitch.
- Paint the mirror and the dam with a release mixture made up of polishing agent.
- Wipe the tool with alcohol or turpentine.
- Check for proper viscosity of the warm pitch.
- Pour the pitch onto the mirror stopping short of filling the dam.
- Immediately place the tool on top of the pitch and press down slightly.
- Wait a short time while the pitch solidifies.
- Strip the dam off the mirror.
- Slide the lap off the mirror.
- Wash and clean both the lap and mirror.
- Cool the lap to room temperature.
- Place masking tape on the pitch surface in the locations of the desired pitch facets.
- Use the hot channel cutter to cut pitch out of the channel areas in the gaps between the tape.
- After the first set of channels are cut, remove masking tape.
- Apply new masking tape marking the second set of channels at 90 degrees to the first.
- Use hot channel cutter to cut the second set of channels.
- Remove the masking tape.
- Use the side of the hot channel cutter to trim and bevel the edge of the lap.
- Texture the lap's facets by pressing with window screen or other form of netting.
- Cold press the lap in preparation for polishing.
While many will disagree with me, I think this method can be just as fast as others (with the possible exception of the preformed lap mold methods). The two key advantages of this method that make it relatively fast and easy are that the lap is inherently formed to the exact curve of the mirror and the cutting of the channels removes the pitch rather than just moving it from place to place. I see these as key advantages of the many channel cutting methods.
The first advantage of this method is that it starts with the freshly poured lap assuming the same curvature as the mirror. Because the mirror's surface is used as a mold for the lap, it is very easy to quickly establish excellent contact after completing the lap. This results in a considerable time savings over methods which start with a flat or crudely mounded lap surface. The deeper the curve in the mirror, the more important this advantage becomes. This directly translates to reduced pressing time before excellent contact is attained.
The second, related advantage of the hot channel cutter method (or any channel cutting method) becomes apparent when you actually form the channels in the fresh lap. Using one of the "pressed channel" methods, whenever you push the channels into the fresh, warm pitch lap, you deform the surrounding facets. Pressing channels into pitch causes the pitch to flow upward adjacent to the freshly made channel. The lap must then be hot pressed with the mirror to regain contact fully across the facets. Pressing with the mirror forces the pitch to flow back into the newly created channels somewhat. You must then rewarm the pitch and press the channels once again requiring another pressing with the mirror which refills the channels which requires opening the channels again which requires pressing the mirror again, etc. until you get tired and call the lap done. (I am exaggerating somewhat but you get the idea. Methods which press channels into the pitch will always be iterative. It takes at least several iterations to get the channels deep enough and contact good enough to start polishing or figuring. Initial lap contact is usually not as good as that obtained with channel cutting methods.) Cutting the channels by any means will remove the pitch from the lap and thus requires little if any significant hot pressing following the channelling operation.
Not having to hot press is a big advantage for me. I prefer not to do much hot pressing of laps. In fact, once I get to the figuring stage of making a mirror, I try to never hot press. By cutting channels using the techniques described here, I can rechannel even in the late stages of final figuring and start a figuring session after only a normal cold press cycle. Rechanneling with this method does not change the overall shape of the lap enough to warrant hot pressing. Although I have only personal experience with a limited number of mirrors to draw upon, I believe hot pressing prior to figuring sessions is a major cause of "dog biscuit" and rough surfaces on many amateur mirrors.
Many mirror makers have probably amazed their non-ATM friends by showing them the effects of a warm hand print on their mirror while undergoing the Foucault test. Everyone who has tried this knows that the glass swells enough to be easily visible on the test stand and is familiar with the considerable length of time it takes for the effect to finally disappear. This same effect can occur during hot pressing. Warmed pitch facets cause the glass under them to swell like many warm fingers touching the glass. Beginning a figuring session before the glass has thoroughly cooled back to equilibrium results in the raised areas being polished off leaving irregular holes once the mirror cools completely. I have seen a distinct checkerboard pattern of dog biscuit on mirrors that I believe is caused by this practice. For this reason, I only hot press if some catastrophe has befallen my lap and then I always wait several hours or, better still, overnight for the mirror's shape to reach equilibrium again before beginning a figuring session. Using the hot channel cutter method of making or re-channeling laps pretty much eliminates the need to ever hot press.
I also am a strong advocate of micro-channeling laps. There are many ways to do this. My favorite is to cold press the lap against the mirror with fiberglass window screen between the two. This imparts many additional tiny channels into the pitch and allows for much better circulation of water and polishing compound while working. I nearly always press my laps with window screen and then again without it prior to every polishing or figuring session. I find that it enhances the level of contact between the mirror and the lap and helps give nice smooth surfaces. Window screen is not the only material useful for making micro-channels. Other ATMs use bridal veil material or "onion bag netting" for this purpose. Still other ATMs just scratch the face of the lap with with a razor blade or wire brush creating thousands of tiny random channels.
With the photographs below, I will describe my version of the Hot Channel Cutter method of making a channelled pitch lap. The photographs were taken during the fabrication of a full sized lap for a friend's eight inch mirror. The method is much the same for making sub-diameter laps. I will describe the differences as I go through the steps.
Preparations For Making The Lap
Like most ATM activities, a key aspect to having a lap making project go smoothly is to be thoroughly prepared. Before starting, you should gather all the materials and tools together and organize them in your work area. With everything you need in one place, you will find that making a pitch lap is not that difficult or complicated. You will also find that having everything laid out in advance will allow you to overlap many of the preparation steps and speed the process considerably. Some of the things you will need include the following.
Pitch
Cerium Oxide
Paper Towels
Turpentine or Mineral Spirits
Liquid Dish Soap
Aluminum Foil
Warm Water
Cold Water
1" x 3.5" Brass Shim stock
Masking Tape
In addition to these materials, you will need to have the following tools at the ready.
Metal Can
Shallow Bucket or Pan
Scissors
Ruler
Small "C" Clamp or 4x40 screws
Permanent Marker
Small Brush
Soldering Gun or Iron
Small Plastic Cup
Small Wide-Top Jar or Can of Water
As I describe the details of making a pitch lap using this method, I will cover the use of these materials and tools. In addition, I will try to describe alternate materials that may be substituted. As always, the resourceful ATM will find many other substitutions that work just as well. Innovation by others is always to be encouraged.
As part of the preparation for making the lap, you should carefully consider the base upon which the lap is to be built. Traditionally, the grinding tool has been used as a base. It is ideal and has most of the required characteristics. It is hard and sturdy, it is impervious to water, it has the same curvature as the mirror, and it is ready to use. In general, however, I do not recommend using the grinding tool as a pitch lap base. The primary reason is that should the need arise to regrind the mirror with the last stage or two of grits, the lap must be torn down and rebuilt again later. If the grinding tool is channelled as most tile tools are, then using it as a pitch lap base can bring additional problems. I prefer to use epoxy sealed plaster casts as the base for my pitch laps. The method I use to make them is detailed in the article covering tile tools on this Web site. The plaster base is cast and sealed as described there but, of course, the tiles are not attached.
Melting, Tempering, and Testing the Pitch
To start a pitch lap, the first step is to melt and temper the pitch as required. I find it best to melt pitch over very low heat. It often takes 40 minutes to an hour to fully melt the pitch without unduly boiling parts of it before the remainder melts. Take your time. This does not have be approached as a race.
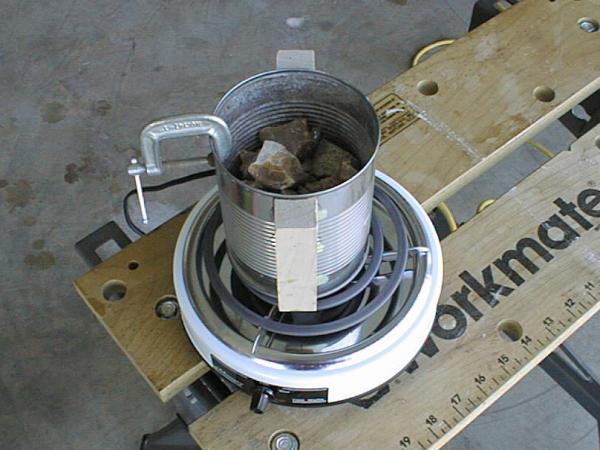
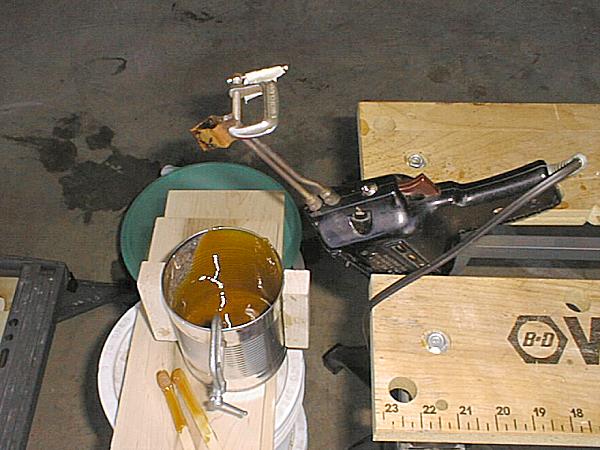
I melt and store my pitch in a quart sized metal paint can. New, clean, empty paint cans of this sort may be purchased at many hardware and paint stores. The lids can be easily sealed to store extra pitch between uses and the pitch may be melted and poured using only the storage can. I find them very convenient for this use. A temporary handle for the melting can may be improvised using a "C"-clamp as shown in Figure 1 below.
Before you can melt the pitch, you must get it out of the packaging container it is supplied in. This packaging often takes the form of a paper container with a snug fitting lid. I find the easiest way to remove the pitch is to place the package in a gallon sized sealable plastic bag and hit it with a wooden mallet or sturdy wooden block. The pitch will usually shatter without much trouble. The plastic bag serves to contain all the loose flying pitch chips that can result. You need not smash the pitch into tiny bits. You only want to break it up into chunks that may be easily removed from the supplier's container. Once the pitch is broken up enough to remove from the original packaging, the chips and chunks are poured into the paint can for melting.
As the pitch slowly melts with the low heat, stir it occasionally as best you can. It will melt at the bottom of the can first and slowly start to bubble up at the sides. A large blob of unmelted pitch will tend to float off the bottom in the center of the can. Push this towards the bottom and turn it over from time to time to help it melt. For stirring the pitch, I use a wooden skewer such as those sold for use in outdoor cooking. Chop-sticks also work great for stirring pitch.
Once all the pitch has melted, you should stir it for a few minutes to ensure that it is homogeneous. This is important, especially if you have mixed pitch from multiple sources, age batches, or recycled portions. I have a collection of old pitch, new pitch, and pitch I have recycled from previous uses. I often use this in proportions that help me get the pitch to the proper hardness. If you mix pitch as I do, remember to never mix different types of pitch. It may not cause any problems but you shouldn't take any chances on the properties changing. Mix Burgundy pitch (amber, light brown, or yellowish in color) only with Burgundy pitch and the black pitches (such as the very popular Gugolz) only with like types.
While the pitch is melting, fill an old cleaned jar or food can with room temperature tap water. It is important that this water be relatively close to the temperature at which you expect to use the finished lap. The water will be used to test the hardness of the pitch. Once the pitch has completely melted and you have stirred it to ensure it is homogeneous, it is time to see how hard it is. There are many possible ways to do this but I simply allow a single drop of hot pitch to fall from the wooden stirring stick into the jar of water. After waiting for 3 to 5 minutes, I take the hardened pitch blob out of the water. (Don't dump the water out when you do this -- you may need to test several more times.)
Dry the small blob of pitch and place it on clean sheet of paper. Try to press your thumbnail into the blob by resting your elbow on the work surface and allowing only the weight of your arm to supply the force on the pitch. Time the length of time it takes to make a shallow indentation in the pitch about 1/4" long (and usually only about 1/32" deep). If the indentation takes about 45 to 60 seconds, the pitch is about the way I like it. If you cannot make much of a dent in the pitch in 90 seconds or if it shatters under a light pressure, it is too hard and should be softened. If your thumbnail penetrates more than 1/16" deep, the pitch is generally too soft.
Pitch that is too hard may be softened by adding a tiny amount of solvent to it. For Burgundy pitch, turpentine is usually used. I have not worked with Gugolz pitch but have heard that mineral spirits works well as a thinning agent. You should err on the side of adding too little solvent at a time. Making the pitch too soft will require considerable slow heating time to re-harden it. If the pitch tested as being too hard, add 1 drop of solvent per ounce of pitch (or less) to the melting can. Stir the solvent in for several minutes then try testing a new blob. If it is still too hard, repeat the process until the hardness seems about right. (The blobs of pitch may be returned to the melting can after testing. Just be sure to allow enough time for them to melt again before pouring your lap.)
If your stock pitch is too soft, you must "cook" it for a while to drive off some of the volatile components. This cooking is really just an extended slow heating of the pitch. You do not really want to bring it to a full boiling temperature -- just enough that you can see some convection in the liquid pitch. It may take an hour or two for the pitch to harden enough to use. Stir the pitch every few minutes as it cooks. Test every 20 minutes or so as the pitch seems to be getting close to the proper hardness. Fresh Burgundy pitch usually seems much too soft for my preferences. I usually need to either cook it for about two hours or else mix it with some older hard pitch. Pitch does slowly dry out and get harder with age. I still have some that is over 20 years old and still in the original paper containers. It literally feels hard as a rock. While I could soften and use it right away, I don't use this pitch directly but rather mix it as needed with softer pitch to make the resulting mixture harder. It saves me cooking time.
I should mention that while I often melt pitch and pour my laps indoors, cooking soft pitch is best done outside because of the fumes given off for an extended period of time. I rather enjoy the smell of Burgundy pitch so a short session of indoor lap preparation isn't too bad. I would not advise melting the tar-like pitches indoors because of the disagreeable smell -- unless of course, you find that type pleasant as well.
Once the pitch tests at about the proper hardness for your tastes, reduce the heat to a bare minimum while you prepare the mold for the lap. You might also consider placing a very loose cover over the pitch melting can. This will serve to help conserve both the heat of the molten pitch and the volatile components still trying to escape.
Preparing the Mirror and Lap Base
The next step is to prepare the mold for the lap. Using this lap making process, the lap will be molded against the mirror rather than being poured directly onto the lap base as is more often the case with other methods. To do this, you need to build a dam around the mirror and coat it with a release mixture to keep the freshly poured lap from sticking. Several precautions need to be taken here. Pouring hot pitch directly onto a mirror can be very risky business. The resulting thermal shock could cause the mirror blank to crack or shatter. If you are using Pyrex type glass and take proper precautions, it is safe. More care should be exercised with plate glass. In any case, be aware of the danger of breakage and use this method at your own risk. I have used this method for many years on Pyrex without any problems at all. Strain free, quality glass is quite robust. With care and attention, this method may also be used on plate glass.
The key to protecting your mirror from thermal shock is to reduce the difference in temperatures between the glass and the pitch. This is done in two ways. First, the mirror and lap base are slowly warmed above normal room temperature. They need not and should not be extremely hot. You should warm them in a water bath to about the temperature used in many automatic dish washers -- roughly 110° to 130°F. Secondly, you should not pour the lap while the pitch is still very hot and fluid. You should wait until the pitch has begun to cool and thicken. This will lower the temperature difference between the glass and pitch to about 20 to 30 degrees. This difference should be benign to all quality strain-free glass.
If you are using plate glass and wish to be especially careful, you can insulate the glass from a sudden thermal shock somewhat by using the same procedure as will be used for making sub-diameter laps. This will consist of adding a single sheet of wet paper towel covered by a sheet of aluminum foil as will be described below.
The mirror and lap base are warmed in the shallow pan or tub. You should use one that is large enough to completely submerge both to about 3" depth and allow room at the sides to lift them out when required. Start by placing the lap base in the tub. Next, place three small sponges at 120° intervals around the periphery of the base. Place the mirror face up on the sponges. (The sponges will make it easier for water to circulate between the base and the mirror and also facilitates griping the mirror when you remove it from the tub.) Fill the tub with slightly warm tap water (up to 20° above room temperature) to a level about 2" to 3" above the surface of the mirror. Allow the base and tool to warm to this level for about 10 minutes. At 10 minute intervals, add small amounts of warmed water around the sides of the base and mirror stack. It also helps to use your hand to circulate the water a little to ensure more even warming. Continue to add warmed water every 10 minutes a little at a time until the bath is about 110° to 130°. The final temperature does not need to be higher than this. This process should take 30 minutes to an hour. You should still be able to quickly dip your fingers into the water without immediately burning them.
While you are warming the mirror and lap base, you can prepare the release mixture that will keep the pitch from sticking to the mirror. It is made up of a rather thick mixture of polishing agent, water and liquid dish washing soap. You will only need a small quantity so this is mixed in a very small paper or plastic cup. I use small 2 ounce to 4 ounce plastic cups for this. You will not need to fill these. In fact, less than 1/2 ounce of mixture is needed for mirrors up to about 12" diameter. Start by adding 1/2 teaspoon (about 3ml) of dry polishing agent to the cup. You may use either Cerium Oxide or rouge or any other agent you normally use. To this, now add 2 teaspoons (10 ml) of water. Stir the mixture until all the polishing powder is completely wet and the consistency is uniform. Finally, add about 5 to 8 drops of liquid dish washing soap. Clear liquid hand soap may also be used. Mix the ingredients until uniform but try not to end up with a frothy mix of bubbles. The release mixture will be somewhat thick and very slippery due to the relatively large amount of soap added. Set this aside while you finish preparation of the mirror and lap base.
After the mirror and tool have warmed sufficiently, you are ready to prepare them for pouring the pitch. These next few steps are where organization pays off. If you are well organized this will go smoothly. If not, you should plan on having an assistant nearby. You need to be able to complete the next few steps without allowing the mirror and lap base to cool off too much.
First, turn off the heat under the pitch. You are going to let it start slowly cooling down. During this cool-down process, you will need to stir the pitch every few minutes. While performing the other tasks described here, don't forget to stir the pitch occasionally. Remove the mirror and lap base from the warm water bath and dry them carefully. For a full sized lap, use masking tape to build a dam around the edge of the mirror. You want the dam's upper edge to be about 1/4" to 3/8" above the edge of the mirror. This sets the approximate thickness of the resulting lap.
If you are making a sub-diameter lap for a larger mirror or simply wish to take extra precautions with plate glass, you need to follow a slightly different procedure. Place a single thin paper towel onto the surface of the mirror. Wet it thoroughly with plain warm water from a spray bottle. Place a sheet of aluminum foil onto the wet paper towel and smooth it into good contact using the side of your hand as a squeegee. (The paper towel is used to protect the surface of the mirror from possible scratches caused by sliding the foil off when you remove the lap from the mirror. It can also provide some thermal shock insulation for plate glass mirrors.) When making a sub-diameter lap, place the lap base on top of the foil and draw an outline of it using a permanent marker. Remove the lap base and set it aside. Cut a strip of plastic long enough to encircle the lap's outline drawn on the foil. The strip should be 1/4" to 3/8" wide. Carefully attach the strip to the foil using short sections of tape or small blobs of hot melt glue placed around the outside of the circle on the foil. Once the strip is secured to the foil, it becomes the dam to contain the pitch for the sub-diameter lap. For a full sized lap on plate glass, simply wrap a masking tape dam around the periphery of the mirror securing the paper towel and foil in place.
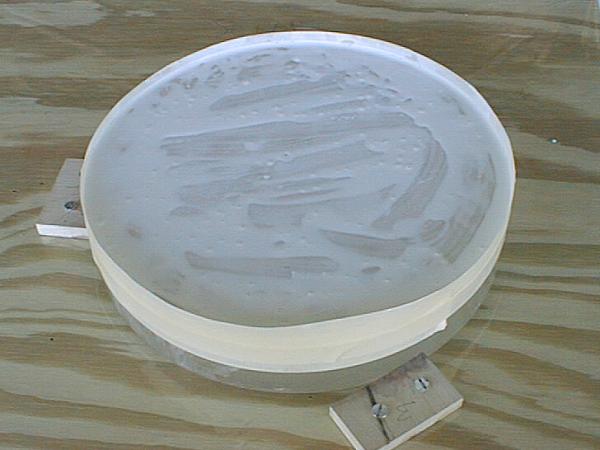
Now that the dam is built, you need to paint both the mirror (or foil) surface and the inside wall of the dam with the release mixture prepared before. (Have you remembered to go back and stir the pitch lately?) I usually use a small glue or flux brush for applying the release mixture. You can also use your fingers -- just be sure to get everything covered so the pitch won't stick. Figure 2 above shows an 8" mirror with its face and dam painted with release mixture.
Finally, make sure that the lap base is completely dry. To ensure that the pitch sticks (as if that is ever a problem!) to the base securely, wipe the convex surface of the base with a paper towel dampened with alcohol or turpentine. This will ensure the surface is clean and dry. Once it has been wiped down, take care not to touch the surface with your fingers again. Set the lap base near the mirror and check the pitch. (You have been stirring it occasionally, haven't you?)
Pouring the Pitch Lap
The reason for stirring the pitch every few minutes as it cools down is to allow it to cool and thicken evenly. Without stirring, the pitch will get much thicker along the sides and bottom of the can while remaining too warm and fluid in the center. You need to have all the pitch at the same consistency for best results when you pour the lap. Begin to stir the pitch constantly now that the other preparations are complete. Use the stirring tool to gently scrape along the sides and bottom of the pitch can. This will help in mixing the more rapidly cooling areas of pitch into the center. Continue to stir the pitch until it has thickened enough that it can be poured in a thick mass. The consistency will be about the same as room temperature honey or thick cake batter.
To help keep the pitch can clean, I add a small makeshift spout just before pouring the lap. Just cut a 3" long section of 3/4" masking tape and press into position with its lower edge against the inner edge of the pitch can. This simply keeps the pitch from running down the outside of the can and into the sealing groove of the paint can after pouring. Afterward, you can strip the tape out of the mouth of the can and discard it. The outside and lip of the can stays very clean and may be tightly sealed for storage of the unused pitch.
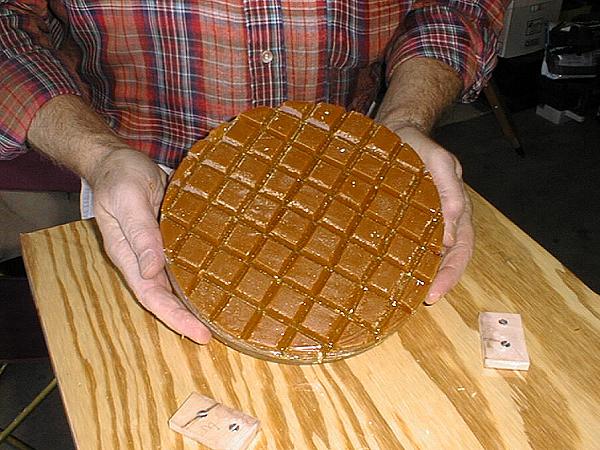
You are now ready to actually pour the lap. Make sure the release mixture on the mirror (or foil) and dam is still wet. If not, you can spritz on a little water from a spray bottle. Start pouring the pitch into the mold near the center and continue pouring in circles out to the edge. Do not mound the pitch up in the center as you would in other methods. Try to pour the pitch into the dammed area to an even thickness. Also do not fill the dam up to the top. Stop pouring when the pitch is level and just below the top of the dam. (If you want to gauge how much below the top of the dam to pour the pitch, it will be about half the sagitta of the tool or lap base -- half the mirror's sagitta for a full sized lap.) Set the pitch can aside while watching out for the sticky pitch strings that form as you stop pouring.
Immediately after pouring the pitch and before the pitch cools, take the lap base and carefully lower it onto the pitch. Make sure the clean, wiped, convex side is towards the pitch. Try to keep the base centered over the dam and make contact with the pitch at the center first. Gently lower the base on the pitch being careful to keep it level. Since the pitch is relatively thick, you will probably have to press the base into the pitch gently so that it makes contact all over. In fact, it is best to press the base into the pitch until you can see that it has reached the edge of the dam all around and started to ooze over the edge of the dam in a few places. Once the base is pressed evenly into the pitch and is making contact all the way around the edge, ensure that it has settled into the pitch to the same level all around and then leave it to cool down for a few minutes. (If the lap base hasn't evenly settled into the pitch, the finished lap will not have a constant thickness across its diameter and will not flow evenly in use.) Allowing the lap to cool down for a few minutes now before proceeding will allow the pitch to solidify enough so that it won't be as easily dented or damaged when you remove the mirror.
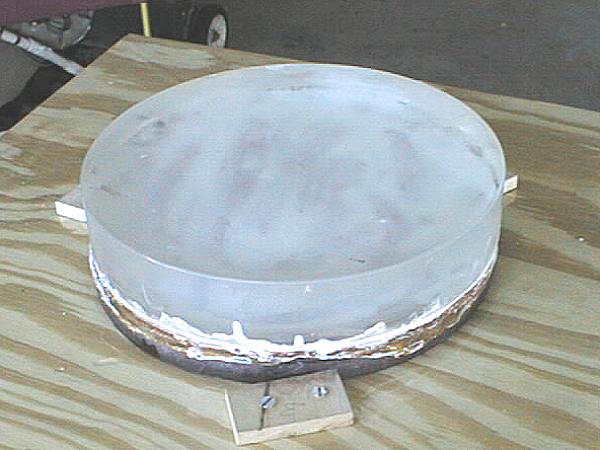
If you are making a full sized lap, turn the cooled lap and mirror combination over on your work area. With the mirror on top now, carefully strip the masking tape dam away from the pitch. Small pieces of pitch will flake away where it overflowed the dam so be sure to cover the work area well with old newspapers. Once the masking tape has been removed, the mirror should slide off the lap. It will often present considerable resistance to moving at first but will start to slowly slide across the lap under constant moderate pressure applied from the side. Do not try to lift the mirror off the lap even after sliding it part of the way off. The soft pitch will still dent rather easily. Instead, slide the mirror evenly off the lap. Once it is half way off, support it evenly and continue to slide it until only the edges overlap. At the very end, slightly lower the mirror as it exits the lap. If the pitch is still soft, this will blunt the edge of the pitch rather than press the edge of the mirror into the pitch forming a dented arc. The blunted edge will cause fewer problems as we finish up the lap.
To remove a sub-diameter lap from the mirror, you only need to tug gently and steadily on the foil and wet paper towel under the pitch. It will start to slide across the mirror. As you approach the edge of the mirror, support the new lap at the edges and take care not to let it tilt downward as it leaves the mirror. Instead, lift up on the lap as it slides off the mirror's surface. Again, this ensures that the edge of the lap is bent rather than creasing its surface.

Once the lap has been removed from the mirror, rinse it under cool water to clean the release mixture off and further harden the warm pitch. Try not to touch the surface of the lap before it has cooled down under the rinse water. While soft, it will dent easily. Once it has cooled to room temperature, normal handling of the surface won't affect the shape. Since we took care to cast the pitch lap to the mirror's curvature, any dents, grooves, or depressed areas will require extra cold pressing before we can start using the lap. For a sub-diameter lap, leave the foil on for a few minutes while under the running water. After the pitch has had a chance to harden, then you can peel the foil and dam off the pitch. If the release mixture was well distributed, it should come off easily.
Wash the lap and its base, dry and set it aside for the moment. Clean up the work area and remove all traces of pitch chips and flakes. You may seal and store the pitch can if you prefer to keep your new and recycled pitch separate. I mix these all the time, so will be reusing the same pitch can when I channel the lap.
Making the Channelling Cutter
With the lap poured, you now need to make a small tool to channel the lap. This channelling tool is nothing more than a small strip of sheet brass which will be shaped into a cutter and attached to a soldering gun or soldering iron. The brass strip used should be about 3/4" by 3" and be about 0.020" to 0.035" thick. Sheet stock thinner than this may bend or warp too easily during use while thicker stock makes the cutter more difficult to bend into shape. Brass sheet may be purchased in small strips such as this at many hardware stores. You may also be able to pick up a usable piece for free by visiting a trophy shop. They use a large amount of sheet brass in this thickness range and often have end cuts and scrap pieces more than large enough to make a cutter. Explaining that you are making a telescope and how the brass strip is to be used will likely result in your walking away with more than you need free of charge.
You will need to cut the brass strip to the required 3/4" by 1" dimensions and smooth any rough edges with fine sandpaper. There should be a smooth, rounded edge on both long dimensions of the strip. In use, it is heat that does the cutting rather than a sharp edge. A rounded edge is less likely to grab, scratch, or cut into the lap foundation material.
The cutter is constructed by bending the strip into the shape shown in Figure 6 at left. It was easiest for me to make the bends starting in the center and working outward. For the center bend, it is best to bend the strip completely in half and open it back up to the desired angle of about 60°. This results in a relatively small radius at the bottom of the "V" shape and makes nicer channels. The remaining bends do not need the sharper radius that benefits the bottom so they can be bent to the required angle without a complete folding of the brass.
The straight tabs at the top are used to attach the cutter to a soldering gun or soldering iron. Choose you favorite attachment method. You can drill a couple of small holes in the tab area and use screws to clamp the cutter to the iron or just use a very small C-clamp for attachment as I have done. Since the cutter is only used when channelling my laps and the soldering gun is used for its intended purpose the remainder of the time, I have opted for the simple external clamp method of attachment. Figure 7 below shows the cutter and clamp setup I use.
Channelling and Beveling the Lap
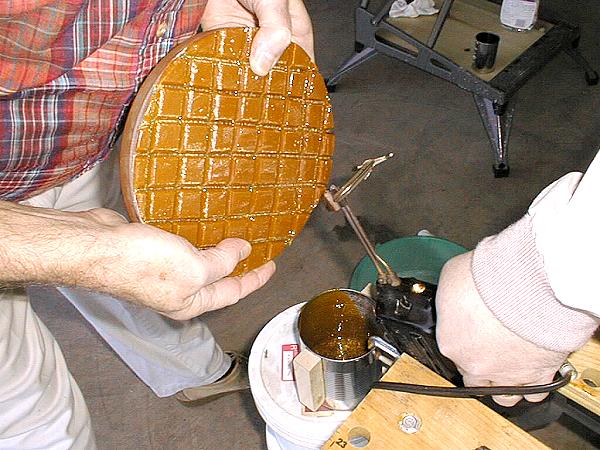
In preparation for cutting the channels in the lap, you need to set up the work area. Start by attaching the brass cutter to the soldering gun or iron. Then clamp the soldering iron to a suitable steady workbench. The soldering iron should be set so that the cutter is inclined upward at about a 45° to 60° angle as seen in Figure 7 below. I use a Workmate® style folding work stand for holding the channelling tool. The working height of the cutter is best kept about waist high. Place a container about 6" below the cutter to catch the pitch that is removed from the channels. As mentioned before, I allow this recycled pitch to mix with the pitch used to pour the lap. Recycling the pitch this way is okay so long as you are careful to avoid any gritty contamination.
With the work area and cutter preparations complete, you are ready to start cutting the channels in the lap. You will first mark the center of the lap so you can offset the facets a little. This helps prevent zones when using a full sized lap. It is not important for sub-diameter laps but I do offset facets for these also just as a habit. Use a marker (a Sharpie works well for this) and measure to the center of the pitch lap. Put a small dot or "X" in the center of the pitch surface.
Once the center is marked, you cover the lap with strips of masking tape to mark and protect the faceted areas. The width of masking tape you choose determines the size of facets on the lap. I usually use 3/4" tape for most laps. You can adjust the apparent hardness of the lap a little by choosing different sizes for the facets. Assuming the channels will always be about 1/4" wide (at the surface), smaller facets make the lap act as if the pitch is softer than it is, while wider facets make the pitch act harder. Whenever the pitch has plenty of room to flow, it acts soft. When it has little room to flow, it acts hard. You can use this to your advantage to fine tune the lap's action.
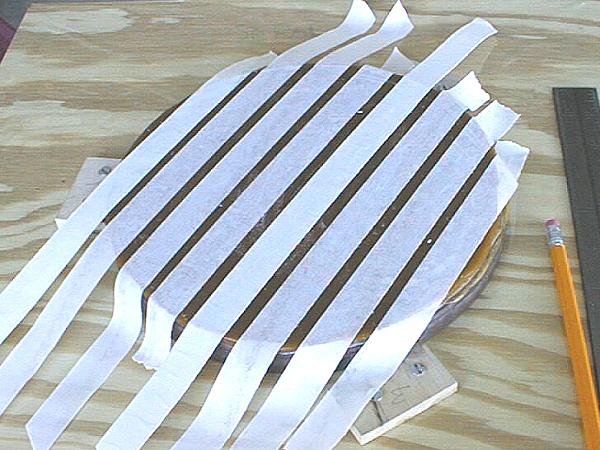
I start applying the tape at the center of the lap. Since you want to offset the facets in a non-symmetrical way, you want to avoid having either a channel or a facet exactly centered on the lap. To accomplish this, the first piece of tape should be placed such that the center mark on the lap is under the tape by 1/4 to 1/3 of the tape's width. Place the tape on the pitch allowing about 3/4" to overhang the top of the lap and lightly smooth it into place. Don't press or burnish into place too firmly -- you want it to be easily removed once the channels are cut. Cut or tear the tape so that about 3/4" overhangs the other edge of the lap. Now, lay another strip of tape parallel to the first with a 1/4" space of pitch being left uncovered.
Continue this process until the lap is covered with tape strips. (See Figure 8 above.) At the left and right edges, the tape may be wider than the remaining exposed pitch area. This isn't a problem, just allow the tape to overhang along the edge. You might be wondering why we bother to place the tape on the pitch at all. It serves two purposes. The first is simply to guide you while cutting the channels so they are straight and roughly the same width. The second reason is more important. The tape serves to protect the pitch that will form the facets. While cutting the channels, you will occasionally have pitch splatters, runs, and chips caused by working too fast, holding the lap at the wrong angle, or excessive heating of the pitch by moving too slowly. The tape will server to keep the surface of the lap's facets perfectly clean. This saves you from having to hot press or scrape small pitch balls off the facets later. By taping the facets now, the lap is ready to go after a cold press cycle when you finish the channelling operation.
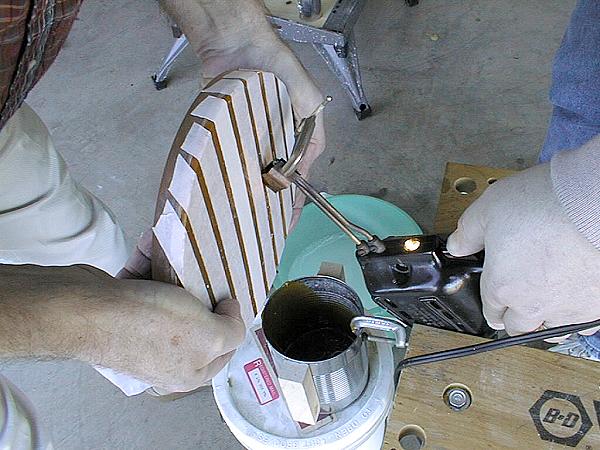
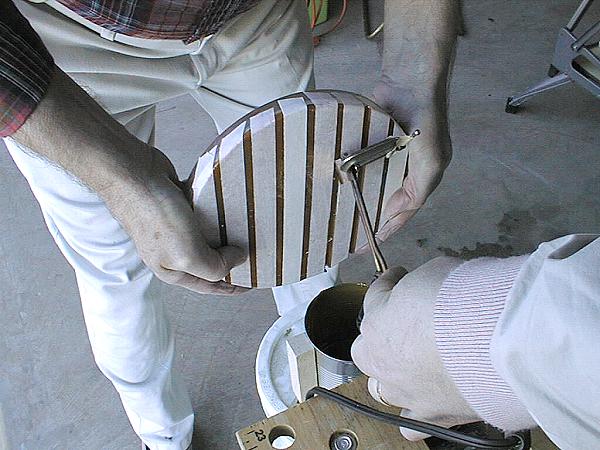
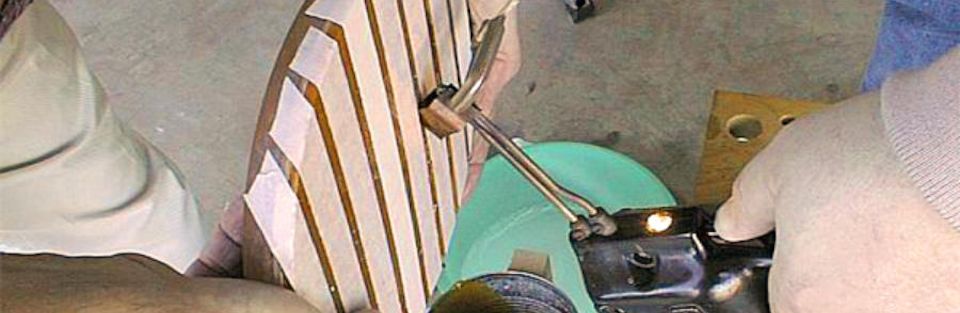
With the lap taped, you're now ready to start the fun part of lap making -- channelling. Plug in the soldering iron or gun. (When using a soldering gun, you will need to find a way to hold the switch in the ON position while cutting the channels.) Wait for the cutter to get hot. The cutting operation is done from the bottom of the lap to the top. To cut a channel, you hold the lap in a nearly vertical position and slowly lower it onto the channel cutter. The pitch will quickly melt and flow down the inside of the V-shaped cutter dripping into the container below. You should hold the lap at a slight angle with the top edge of the lap overhanging the cutter slightly and bottom away from it. This will prevent the pitch from melting and running down the freshly cut channel. Hold the lap so that all pitch flows through the center of the cutter.
Cutting each channel in turn proceeds from the bottom of the lap to the top. Start by lowering the lap into contact with the hot cutter. Again, the lap should be held at an angle so that the cutter's leading edge wants to plow into the pitch. As you slowly lower the lap, the pitch is melted and flows down the center of the cutter. You should apply a slight pulling tension toward you as the cutter makes progress to counteract the tendency for the leading edge of the cutter to enter the pitch more deeply. Allow gravity to provide all of the downward force as you cut the channel. (See Figure 10 showing the cutting operation.)
The hot cutter should be allowed to cut at its own rate. Going too fast will often force the cutter out of the channel breaking off small chips of pitch. That is not a problem, just restart the cut where the cutter exited. You need not cut the channels all the way down to the lap foundation. I usually cut the channels to about 1/4" depth on fresh, thick laps. You should try to keep the cutter moving at a constant depth but expect the cut channels to have undulating bottoms. This is normal and causes no problems. As you gain more experience, the resulting channels will be much cleaner.
As you near the end of the cut at the top of the lap, support more of the weight of the lap to slow down the cutting speed. As the cutter finishes the channel, you will often have small chips of pitch break out. Try to minimize these but don't worry about them. Most of the chips will likely be very small and not affect the edge. As a final step, you will bevel the edge of the lap slightly so it's possible that no chips will be seen at all once you are finished.
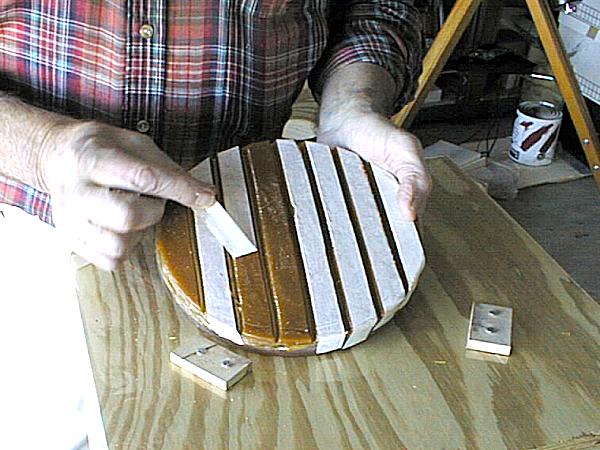
After cutting the complete first course of channels, you need to remove the tape covering the facets. Simply loosen the tape where it overhangs the edge of the lap and lift it off. Best results are obtained when you pull the tape slowly at about a 90° angle to the lap's surface. Remove the tape outdoors or over a large trash can so that tiny pitch chips are not spread widely. Any pitch that splattered on the tape or flowed upward out of the channels will flake away as the tape is peeled off.
With the tape removed, you need to lay out the second course of channels. These are again marked with tape and will be made at a 90° angle to the first set. Once again, you should offset the first facet. I like to place the first strip of tape (during the second round of taping) with its edge exactly on the center mark of the lap. This will force the center-most channel to be very slightly off-center. After laying out the second set of tape channel guides, you cut the channels as before.
Greater care must be taken while cutting the second set of channels. The cuts for these channels will be interrupted at regular intervals by the crossing channels cut before. Because of this, you must slow down the cutting action at each intersection or else risk chipping the corners of the facets. After having done the first set, you will quickly learn how fast you can cut between the interruptions. While the second set of channels takes slightly longer to cut than the first, the operation still goes quickly. For an 8" lap, both sets of channels (including the taping) can be cut in about 20 minutes.
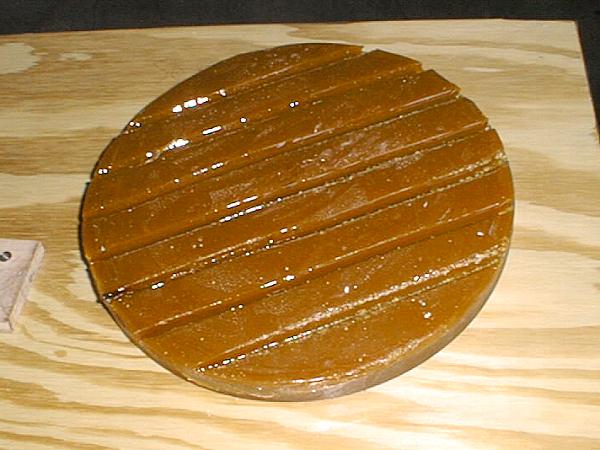
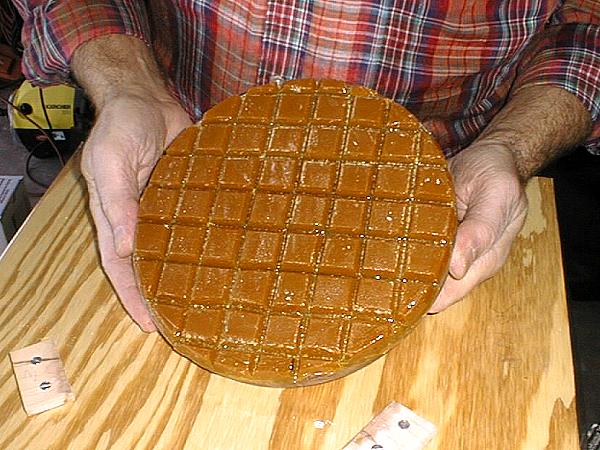
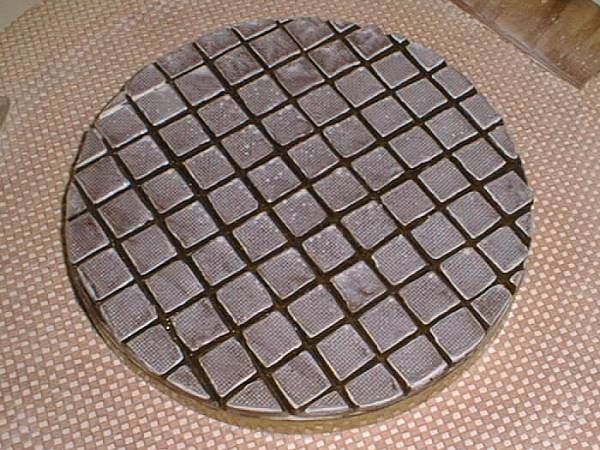
When you have completed cutting the second set of channels, remove the tape from the lap. Again, be wary of tiny flying pitch chips while stripping the tape. Cutting the second set of channels often produces more loose chips than the first because of the interrupted cuts. It's best to remove the tape outdoors over a grassy area. After removing the tape, brush any loose pitch chips off the lap's facets and out of the channels. Your freshly channelled lap should look much like that shown in Figure 13 (above left).
The finishing touches to the lap can now be made. I prefer to bevel the edge of the lap slightly. It makes the lap a little more resistant to chipping at the edge and for full size laps, it reduces the diameter just enough to prevent problems while cold pressing. When using a full sized lap, you should take care when pressing the lap. You must be very sure that no pitch overhangs the edge of the mirror. Cold pressing with part of the lap off the mirror raises that portion with respect to the rest of the lap. Beginning to polish with one edge of the lap higher than the remainder of the surface is sure to wreak havoc with the mirror's figure -- especially in final figuring. Beveling is less important with sub-diameter laps but I find that it helps prevent small chips in the pitch when putting the lap onto the mirror and taking it off.
To bevel the edge of the lap, you use the longer bottom side of the channelling cutter. Hold the lap beside the cutter allowing one side the hot cutter to do the work. (See Figure 14 above right.) The bevel should be cut at about a 60° angle. Slowly rotate the edge of the lap into the cutter so that the pitch is cut and runs down the center of the cutter as it did when channelling. The level of the lap should be such that the center of the lap is at the same horizontal level as the leading edge of the cutter. As before, allow the cutting to proceed at its own pace. If you turn the lap too quickly, pitch will chip off the edge. Cutting too slowly will cause melting and deformation of the facets near the edge. It doesn't take long to find the proper speed. You will soon find the operation of the cutter easy to master. The bevelling of the lap doesn't take long at all. Afterward, the lap is complete and needs only a good cold pressing before use.
Pressing the Pitch Lap
Before using the lap for the first time, you should perform a long cold press cycle. Unless some problem has developed with the lap while you were pouring and channelling it, there is no need to hot press. I always cold press with a micro-faceting material after making a fresh lap. The purpose of micro-faceting is to give more tiny channels for polishing agent and water to circulate during polishing. I also find that in final figuring, it helps ensure a smooth surface on the mirror and better control of the lap. I use fiberglass window screen for this purpose. I use the cheapest variety I can find because it is thinner, stretchier, and better conforms to the curvature of the mirror and lap. Any other clean, lint-free, textured material should work just as well.

To press the micro-facets, cut out a circle of your window screen, bridal veil material, or onion bag netting. Make it a few inches larger than the lap diameter. Spray the mirror's face with water and lay the screen material onto the wet surface. Spray the screen with more water. Now, apply a liberal amount of polishing agent to the facets on the lap. Carefully place the lap onto the screen on the mirror. Add weight to the back of the lap. I usually use about 1 pound of weight for every 5 square inches of lap area while pressing. The amount is not critical -- more weight can be used for less time or less weight for more time. Let the lap press this way for an hour or two this first time.
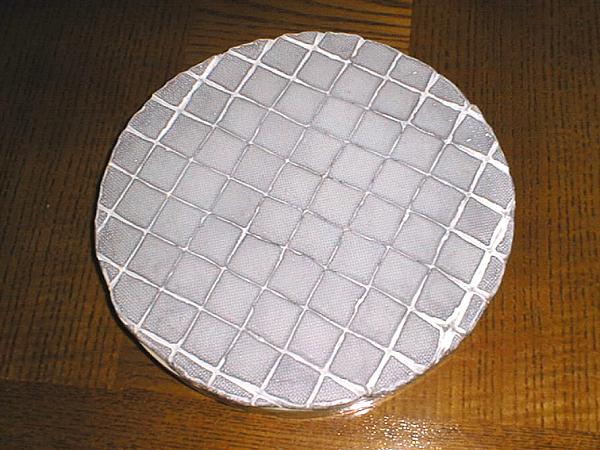
After pressing with the screen material, remove the weight and lift the lap off the mirror. Often, the screen will lift off with the lap. As the lap has pressed against the screen, the pitch flowed between the strands of the material, sometimes gripping it rather tightly. Carefully remove the screen from the pitch taking care not to tear out chips of pitch. There should be a clear pattern of the screen material on the surface of the lap. If not, replace the screen and lap (and add water to keep it from drying out) and press for another hour or two. Your pitch may be just a little harder than I make mine.
Once the pitch clearly shows the screening pattern, cold press once more without the screen. This will press the thousands of tiny peaks on the lap into intimate contact with the mirror's surface. Add a little more polishing agent if the lap shows uncovered pitch in some areas. You don't want uncovered pitch to ever come into direct contact with the mirror during cold pressing since it may stick and have to be removed by force necessitating a new lap. The lap should be pressed for about a half hour without the screen material using the same mount of weight as before. At this point, everything is ready. The lap is finished and ready for use. Remove the weight and you may immediately begin polishing or figuring with the new lap.
Maintaining the Pitch Lap
All laps wear with use. The channels begin to fill in as the pitch slowly flows and the edge will often begin to flow out over the lap foundation. Routine maintenance is required to keep your lap working well throughout polishing and figuring. Laps will require re-channelling and edge trimming after every hour or two of use. Hard laps may last a bit longer while soft laps may last less time. Sometimes, a lap may have to be completely rebuilt after damage or after excessive thinning of the pitch. This is all normal and to be expected.
Re-channelling and trimming of the lap are done the same way as outlined above for a new lap. I often wait until the the channels are nearly completely closed with only a slight indentation at the surface of the lap marking the old channel location. Sometimes, I wash the excess polishing compound off the lap before re-channelling but more often just let the agent mix with the pitch melted off the lap in the process. The old polishing agent builds up in the recycled pitch can. The recycled pitch is incorporated into my next lap. I have never noticed any ill effects after years of recycling pitch in this way.
To re-channel the lap, tape is laid out on the surface and the channels cut in each direction in turn. The tape should be applied to the tops of the existing facets starting in the center of the lap as before. You will probably find, however, that the facets have migrated towards the edge of the lap slightly as the pitch flowed during use. By starting in the center of the lap and working outward, the new facets at the edge may be close to or even overlapping the location of the old channels. This has never caused me any problems. Just cut the channels so that the new facets are all the same size. Occasionally, you will experience pitch splattering during re-channelling caused by water trapped in small pockets under the old channels. As the hot cutter hits these, the water vaporizes and can blow tiny molten grains of pitch out. You can ignore these since they will not be able to settle on the tape-covered facets and will not cause you any problems.
After re-cutting channels in the lap, bevel the edge again as before. Depending on the softness of your pitch, you may have to re-bevel the lap more often than re-channelling in order to keep the pitch from overhanging the mirror's edge during cold pressing. Cutting a fresh bevel is very quick since you don't need to tape the facets. After any re-channelling or re-beveling operation, always cold press for about an hour. You may use the screen material or not depending on whether the pattern of the screen is still visible on the lap. Since I have observed that the screen seems to aid in making excellent contact during figuring, I almost always cold press with window screen and then again without it for every figuring session, not just those following lap maintenance.
While other methods of making and maintaining a pitch lap can look quick and easy at first glance, this method has proven the test of time for me. If you have tried some of the other methods and still feel there must be a better way, consider trying this one. Even if you find it doesn't fit your way of working, you may pick up some aspect that will improve on you own favorite method. Email me if you come upon an improvement to this method. I have incorporated a number of changes over the years from many sources to arrive at this point. Like you, I am still searching for that one perfect method of making and maintaining a pitch lap. This is just the best I have found so far.