Making A Tile-On-Plaster Tool
An Adaptation Of The Waineo Method
John D. UptonDecember 15, 2000
The well known optician Tom Waineo advocated making plaster-based grinding tools. His method of attaching the tiles to the plaster substrate utilized paraffin wax as the bonding agent. I have used his method and found it to have both advantages and drawbacks. Here is a description of my implementation of the Waineo technique and my experiences with using such tools.
As all ATMs soon discover, there are many different ways to do each of the tasks required for grinding your own mirror. Making a grinding tool is no different. For smaller mirrors up to about 10 inches diameter, using a solid glass tool often works out best -- especially for the beginner. When attempting larger optics, however, the availability of even plate glass for a full sized tool becomes a problem. Most amateurs will resort to making their own grinding tools once they get above about 12 inch diameter mirrors.
The late Tom Waineo described a method of making grinding tools that was a little different from the methods usually seen in use by amateurs. I first came across his methods on CompuServe quite a few years ago. He used plaster based tools and attached the grinding tiles using a combination of window screening and paraffin wax. (Paraffin wax may be obtained from many hobby stores and is used for making candles.)
Here is Tom's brief description of the process he used.
"If you have a Home Depot nearby, pick out the cheapest white bathroom tile in square ft sheets of 1 inch squares. Over in the paint dept, get some plaster of paris and plaster sealer. Next a small piece of fiberglass window screen and some epoxy. Cover the mirror with vasoline and lay on thin plastic from a trash bag or a dry cleaner bag. Wrap around a cardboard dam 2 inches higher than the mirror. Fill with plaster and pull off when set. It will slide easy. Place tool in oven at the lowest setting but turning temp dial until light comes on and about 125 F. Leave in overnight with door barely open to let out moisture. When masking tape sticks on, it is ready to seal. Cut some pieces out of the tile square until it fits the diameter. Epoxy window screen to the back. Apply in blobs and a couple times until the screen is covered over. Heat the plaster again and wrap around a masking tape dam. Brush on hot paraffin wax to a thick layer. When you heat the plaster, heat the tile the same time. Place the hot tile screen down on the wax. When cooled a little place mirror on top. After the tool is cool, remove mirror and pour on more wax to fill the grooves a little. Wipe off any excess wax. After finished grinding, you can heat the tile with a heat pad or torch and peel off, scrape off wax, and make a pitch lap. I have reused my tools for many mirrors using this method. It is so routine to me that I may have left out small details. - Tom"
This article will take you through the process of making a tile-on-plaster grinding tool. It is loosely based on the Tom Waineo method with complications of my own added. This method is not quick. (It takes at least three or four days from start to finish.) The process does result in tools that look, feel, and work just the way I like. Only you can judge if this method will meet your needs. Chances are, you will find something that can be adapted to your own preferences, just as I adapted Tom Waineo's methods to suit mine.
Why Use Plaster & Tile Tools?
When working on a larger mirror, it is common to do the hogging out of the rough curve with a relatively small sub-diameter tool. Such is the case with my 17.5" project I have been working. After the bulk of the glass has been (often rather crudely) removed, a new tool is then used for the remainder of rough and fine grinding. The real grinding work is always done with tile or other very hard material attached to a substrate.
There are a number of materials and methods commonly used to make this new grinding tool substrate. I have used wood, cement, and plaster at one time or another and find that all can work well. Each has its advantages and disadvantages when used as a substrate. The key to successful grinding are to use a very hard grinding surface medium such as porcelain (unglazed, fully vitrified) floor tile, glass, or metal squares mounted on a rigid, waterproof substrate.
It cannot be overemphasized that the substrate be stiff and not change shape during fine grinding. Any material that can absorb moisture during fine grinding may be subject to deterioration or warping. The best substrate material in this regard may be a non-ferrous metal plate. Metals such as aluminum, stainless steel, or titanium would all serve well.
Wooden tools can also be used. Extreme measures should be taken with wooden tools to ensure that no moisture can get into the wood base. You should also only use plywood for tools. Solid wood stock can change shape over time even when sealed properly. Any warping of a wooden grinding tool base is very likely to cause trouble during the last stages of fine grinding. Even worse, such problems may not become apparent until you are well into polishing your mirror. That is not the time to have to make and break in a new grinding tool. For hogging, on the other hand, a quickly made wood tool can work great. While hogging a deep curve in a large mirror, we do not need to be overly concerned with the tool changing shape.
I have had good luck using cement tool substrates. Both anchor and patching cements have been used on occasion. These are available in many hardware stores and are used to anchor bolts or patch holes in concrete. They are made of nearly pure cement and contain no coarse sand or gravel. Because of this, they are very fine textured and make fine, smooth, waterproof bases for tile tools. I tend to be a little more paranoid and thoroughly seal all my tool substrates, though the cement tools were very fine textured and didn't really look like they would shed particles during use.
Plaster is also a very common substrate material for grinding tools. My first experience with plaster was not pleasant, though I experienced few real problems. I used a patching plaster for walls obtained at a local hardware store. The plaster did not cure as hard as I would have liked, had a very disagreeable musty smell, and contained a mould that continued to grow even after being completely sealed inside the tool. It ended up being colored like fine Italian marble but worked okay as a grinding tool base.
My most recent experience has been with a USG (United States Gypsum) plaster known as Hydrocal 105. This is also called Buff Stone and is a pleasure to work with. It is a form of dental molding plaster. A friend found a local supplier and it turned out to be very economical -- about $15 per 50 pound bag. The photographs accompanying this article depict my most recent use of this plaster to make a 12.5" tool base for my 17.5" mirror. In addition to Hydrocal, USG also markets products known as Ultracal and Hydrostone, which many other amateurs have used with great success.
Materials Required
The materials required to make a grinding tool using this method are listed in the table below. It is best to assemble everything required for each stage before jumping into the actual work. The procedure described below gives details of how and when these materials are needed.
Plaster
Water
Epoxy or Polyester Resin / Glue
Porcelain Floor Tiles
Aluminum Foil
Heavy Mylar Sheet
Masking Tape
Window Screening
Cellophane Tape
Hot Glue or Modeling Clay
Paraffin or Bee's Wax
In addition, the following tools and utensils are required. Very often, the resourceful ATM can make do with tools on hand for jobs such as this. Innovation and substitution are the two major skills possessed by all ATMs. Undoubtedly, many of you will improve on this procedure.
Small Postal Scale
Ruler & Straight Edge
Containers for Plaster & Water
Compass
Abrasive Kitchen Scrubbing Pad
Stiff Disposable Plastic Card
Scissors
Grinding Wheel (Diamond or SiC)
Flux or Acid Brushes
Mixing Container for Plaster
Mixing Container for Epoxy
Hot Plate or Camping Stove
Preparing The Plaster Form
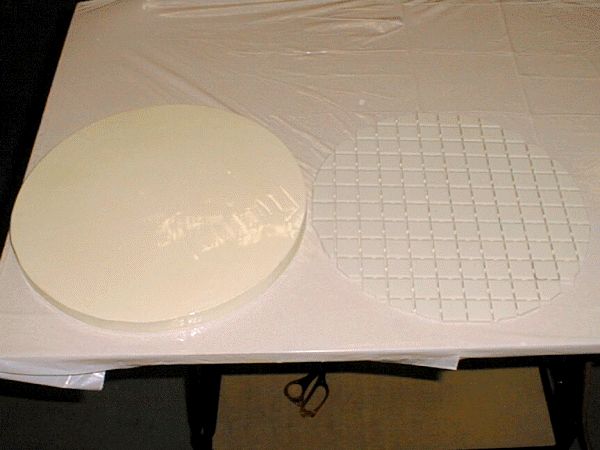
The first step in preparing the tool base is preparation of the form in which the plaster or cement will be molded. Since we are attempting to match the existing curve on the hogged mirror, we will use the mirror itself as a part of the form. The photographs in this article show a sub-diameter tool being cast. In this case a 12.5" tool for a 17.5" mirror. Making a full size tool using this process is actually much easier. Several steps may be skipped. Those simpler portions of the task will be discussed but not depicted by the accompanying photographs.
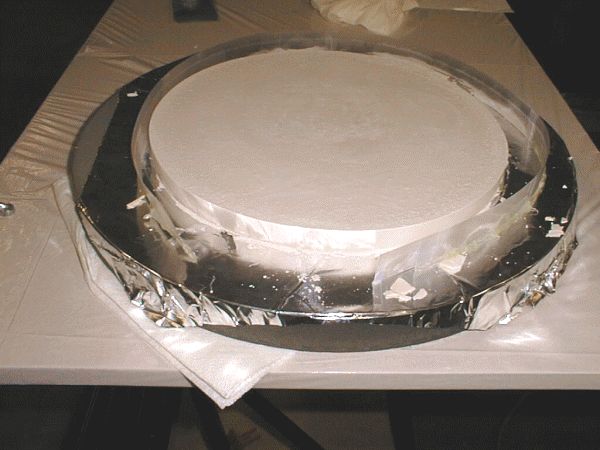
The first thing we need to do is protect the mirror from the plaster or cement. If poured directly onto the mirror's rough surface, we chance having the tool stick securely to the mirror. I usually use household aluminum foil as a release barrier. Other materials like baking parchment or waxed paper will also work, though I have had wrinkles develop in waxed paper in the past. The aluminum foil works well and the only wrinkles are those present before the plaster is poured.
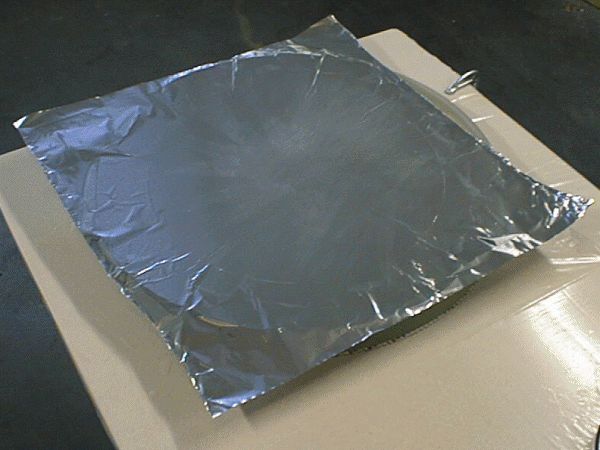
I start by placing the mirror face up on my work surface and placing shims under the edge as required to ensure that it is quite level. I always check this with a carpenter's level just to be sure. This important step ensures that the tool will be a uniform thickness when completed. The surface of the mirror is then wet with a small amount of water. The aluminum foil is next placed onto the wet mirror and smoothed into good contact. The mirror's damp surface will serve to hold the foil neatly in place. You may use a towel, sponge, or other such soft compliant object to help smooth the foil and ensure that it is in good contact with the mirror. It is best not to wait too long after placing the foil on the mirror before pouring the plaster. (Plain water works well enough for holding the foil on the mirror's face. Don't be tempted to add soap or use other agents such as oil as it may make the tool too difficult to slide off after the plaster sets.)
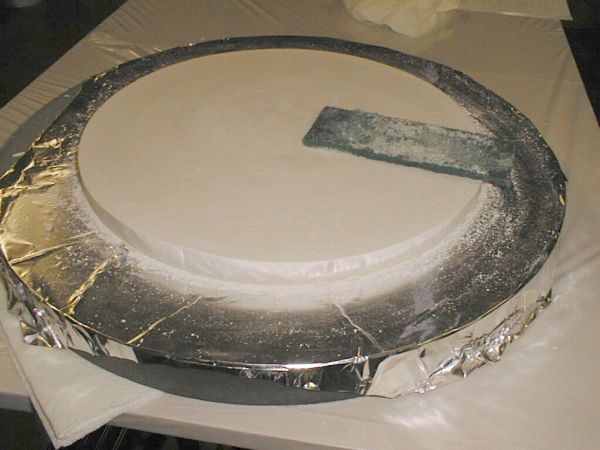
Now it is time to form the dam to contain the plaster. I usually use a stiff heavy mylar for this. Local hobby stores carry this in poster-sized sheets for about $3. Drafting vellum also works well, but is a bit more expensive. The plastic is cut into one or more strips at least as wide as the tool will be thick. You need enough total length to equal the circumference of your tool plus about 4 to 6 inches of overlap at each required joint. For my 12.5" tool, I used 3 strips 24" long. I allowed a generous 11" of overlap at each joint. Each joint of the strip is wrapped with cellophane tape. When completed, the joined strips form a circle the diameter of your future tool.
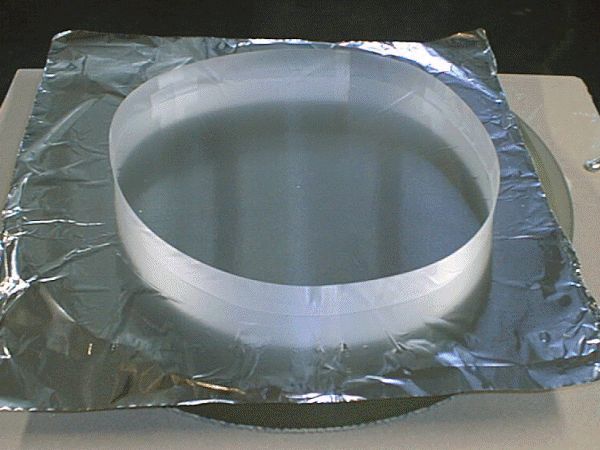

Because I am making a sub-diameter tool, at this point, I mark the center of the mirror and use a (dull pointed) compass to draw a circle on the foil equal to the tool diameter. I use this line to help guide me in placing the plastic ring dam onto the mirror. The plastic is first loosely attached with a couple of small pieces of tape. Once I am sure that the plastic ring is the right length, I tack it in place using hot melt glue. I then apply a small bead of hot melt glue all the way around the plastic dam to secure it in place on the foil and minimize any leaking of plaster under the ring.
If you choose do not use hot melt glue, you may also use modeling clay or just place small pieces of tape at 0.5" intervals all around the dam to make sure it doesn't lift when pouring the plaster. (I am quite a fan of hot melt glue. I have found a multitude of ATM uses for it over the years. The "hot glue guns" are quite inexpensive and the glue is also very cheap. If you have never tried using it, you should.)
At this point, form preparations are complete. Now with the mirror leveled and the dam in place, it is time to mix and pour the plaster or cement for the grinding tool's substrate. This portion of the process goes much more quickly than the preparations discussed above.
If you are constructing a full sized tool, you will find that it is actually much easier to make. You do not need the plastic for the ring dam and can, instead, use aluminum foil, masking tape, duct tape, or other material to form the dam around the circumference of the mirror directly. Just make sure that it is high enough to give the proper thickness of tool. You also don't need to attach the dam to the foil on the mirror's surface as in the case of the sub-diameter tool. The tape around the edge of the mirror will hold everything in place just fine.
Mixing And Pouring The Plaster
This is the most important step in making the plaster base. Proper preparation and mixing of the plaster determines how well it will cure and how strong the finished product will be. Always follow the manufacturer's directions with the plaster exactly. USG stresses that the final strength of the plaster is determined by the plaster to water ratio used and the complete and thorough wetting of each plaster particle during preparation.
I am now using Hydrocal 105 for my tools. The specifications state that it be mixed with water based on weight rather than volume. For each 100 units of plaster (by weight) 40 units of water (also by weight) are required. The instructions are also very explicit about always adding the plaster slowly to the water. The first time I used this Hydrocal, it just didn't look right. It seemed to me to be much less water than required. The volumetric ratio looked more like 5 or 6 to one plaster to water. I was pleasantly surprised to see that it really worked correctly.
Be sure to get everything ready before mixing the plaster. Begin by estimating the amount of plaster you will need. Calculate the volume of the tool you are making. Don't forget to account for the volume of the hollowed curve on the hogged mirror. (I forgot to account for this on the tool shown in the photographs, but it came out just thick enough for me to use anyway.) The tool's total volume will be equal to the volume of the cylindrical part v = PI*(r^2)*t plus the volume of the hogged sagitta on the mirror v = PI*(r^4)/(8*f) where v are the volumes of the two portions of the shape, r is the radius of the tool, t is the edge thickness of the tool, and f is the focal length of the mirror.
To find out how much plaster to weight out, multiply the desired volume of the tool by its density. The manufacturer's data will give you this value or you can guess about 1.0 ounce per cubic inch. Since only a small amount of water is lost in the drying and curing stage, you can assume 3% to 5% extra weight for the plaster and water mixture. This should still give you a little extra so that your tool doesn't come out thinner than expected.
For example, for my 12.5" by 1" thick tool I should use v = PI*(6.25^2)*1.0 + PI*(6.25^4)/(8*57.5) = 122.7 + 10.4 = 133.1 cubic inches. (My mirror will have a 57.5" focal length.) Adding 3%, I should mix up 133.1*1.0*1.03 = 137.1 ounces of plaster and water. Since the water is 40/140 of the total weight, I need about 39 ounces (weight) of water and about 98 ounces (weight) of plaster. Carefully measure out the calculated required amounts of plaster and water. Keep them in separate containers until you are ready to mix and pour the tool.
Pour the water into the mixing container. Slowly sift the dry plaster into the water a few spoonfuls at a time. Allow the plaster to wet itself and sink to the bottom of the mixing bowl. If the plaster tends to float on top of the water, you are probably adding it too fast or adding too much at once. Don't stir the plaster at this point, let it settle to the bottom on its own as it is added to the water. After all the plaster has been added to the water, let it soak for a minute or so. USG describes this as an important step. Each small particle of plaster must be allowed to absorb water from the mix in order to cure to its maximum strength.
After allowing the plaster to rest for a minute or so, start to slowly stir the mixture. Don't get too aggressive at this point as too many air bubbles will become trapped in the mixture. Stir slowly and thoroughly for a few minutes until the plaster has a smooth creamy texture. The plaster should still be quite fluid at this point. Now pour the plaster into the mold on your mirror. As soon as the plaster is poured, tap the side of the mirror (below the dam area) or the work table to encourage the plaster to spread out flat in the mold. This helps to both evenly distribute the liquid plaster and cause trapped air bubbles to rise to the surface where they can be popped and allowed to fill in. Keep vibrating the plaster for a few minutes or until the surface is quite flat. Because of the glossy liquid surface at this point, it is easy to see how flat the surface is by looking at the reflection of an overhead light. Move your head back and forth to examine the surface across the full diameter of the tool. When you are satisfied that the surface is flat, leave the plaster to set up. This is a good time to clean up your work area and get the paster off your tools before it completely hardens.
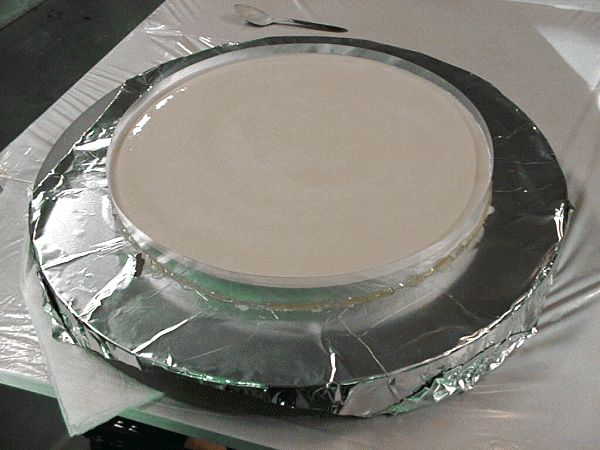
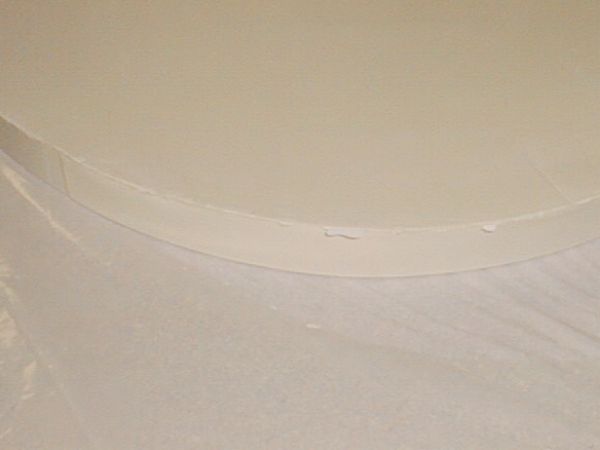
After about 30 minutes, the surface of the plaster will quickly change from a glossy, wet, watery appearance to a dull, damp, chalky appearance. This change is accompanied by the plaster beginning to get warmer. After another 5 minutes, you may lightly touch the surface to see that it is quite warm. Wait for another 5 minutes or so; then it is time to carefully remove the plastic ring dam. I do this by very carefully cutting one of the cellophane tape seams in the ring and allowing it to open up around the plaster tool. Take your time and go slowly. The wet plaster is still rather fragile at this point. You can use this to your advantage. Since the wet tool is still quite soft, you can smooth out any rough spots or defects easily. You can also change the shape of the tool slightly if you need to for any reason by gently sanding or cutting the plaster.
Remove the ring dam from the tool, but leave the tool on the mirror for now. While the plaster is still damp and soft, you will clean up the back side. This is best done using an abrasive kitchen scouring pad. Rub any rough spots on the top surface (back) of the tool. The soft plaster will scrub away easily. Shake the removed plaster out of the abrasive pad occasionally. Also run the pad around the upper edge of the tool to ease the sharp corner a little. This is how you pre-bevel the tool for use. Sharp corners are an invitation to chipping later as we use the tool. After the back and rear edge are cleaned up and smooth, carefully slide the tool off the mirror by pulling gently on the aluminum foil. The tool will be very tight at first, but will start to move and slide slowly across the mirror.
When the tool reaches the edge of the mirror, gently support it from underneath. Turn it over and carefully place it with the convex side up on your flat work table surface. (You may want to protect the work surface as the tool will still be quite damp and warm.) I try to be careful about not touching the plaster with my bare hands during all of this handling. I have sometimes had a few problems with the natural oils from my hands being absorbed by the plaster. It tends to cause the plaster to cure unevenly and is slightly resistant to sealing after curing. The upper edge of the plaster disk may have rough areas and plaster ridges caused by plaster seeping under the ring dam. Use the abrasive pad to remove these rough areas. The top convex surface of the fresh tool is generally very smooth already and will not need any touch up from the pad.
Curing And Sealing The Plaster
Following the casting, the plaster must be allowed to cure and dry before further working. This process can take a few days. You should not try to rush the drying too much, especially in the early stages. The curing process takes place as water is incorporated into the gypsum structure of the plaster. Too fast drying rates removes this water before it can be incorporated. This will result in a tool which is chalky and has less strength than one which is properly cured.
To promote a good curing process, I first wrap the wet tool in a layer of paper towels and place it in a large plastic bag to seal in the moisture being given off. I then wrap the whole thing in an old blanket to help conserve the warmth being generated by the curing process. I leave the tool this way for 8 to 12 hours. This added step is probably not required, but I would usually have to wait at least overnight for the initial curing, so it doesn't cost me any additional time. I find that when I remove the tool from the plastic bag, it is completely dry within a few more hours. About 24 hours after pouring, the tool seems quite dry. Because of limited hobby time, I often don't get around to sealing the tool for another day or so anyway. By that time, it seems very hard and fully cured.
Many ATMs have very good success with using unsealed plaster and cement tools. I like to be especially careful, so I always completely seal the tools I make. I have used paint and varnish in the past, but the best sealer I have found is epoxy or polyester resin. I have only used epoxy myself, but a friend using polyester resin has also had excellent results. Finished tools made in this way feel as hard and slick as glass. Sealing the tool eliminates any possibility of it shedding small particles while in use. I find a little bit of scratch prevention well worth the trouble.
The actual sealing process is very simple. I place the tool on the work table and elevate it a bit by placing the lid from a large jar underneath. This raises the tool about 1/2" so that I can apply the epoxy to both one side and the edge during a single session. After the epoxy cures, I turn the tool over and do the other side. (If you wish to glue your tiles on instead of using paraffin wax as described later, you should seal the flat back and sides first. Then you can apply the epoxy sealing coat to the convex front side and just stick the tiles in place while it is still wet.) I have always used Durro brand "2 Ton" epoxy for the tools I make. (All were smaller than 13 inches diameter.) This can be found in many hardware stores and is the type that comes in a dual syringe applicator. Avoid the quick setting types of epoxy as they may not give you enough time to smooth the surface before beginning to set. Mixing this epoxy is very easy. You just dispense the amount you need into a small disposable cup and mix thoroughly. (After thoroughly mixing the epoxy, mix it again. Improperly mixed epoxy does not fully harden -- it will be sticky for a very long time.) It is then ready to apply. The dual syringe applicator automatically dispenses the proper ratio of resin and hardener for you.
In applying the epoxy sealer, I mix up the epoxy and dump it onto the center of the tool. I use a piece of very stiff plastic (similar in thickness to a credit card) as a squeegee to spread the epoxy over the surface to the edge. I then use a small disposable glue or flux brush to paint the epoxy around the edge of the tool. Let the epoxy cure for a day. When dry, turn the tool over and seal the other side. When the second side has cured, carefully inspect the tool for gaps in the coating. Check closely where the top and bottom meet the edge. If any gaps are found, mix a small batch of epoxy and cover the bare areas. The tool base is now complete. If you glued the tiles on with the top coat of epoxy sealer, you are ready to grind.
Here is a tip if you want to glue the tiles on. Hand placing the tiles on the epoxy coated tool can take some time. The epoxy may start to set before you are finished. To avoid this, buy some adhesive backed shelf lining paper from your local grocery or hardware store. Cut out a circle the size of your tool. Peel the backing off the paper and place it adhesive side up on a work table. Apply the tiles to the paper and firmly stick them in place. Space them as you prefer. After coating the tool with epoxy, place the tiles onto the epoxy all at once by laying the tiles and contact paper onto the surface. (The tiles go onto the wet epoxy surface and paper stays on top.) After allowing the epoxy to completely cure, the contact paper is peeled off the tiles and the tool is ready to use.
Preparing The Tiles
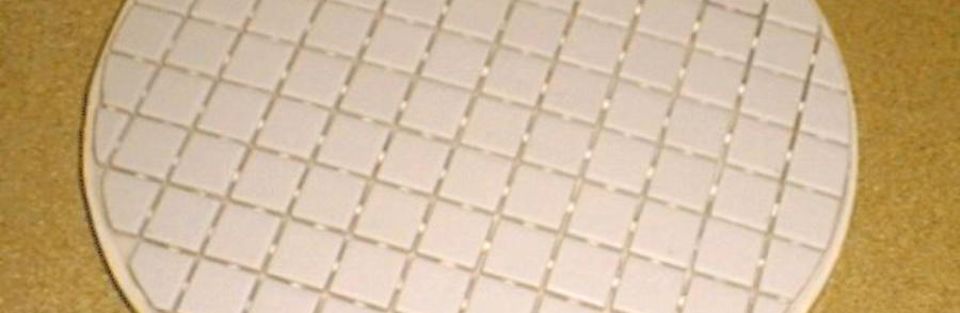
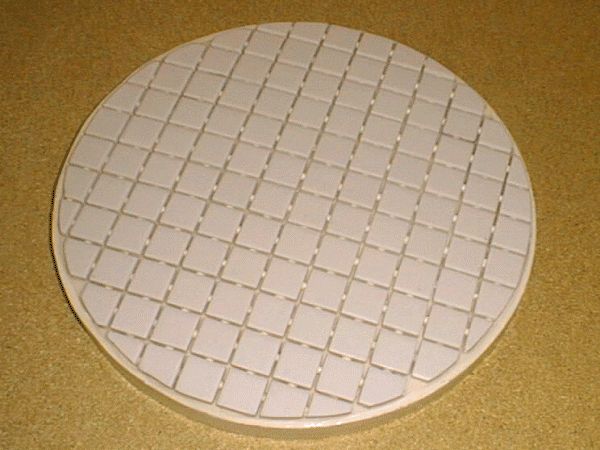
If you have decided to use the paraffin wax attachment method, some preparation of the tiles is in order before we go further. The tile preparation steps may also be of some interest even if you have decided to epoxy your grinding tiles in place. At one time, I used the hexagonal tiles as sold sold by Willmann-Bell. I have since begun to use square tiles as they are a little easier to find and are generally less expensive. They also have the added benefit of forming straight channels on the resulting tool which are easier to keep clean and beveled.
The first step in tile preparation is to attach the tiles to a flexible mat. The paraffin wax used to hold the tiles onto the plaster base is actually a relatively weak adhesive. If the tiles are interconnected on a backing mat of some sort, local loads on the individual tiles are spread over a larger area. This general weakness of adhesion with paraffin wax is its main drawback. Some ATMs and professionals advocate using pitch for attachment. I have never tried it myself but would agree that pitch should improve the method. If I do ever try it, I will mix up some blocking pitch with a relatively high percentage of wax. Paraffin wax doesn't flow much on its own as does pure pitch. I'd rather not chance my tile tool changing shape in the final stages of fine grinding due to having the pitch flow.
Tom Waineo recommended gluing the tiles to a circle of window screening material. I have tried this method and found it to work well. (Window screening material seems to be another staple of ATMing. I have found many uses for it over the years.) I have also discovered (the hard way) that this attachment of the tiles to the window screening is a very important step in making tools this way. The window screening material seems to serve two purposes. The first is to attach the tiles to each other which spreads the local forces on the tiles during use. The second is that the material itself presents a large coarse textured surface area to the paraffin wax allowing it to grip the matted tiles better. (The screening may not be required if blocking pitch is used to attach the tile, but I haven't tried it that way to see for sure.)
The second step in preparing the tiles was to draw a circle the size of the desired tool onto the matted tiles. I then used a tile nibbler tool to cut away partial tiles to form an approximate circle. Where only small pieces of tile would be left, I simply removed the whole tile. After attaching the tiles to the window screening, you may wish to edge them. Perhaps overdoing the neatness aspect of making the tool, I edged the tiles to better form a smooth circle. Besides neatness, this step also makes it easier to keep the sharp edges of the tiles beveled while grinding.
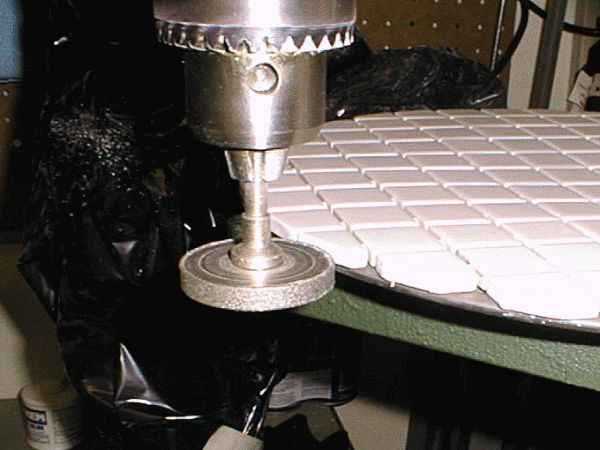
The edging operation was carried out on my drill press using a small inexpensive diamond grinding wheel. The porcelain floor tiles are so hard that most types of grinding wheel take a very long time to cut the tile -- if they cut at all. The diamond wheel cuts the hard tile (and glass also) as if it were wet chalk. Be sure to keep both the wheel and tile wet during the grinding operation and cover up all exposed surfaces of your drill press to keep the hard, abrasive tile dust out of the moving parts.
I used a large Lazy Susan turntable bearing on the drill press table to help make the edge quite round. The matted tiles were placed onto the bearing and slowly rotated by hand into the grinding wheel. The result was a very smooth, even edge on the tiles that make maintaining a bevel easy during use of the tool. Set up and clean up actually take longer than the edging itself.
When the edging is completed, the matted tiles will closely approximate a circular outline. You may want to put the initial bevel on the tiles at this point before attaching them to the plaster base. I use diamond hones for this operation. Inexpensive diamond hones may be ordered from Harbor Freight Tools. I use their 2" by 6" hones (#36799.) They are sold in sets of three hones with #180, #260, and #360 grit sizes for $10 to $13 depending on whether they are on sale at the time. These hones are great for beveling both the outer edge and the channel edges between the tiles.
Attaching The Tiles
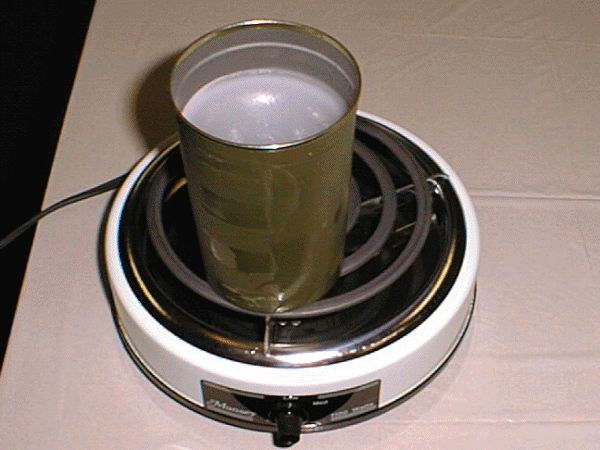
The final step in making the grinding tool is to attach the matted tiles to the plaster base. I use melted paraffin wax for this attachment as recommended by Waineo. I purchased a large block of paraffin wax at a local hobby store. The cost was about $1.00 per pound. The tile attachment operation using the paraffin wax is done much like the pouring of the plaster itself. The mirror is placed face up on the work table and carefully leveled. Its surface is dampened and then covered with aluminum foil. The tiles are prepared by forming a thin dam around their periphery with narrow masking tape. The tape should only be as wide as the tiles are thick so that at most, the dam rises about 1/16 inch over the back of the tiles.
The matted tiles are placed face down against the aluminum foil and pressed into good contact. Best results are obtained when both the tiles and the sealed plaster base are clean and free of oil or other contamination. You may want to wipe the parts clean with denatured alcohol or acetone before pouring the wax. Allow the cleaner time to completely evaporate before proceeding with pouring the paraffin wax. You want the tiles and tool substrate to be completely dry.
When the paraffin wax is hot enough to be very fluid (but not smoking hot), it is poured onto the window screening and tiles. It should be poured to a depth of about 1/16 to 1/8 inch at most. You can make it a bit thicker if you want to allow some of the wax to spill over the small dam. This will help to ensure good wax adhesion all the way to the edge of the tiles. The sealed plaster tool substrate is quickly placed on top and gently pressed into place in the hot wax with its convex side down. Try to do this in one quick smooth motion since the wax will begin to solidify on contact with both the tiles and the plaster base as they are considerably cooler than the wax itself. It helps to hold the tool with both hands and while resting your arms on the work table, lower the centered tool straight down into the hot wax. Press gently until the wax flows out to the edge of the tool. It will not hurt to let some wax overflow the dam around the edge of the tiles. It will be scraped away in a few minutes when the tool is cleaned. Leave the tool to cool completely before attempting to remove it. The wax will remain soft for several minutes. It is best not to disturb the tool until the paraffin wax has cooled to room temperature.
After the wax has cooled to room temperature, you may remove the tool from the mirror by gently sliding the aluminum foil off. Once off the mirror, carefully strip the foil off the tiles. It should come off without much trouble since little wax generally seeps under the tiles. Check to be sure that the wax created good adhesion between the window screen and the plaster base. Check also for voids around the edges of the tiles where the tool might not have been pushed into the wax far enough.
If everything looks okay, use a stiff piece of plastic with a rounded corner to scrape away the excess wax from the edges of the tool. An old bank card works well for this. Also use the plastic to scrape excess wax from the channels on the tool. After this bit of final cleanup, the tool is ready to use. If problems are found during this inspection, you can pull the matted tiles off the base, scrape the wax off and remelt. There is no need to try to clean the tiles or base again as they will be covered with pure wax. Just make a new masking tape dam and try again.
Using The Waineo Tile Tool
Once made, the Waineo tile tool is used just like any other grinding tool. About the only precaution to take is not to hit the edge of the tiles on a hard surface while in use. This can break the wax's adhesion on the edge tiles. If this should happen, you can sometimes repair the damage by locally heating the area with an electric heat gun or propane torch. Don't get things too hot, just enough to cause the wax to soften enough so that it can once again stick to the window screen. I have only had this happen once. I dropped a 12 inch tool from about 6 inches onto the 17.5" mirror. While several tiles were dislodged, greater damage was done to the mirror. It caused a chip about 1/4 inch long and 1/16 inch deep on the surface. Luckily, this was done at the beginning of grinding the back flat and was nearly ground out by the time grinding was complete. Other than that incident, the wax has held these tools together quite well. I would not recommend a more forceful test such as this. I also take a bit of precaution in making the tools now. I make the plaster base about 1/4 to 1/2 inch larger than the tiles so that there are no tiles very near the edge. Minor bumping of the tool edge on something (hopefully not the mirror again) are not likely to damage the tile attachment.
Cleanup and normal maintenance are much the same as for other tools. A thorough washing between grits and re-beveling of the edges and channels follows normal practice. The channels should be carefully scrubbed out with a stiff (plastic) bristle brush under running water. As an added precaution against grit contamination, Waineo recommended local heating of the top surface of the tool's channels between grit sizes. You can use a heat gun or propane torch and play it rapidly across the surface of the tool after cleaning up for switching grit sizes.
This treatment serves to melt the topmost thin layer of wax exposed between the tiles and causes any stray grit to become permanently captured by the wax. Embedded in the wax this way, it is very unlikely to be dislodged later causing scratches. If you wish, you may also scrape very small shavings of wax on the tool's surface, sweep them into the channels, and then melt them into place with the heat gun or torch. Any grit covered up in this manner will never find its way back to your mirror's surface. This is the feature I like best -- the ease of rendering grits harmless between sizes. A thorough scrubbing followed by a quick once over with the heat gun and stray grit is locked up out of the way. Additional wax may be added as needed and old grit-impregnated wax may be scraped out of the channels as required.
Tools made using the wax attachment method are also reusable. When grinding is complete, the tiles may be easily stripped off, the plaster base cleaned and reused as the base for the pitch lap. If the tiles are not ground down too thin, they may even be applied to another plaster base with a different curvature for use on another mirror.
Conclusion
I have learned a few things since first trying Tom Waineo's technique. The most important thing to watch out for is separation of the tiles. Loose tiles may have strange effects on your mirror during fine grinding and can act as hiding placing for grit. Taking precautions and spotting loose tiles early is a very worthwhile approach. Loose tiles near the edges maybe either repaired or removed as is the case with epoxied tiles.
For smaller mirrors using full sized plaster tools, I would recommend gluing the tiles directly to the plaster base. Such mirrors are not likely to require multiple layers of tile and a second tool base can be easily duplicated for use as a pitch lap base. You should never use the wax attachment technique for hogging operations. The localized forces on the tool are too great. Hog your mirror with a metal tool and then cast the plaster base for a tile tool. For smaller mirrors with shallow sagittas using a full size with epoxied tiles is a good approach and will work for hogging also since the total amount of glass to be removed is relatively small.
With sub-diameter tools and larger mirrors, I like the paraffin wax attachment method. It allows me to remake the tool without gluing another layer of tiles over a previous layer. To me, this is an advantage since I have had some trouble properly cleaning tools with multiple layers of tile. Grit seems to find places to hide that I would not think possible. The result is often backtracking a grit size or two (or three) to fix the resulting scratches. For larger tools, it is also handy to make only a single plaster substrate that can later serve as a base for the pitch lap.
I like the overall flexibility of plaster based tile tools made using the Waineo method. One improvement to the technique that I will try some day is the use of blocking pitch rather than paraffin wax for tile attachment. I suspect it would hold much better than the wax but may not gain much in tool fragility since pitch can shatter rather easily from an impact. I would like to hear from anyone who tries the method with blocking pitch so we can compare notes on tool use and durability.