Blog Topical Index
Tips, Techniques, and Projects for the Amateur Telescope Maker / Astronomy Enthusiast
John D. UptonPage Last Updated: May 20, 2017
Telescope Related Articles
Optics Related Articles
Observing Related Articles
Metalworking Related Articles

Woodworking Related Articles
Astrophotography Related Articles
Electronics Related Articles
Programming Related Articles
Blog Entry Topical Index
Short blog articles are topically indexed on this page. Each entry is tagged with a general category which is also linked to the Chronological Blog Index page. Many entries here will fall outside the normal scope of amateur telescope making and may deal more with other aspects of enjoying astronomy as a hobby activity.
Many of my blog postings are yet to find their way to this website. Old entries will added here as they are transcribed from other sources.
Table of Contents
New APM 16x70 ED BinocularsJanuary 10, 2017
New APM 16x70 ED BinocularsJanuary 10, 2017
TelescopesBack in December, I ordered a new set of binoculars. I have been wanting a higher quality large binocular for a number of years. I have always wanted something of the general caliber of the Fujinon 16x70 FMT series but always balked at the price. Two years ago, based on good reviews of the new Lunt Magnesium Series binoculars, I tried to order some 16x70s but it seemed that at the time of my enthusiasm for ordering, Lunt Engineering USA was just not quite ready for prime time. Their main office was unable to give me any details on the binocular nor how to even order them -- even though the 16x70 appeared on their Website. They referred me to a distributor in New Jersey. After multiple phone calls and messages, I was told they had no idea how to determine stock at the Lunt headquarter in Arizona. I finally gave up. (Meanwhile, APM in Germany had them in stock but they were over $200 more than the USA price.)
APM (a company owned by Markus Ludes of refractor fame) seems to act as a development partner or co-owner of Lunt Engineering and recently started advertising a new offshoot of the Magnesium Series (MS line) of the Lunt binoculars. They are branded APM but I have seen rumors that they may be offered by Lunt after initial introduction by APM. This new "ED APO" series incorporates ED glass and a redesigned eyepiece to supposedly improve on the Lunt MS offering. Specs can be seen at the APM Website. The original Lunt MS 16x70s got great reviews on several astronomy forums. On Cloudy Nights, several reviewers commented that the Lunt MS 16x70 matched about 90% to 95% of the Fujinons which are regarded something of a gold standard in 16x astronomy binoculars.
In the second week of December, APM offered the new 16x70 binoculars for $645 US including shipping. I ordered right away. There were a couple of delays in shipping but I finally got my new binoculars yesterday. I spent a little bit of time in the driveway last night comparing them to my 16x80 Orion binoculars that date from the mid 1990s. So far, the new APM ED 16x70 Magnesium binoculars seem to mostly address the three main issues I had with the Orion 16x80s.
The Orion binoculars weigh 5 lbs. 12 oz. while the new APM ED MS 16x70 weigh in at 4 lbs. 10 oz. The new pair is a bit larger than I expected in that it is about half inch longer than the Orion. I am not sure that the magnesium frame of the new binoculars accounts for all of the weight difference between the two. The weight difference between the 70 mm versus 80 mm objectives probably accounts for a significant portion also. The lighter weight of the new binoculars do help hand held viewing but probably not as much as I thought it might. Still, when used from a seated position they are more than acceptable for scanning the skies. I very often used the Orions that way. Used on a tripod, the APM 16x70s have pretty much everything I had hoped for.
In terms of overall sharpness, they meet and surpass all of my expectations. The Orion binoculars, while having a 3.5° field of view, are only reasonably sharp over a width of half that. The outer 25% of the field on each side of center is for the most part unusable. Focusing on a star in the center of the field of view and then moving it to the edge shows a great deal of bloating and some coma. (It's bad -- imagine looking at a sharp star cluster surrounded by a myriad of comets! Still, I used them as that is all I've had for years.) The new APM binoculars, on the other hand, seem equally sharp from the center of the field out to very near the edge of the 4.1° field. This was my main reason for buying these binoculars. I was never really satisfied with the overall sharpness of the Orions but didn't really want to spend well over $1000+ for something better.
Finally, in terms of chromatic aberration, the new APM binoculars, while not perfect, are a huge improvement over the Orions. This was most obvious in observing the Moon through both. With the Orion binoculars, the Moon looked good in the center of the field of view but if I moved it so that one limb was right at the edge of the field, considerable color was noted on each side of the Moon. The outermost limb of the Moon in the field appeared red while the limb nearer the center of the field appeared green. Doing the same test with the APM binoculars showed a very small amount of remaining chromatic aberration. In this case, the limb nearest the edge took on a very narrow yellow fringe while the limb nearer the center had a very narrow violet fringe. Both fringes were less than about one third of the width of those seen in the Orion binoculars.
As an afterthought, I should have tried refocusing both binoculars while viewing the Moon at the edge of the field. It is possible that the observed chromatic aberration could have been improved or at least changed by refocusing. I'll do that on my next extended outing with both binoculars.
My general impression was that the overall sharpness was much better in the APM binoculars than the Orions. When set up on the tripod, the APM image of the Moon was much crisper and showed significantly better detail than the same view with the Orion binoculars.
At some point, I would like to do a side-by-side test of the new APM binoculars with a fellow club members Swarovski Binoculars. While the difference in magnification will make a direct comparison difficult, it should prove interesting. I would be particularly interested in comparing any chromatic aberration in the two. It shouldn't be too hard to beat the Orion binoculars but I'm not sure at this point just how much the ED glass helps in the APM ED MS series. Overall though, considering the price of alternatives, I think these are definitely keepers.
Table of Contents
Blog Post - Datedate of entry
Blog Postdate of posting
category-tagThis is a sample blog post. It serves as a placeholder for a future short article. Blog postings here can cover any number of subjects related to amateur telescope making, astronomy, space science, or some only peripherally related DIY activity. To seed this website, a number of my writings will be transcribed here from both public astronomy forums as well as posting I have made to my local club's private discussion forum. Each blog post is tagged with the categories into which it best fits. The categories are linked back to the Blog Topical Index. In this way, the reader of a posting can quickly jump to other postings covering similar subjects.
Table of Contents
Saturn On A Summer's NightJuly 11, 2015
Public OutreachFeb 15, 2013
Comet Lovejoy From School Star PartyJanuary 17, 2015
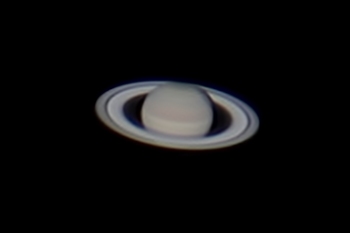
Saturn On A Summer's NightJuly 11, 2015
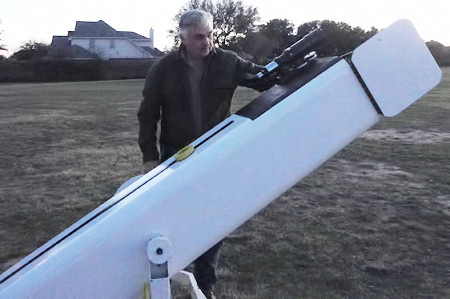
AstrophotographyObservingI spent the evening with a fellow astronomy club member at his back yard observatory last night. The night started off looking a little iffy but turned out great. I started hauling my monster HDX110-EQG mount and Celestron 11" EdgeHD scope from his driveway to the yard about 8:00 PM. It took about 45 minutes to get set up.
Once it was dark enough to see Polaris, I did a very rough eyeball polar alignment and then viewed Saturn, Jupiter, and Venus in the scope. Saturn looked very good but Jupiter was terrible. While it was lower in the sky than Saturn, the difference in seeing across the sky was much greater than might be expected. Venus showed a much cleaner disk. It was fun to see that Venus's disk was visibly larger than Jupiter. While no real hint of cloud features were visible on Venus, the large sharp crescent was quite pretty.
After checking out a few functions on the mount, I went back to Saturn and hooked up my Canon T2i to the scope. I used it to take several videos of one minute length at 60 frames per second. The view on the live viewfinder was really nice. I have done some work on the video capture and have attached the resulting image above. Specifics of the image are shown at the bottom of this post.
After getting the DSLR video of Saturn, I switched cameras and tried to get some images with my SPC900N Web camera. I had lots of software issues with this and the view just wasn't as good as with the DSLR. I captured a couple of videos and will attempt to process them later but don't expect anything worthwhile to come from this effort.
Following the frustration of the Web Camera, I hooked up my Orion StarShoot Pro Guider (monochrome) camera and repeated the process of getting videos of Saturn. I had wanted to try the three different cameras just to see how they compared for planetary photography. The small pixels in the guider seemed to work well for this use. The images on the live screen looked better than those from the Canon DLSR.
Finally, I did some testing of PHD2 v2.5.0 to see if I could get it to work. I have previously had lots of problems with PHD2. It would never see the stars I could see in the screen. I'd click on a star to guide with and it would just complain there was no star in that position. Starting PHD1 without moving the scope, I could see and click on that same star and PHD1 would happily calibrate and start guiding. Last night, the new version of PHD2 worked much better.
I tested guiding for a while and verified that the new camera and PHD2 played nicely with each other. As a final test for the night, I used the Polar Alignment Wizard in PHD2 to do a real drift alignment. I really like the function. Overall, it took me about 45 minutes to get aligned but much of that was learning what to do and how to use the program. In the end, I was able to reach a polar alignment error of less than 30 arc-seconds in both altitude and azimuth for the mount. I think with a couple more time of practicing, I could get under 1 arc-minute for each axis in about 15 minutes. That would make it comparable to the DARV method I sometimes use.
After that testing, I started to tear down and pack up the car. It was later than I had wanted but my host was as always very gracious. I left his house about 2:45 AM. I had a great time and made lots of progress in my experimenting and debug.
Now for the particulars of the Saturn Image above:
- Scope = Celestron 11" EdgeHD at 2800mm native focal length
- Camera = Canon T2i DSLR in Crop Video mode at ISO 400
- Software = Captured with Canon EOS Utility Live View Shooting Mode
- Total Video Capture = 5m 8s (18,488 frames) at 60 fps
- Frames in Final Stack = 601
- Processing = Initial Wavelets in Registax, Upsized in PaintShopPro, Deconvolution and noise reduction in PixInsight.
Public OutreachFeb 15, 2013
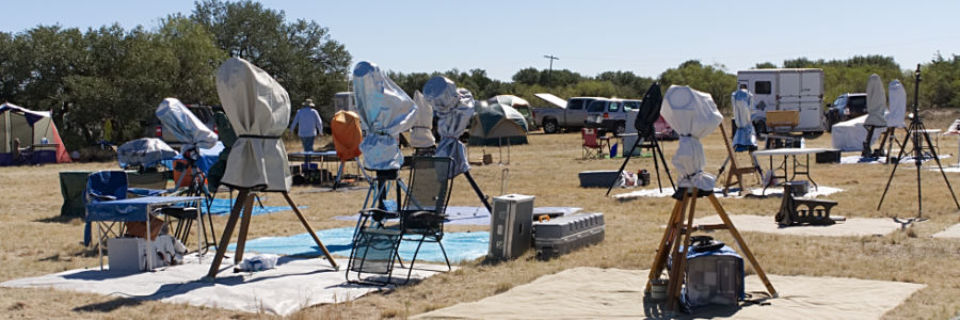
ObservingMy local astronomy club has always been relatively active with respect to public outreach and education. Last month, we had a heavier than average load. It seems that January was the month for concluding Science Fair projects in the local school district. We did two star parties for elementary schools, one star party for a middle school, and one public open house night at the Observatory of a local university. Each of the school star parties was held on the night the students showed off their Science Fair projects to parents and other students.
Even though our club is relatively small, consisting of only about 25 members, we generally have a good turnout for these events. We have been able to manage between six and eight telescopes at each of our events this year. I find these events to be a lot of fun. I really like the comments and expressions from both students and their families upon first seeing objects with their own eyes through the telescope. Hopefully, these events will serve to spark an interest that just might become a lifelong avocation for a few of the young hearts and minds we interact with.
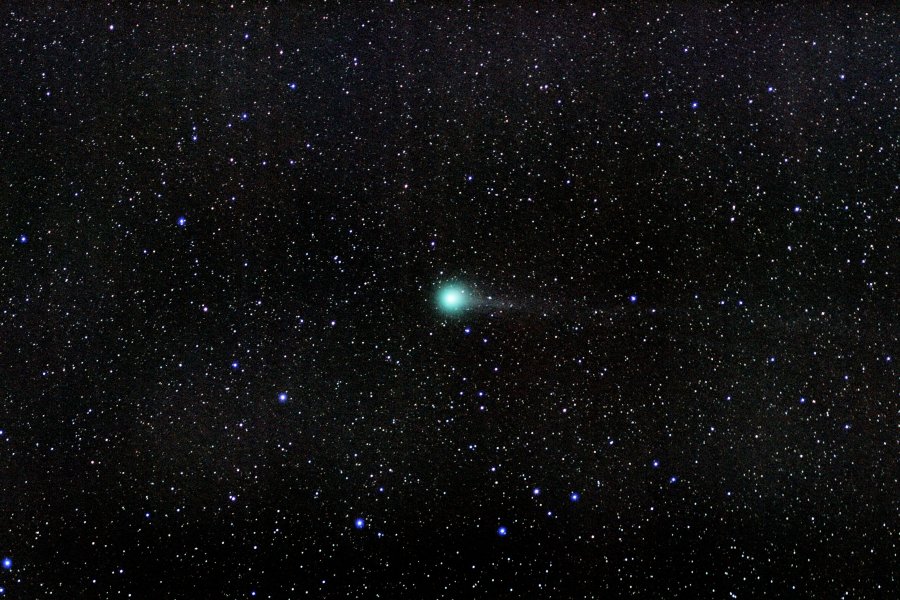
Comet Lovejoy From School Star PartyJanuary 17, 2015
AstrophotographyObservingThe attached image here is a quick and very dirty processing of comet Lovejoy as seen from Deerpark Middle School in Jolyville this evening. Photo details are shown below. The sky conditions at the public star party were pretty mediocre. The comet should look *much* better in a dark sky and should take longer exposures pretty well. The 30 second exposures put the sky background up to about half the maximum pixel counts for the camera and could be extended for better capture of the tail although it would have better to shorten the exposures and simply take more of them. Since this was being done live at a public outreach star party, the longer exposures worked better in this case.
Image Capture Particulars:
- Date: 2015/01/16
- Time: 8:45 PM
- Camera: Canon T2i Piggybacked on telescope
- Lens: Canon 85mm F/1.8 Operating at F/2.0
- Image Stack: 14 Exposures
- Exposure Time: 30s subexposures
- ISO: 800
- Darks: 9 @ 30s (No flats or bias)
Image Processing Particulars Within PixInsight:
- Calibrate with integrated Dark,
- Align on Stars (Not the comet in this quick and dirty version.),
- Stack subexposures,
- Color correction on background,
- Gradient removal,
- Histogram stretch - slight,
Image Processing Particulars Within PaintshopPro X6
- Crop image to more appropriate size and framing,
- Noise reduction - slight,
- Quickie deconvolution to clean up stars,
- Final histogram stretch,
- Resize to 900x600,
- Compress and export to JPG
I exposed at F/2, ISO-800, and 30 seconds. The exposures were almost pure white (or pink due to the poor low light color balance under the light polluted skies). My RAW image background pixel counts were around 210 of 255 max per channel in Canon's Digital Photo Professional software tool. The core of the comet was fully saturated at 255 counts. When imported into PixInisght, they were read and converted as 16 bit even though the camera is 14 bit depth and resulted in counts of about 16,000 of 65,535 making the background (and everything else) appear darker. The bright skies in Jolyville ate up most of my dynamic range. The photo could have been much better from darker skies.
As far as the quickie deconvolution I did, I use a Photoshop Plug-in called FocusMagic. I bought it about ten years ago and love it. It can improve the focus on many photos through deconvolution and in this case, I used it in "Motion Blur" mode where it can do directional deconvolution. It works great inside PaintShopPro but also comes with a standalone tool which works by itself.
I have always done most of my astro-processing using astro-imaging tools -- Nebulosity, PixInsight, etc. I tend to finish the final presentation tweaking in PaintShopPro; such things as resizing, targeted compression, and conversion to JPG. I tend to lean to the side of treating astro-images as data rather than art. (That hasn't always been the case for me.) I try to avoid using artistic license when processing astro-images now. For that reason, I lean towards the philosophy of "if PixInsight can't do it, it shouldn't be done to the image". (David Ault has greatly influenced my thinking in this area.)
I heavily use plug-ins for my normal photographs. I have the Topaz suite of plug-in tools as well as FocusMagic. In the case of quick and dirty images like this comet image, I do sometimes use these. For my other images, PixInsight is used for all the heavy lifting and PaintShopPro is used only for final output optimization.
Table of Contents
Public Use WorkshopsJan 04, 2013
Public Use WorkshopsJan 04, 2013
MetalworkingWoodworkingI recently became aware of an interesting alternative to the home workshop for ATMers. A new business opened in our area which provides a working space and a variety of hand and machine tools for hobbyists, inventors, and small businesses. This business is called Tech Shop. As it turns out, there is also a second alternative available in our area which is called Hacker Space. These public use workshops are available in several cities across the country.
The concept behind Tech Shop or Hacker Space is that members pay a monthly membership fee and then may use the tools which are available on the premises. Before using the more complex (and dangerous) power tools in the shop, the user must take a required safety class for that tool. Once the safety classes are successfully passed, the user may sign up for as much usage on that tool as they would like. (Some tools may also require a small hourly usage fee to cover consumables.) An online Web site is usually used to show the availability of the tool so that the user can pick and reserve their times for usage. Hours of operation vary but the workshops are generally available from early morning until midnight.
At the local Tech Shop, there's a wide variety of tools from which to choose. The business is divided up into separate rooms housing a wood shop, a metalworking shop, a welding shop, a paint / powder coating shop, and a machine shop. In addition, there are several laser cutters, a water-jet cutter, and a 3-D printer. There are also computers set up as design stations so that the members may use varying types of CAD Software to design their project. An ATM would be hard-pressed to think of a tool which is not available in the Tech Shop.
While the cost of membership and the required safety and training classes for the machine tools are not inexpensive for a hobbyist, some projects an ATM might not otherwise consider suddenly become possible and somewhat affordable when considering the alternatives. One example which comes to mind is use of the water-jet cutter. An ATM or club could buy large slabs of raw glass and easily cut blanks of varying sizes as required. The CNC ShopBot panel cutter in the wood shop is another example. A complete set of Dobsonian telescope parts could be cut from one or more sheets of plywood very quickly and with exceptional accuracy.
For an ATM with limited space availability, these public use workshops could be put to great use. If you have a specific project in mind, a quick web search might turn up a Tech Shop or Hacker Space in your area. The businesses generally provide free tours for prospective members. These public use workshops are dream come true for the avid do-it-yourselfer.
Table of Contents
Public Use WorkshopsJan 04, 2013
Public Use WorkshopsJan 04, 2013
WoodworkingMetalworkingI recently became aware of an interesting alternative to the home workshop for ATMers. A new business opened in our area which provides a working space and a variety of hand and machine tools for hobbyists, inventors, and small businesses. This business is called Tech Shop. As it turns out, there is also a second alternative available in our area which is called Hacker Space. These public use workshops are available in several cities across the country.
The concept behind Tech Shop or Hacker Space is that members pay a monthly membership fee and then may use the tools which are available on the premises. Before using the more complex (and dangerous) power tools in the shop, the user must take a required safety class for that tool. Once the safety classes are successfully passed, the user may sign up for as much usage on that tool as they would like. (Some tools may also require a small hourly usage fee to cover consumables.) An online Web site is usually used to show the availability of the tool so that the user can pick and reserve their times for usage. Hours of operation vary but the workshops are generally available from early morning until midnight.
At the local Tech Shop, there's a wide variety of tools from which to choose. The business is divided up into separate rooms housing a wood shop, a metalworking shop, a welding shop, a paint / powder coating shop, and a machine shop. In addition, there are several laser cutters, a water-jet cutter, and a 3-D printer. There are also computers set up as design stations so that the members may use varying types of CAD Software to design their project. An ATM would be hard-pressed to think of a tool which is not available in the Tech Shop.
While the cost of membership and the required safety and training classes for the machine tools are not inexpensive for a hobbyist, some projects an ATM might not otherwise consider suddenly become possible and somewhat affordable when considering the alternatives. One example which comes to mind is use of the water-jet cutter. An ATM or club could buy large slabs of raw glass and easily cut blanks of varying sizes as required. The CNC ShopBot panel cutter in the wood shop is another example. A complete set of Dobsonian telescope parts could be cut from one or more sheets of plywood very quickly and with exceptional accuracy.
For an ATM with limited space availability, these public use workshops could be put to great use. If you have a specific project in mind, a quick web search might turn up a Tech Shop or Hacker Space in your area. The businesses generally provide free tours for prospective members. These public use workshops are dream come true for the avid do-it-yourselfer.
Table of Contents
Saturn On A Summer's NightJuly 11, 2015
Comet Lovejoy From School Star PartyJanuary 17, 2015
Saturn On A Summer's NightJuly 11, 2015
AstrophotographyObservingI spent the evening with a fellow astronomy club member at his back yard observatory last night. The night started off looking a little iffy but turned out great. I started hauling my monster HDX110-EQG mount and Celestron 11" EdgeHD scope from his driveway to the yard about 8:00 PM. It took about 45 minutes to get set up.
Once it was dark enough to see Polaris, I did a very rough eyeball polar alignment and then viewed Saturn, Jupiter, and Venus in the scope. Saturn looked very good but Jupiter was terrible. While it was lower in the sky than Saturn, the difference in seeing across the sky was much greater than might be expected. Venus showed a much cleaner disk. It was fun to see that Venus's disk was visibly larger than Jupiter. While no real hint of cloud features were visible on Venus, the large sharp crescent was quite pretty.
After checking out a few functions on the mount, I went back to Saturn and hooked up my Canon T2i to the scope. I used it to take several videos of one minute length at 60 frames per second. The view on the live viewfinder was really nice. I have done some work on the video capture and have attached the resulting image above Specifics of the image are shown at the bottom of this post.
After getting the DSLR video of Saturn, I switched cameras and tried to get some images with my SPC900N Web camera. I had lots of software issues with this and the view just wasn't as good as with the DSLR. I captured a couple of videos and will attempt to process them later but don't expect anything worthwhile to come from this effort.
Following the frustration of the Web Camera, I hooked up my Orion StarShoot Pro Guider (monochrome) camera and repeated the process of getting videos of Saturn. I had wanted to try the three different cameras just to see how they compared for planetary photography. The small pixels in the guider seemed to work well for this use. The images on the live screen looked better than those from the Canon DLSR.
Finally, I did some testing of PHD2 v2.5.0 to see if I could get it to work. I have previously had lots of problems with PHD2. It would never see the stars I could see in the screen. I'd click on a star to guide with and it would just complain there was no star in that position. Starting PHD1 without moving the scope, I could see and click on that same star and PHD1 would happily calibrate and start guiding. Last night, the new version of PHD2 worked much better.
I tested guiding for a while and verified that the new camera and PHD2 played nicely with each other. As a final test for the night, I used the Polar Alignment Wizard in PHD2 to do a real drift alignment. I really like the function. Overall, it took me about 45 minutes to get aligned but much of that was learning what to do and how to use the program. In the end, I was able to reach a polar alignment error of less than 30 arc-seconds in both altitude and azimuth for the mount. I think with a couple more time of practicing, I could get under 1 arc-minute for each axis in about 15 minutes. That would make it comparable to the DARV method I sometimes use.
After that testing, I started to tear down and pack up the car. It was later than I had wanted but my host was as always very gracious. I left his house about 2:45 AM. I had a great time and made lots of progress in my experimenting and debug.
Now for the particulars of the Saturn Image above:
- Scope = Celestron 11" EdgeHD at 2800mm native focal length
- Camera = Canon T2i DSLR in Crop Video mode at ISO 400
- Software = Captured with Canon EOS Utility Live View Shooting Mode
- Total Video Capture = 5m 8s (18,488 frames) at 60 fps
- Frames in Final Stack = 601
- Processing = Initial Wavelets in Registax, Upsized in PaintShopPro, Deconvolution and noise reduction in PixInsight.
Comet Lovejoy From School Star PartyJanuary 17, 2015
AstrophotographyObservingThe attached image here is a quick and very dirty processing of comet Lovejoy as seen from Deerpark Middle School in Jolyville this evening. Photo details are shown below. The sky conditions at the public star party were pretty mediocre. The comet should look *much* better in a dark sky and should take longer exposures pretty well. The 30 second exposures put the sky background up to about half the maximum pixel counts for the camera and could be extended for better capture of the tail although it would have better to shorten the exposures and simply take more of them. Since this was being done live at a public outreach star party, the longer exposures worked better in this case.
Image Capture Particulars:
- Date: 2015/01/16
- Time: 8:45 PM
- Camera: Canon T2i Piggybacked on telescope
- Lens: Canon 85mm F/1.8 Operating at F/2.0
- Image Stack: 14 Exposures
- Exposure Time: 30s subexposures
- ISO: 800
- Darks: 9 @ 30s (No flats or bias)
Image Processing Particulars Within PixInsight:
- Calibrate with integrated Dark,
- Align on Stars (Not the comet in this quick and dirty version.),
- Stack subexposures,
- Color correction on background,
- Gradient removal,
- Histogram stretch - slight,
Image Processing Particulars Within PaintshopPro X6
- Crop image to more appropriate size and framing,
- Noise reduction - slight,
- Quickie deconvolution to clean up stars,
- Final histogram stretch,
- Resize to 900x600,
- Compress and export to JPG
I exposed at F/2, ISO-800, and 30 seconds. The exposures were almost pure white (or pink due to the poor low light color balance under the light polluted skies). My RAW image background pixel counts were around 210 of 255 max per channel in Canon's Digital Photo Professional software tool. The core of the comet was fully saturated at 255 counts. When imported into PixInisght, they were read and converted as 16 bit even though the camera is 14 bit depth and resulted in counts of about 16,000 of 65,535 making the background (and everything else) appear darker. The bright skies in Jolyville ate up most of my dynamic range. The photo could have been much better from darker skies.
As far as the quickie deconvolution I did, I use a Photoshop Plug-in called FocusMagic. I bought it about ten years ago and love it. It can improve the focus on many photos through deconvolution and in this case, I used it in "Motion Blur" mode where it can do directional deconvolution. It works great inside PaintShopPro but also comes with a standalone tool which works by itself.
I have always done most of my astro-processing using astro-imaging tools -- Nebulosity, PixInsight, etc. I tend to finish the final presentation tweaking in PaintShopPro; such things as resizing, targeted compression, and conversion to JPG. I tend to lean to the side of treating astro-images as data rather than art. (That hasn't always been the case for me.) I try to avoid using artistic license when processing astro-images now. For that reason, I lean towards the philosophy of "if PixInsight can't do it, it shouldn't be done to the image". (David Ault has greatly influenced my thinking in this area.)
I heavily use plug-ins for my normal photographs. I have the Topaz suite of plug-in tools as well as FocusMagic. In the case of quick and dirty images like this comet image, I do sometimes use these. For my other images, PixInsight is used for all the heavy lifting and PaintShopPro is used only for final output optimization.
Table of Contents
Raspberry PiJan 16, 2013
Raspberry PiJan 16, 2013
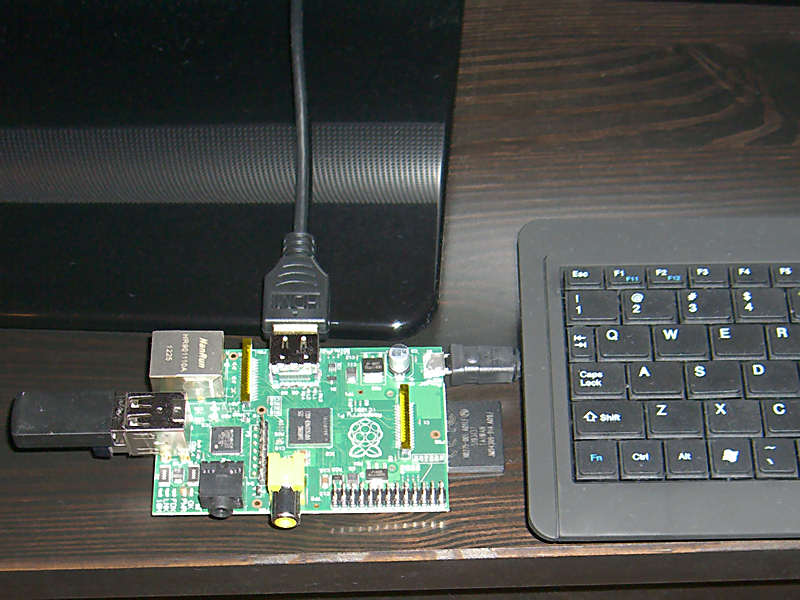
ElectronicsIf you like to dabble in computer electronics as I do, you have probably already heard of the Raspberry Pi. The Raspberry Pi is a very low cost single board computer that runs a version of the Linux operating system. At a base cost of only $25, the Raspberry Pi is well-suited for inclusion in many ATM projects. This system only became available during the summer of 2012. As production is being ramped up, they are in generally short supply.
In spite of the low cost, the Raspberry Pi is a very capable system. It includes a processor, 512 MB of RAM, two plug and play USB ports, a video interface featuring HDMI or composite video output, an audio output, and an SDHC board socket to be used as a solid-state drive. It also includes a GPIO port for interfacing to custom hardware. For $10 more, a version with an Ethernet port and RJ45 connector is available. The unit receives its power input from a micro USB port which can be driven from any USB phone charger rated at 1 amp or better.
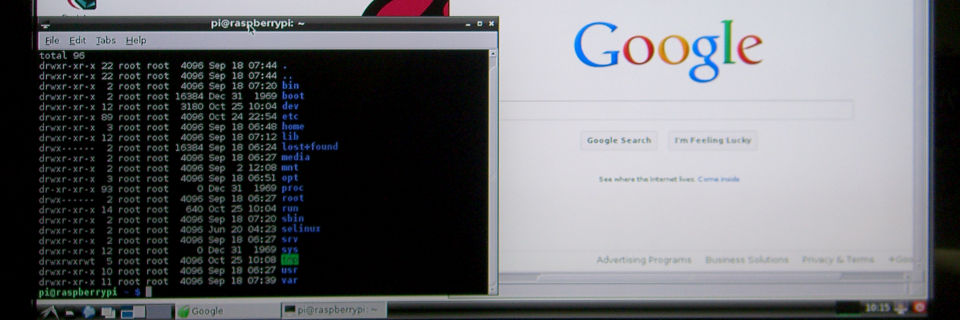
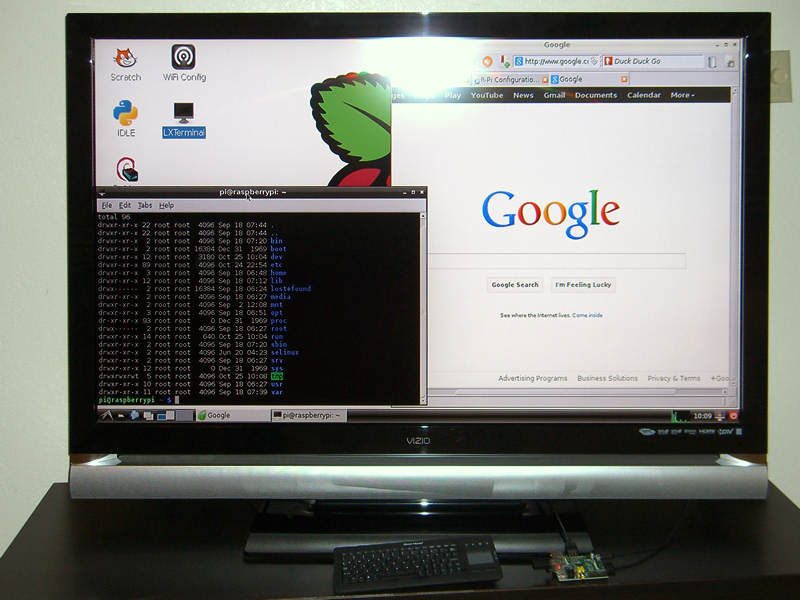
The operating system is loaded to the SDHC card which is then plugged into the unit. A modified version of the Debian Linux distribution is used. The operating system is configured with a version of X Windows if you prefer a GUI interface over a command line interface. (See Figure 1.) The Python programming language is loaded and ready for use in writing scripts.
This system will not replace your desktop although it is more than powerful enough for many embedded applications. Expect about the same processing power as you would from a modern smartphone. To get the system up and running, just plug in the SDHC card (your solid-state drive), a USB keyboard and mouse, and provide a network connection. In my case, I used a wireless USB keyboard and wireless USB Wi-Fi adapter as seen in Figure 2. Apply power from the phone charger and away you go.
The potential uses for the ATM are many. Telescope controllers, observatory controllers, and optical test configuration controllers all come to mind. Some projects could be built without resorting to interfacing to custom hardware. One such use might be an intermediate file server and controller for a DSLR camera. Linux software is available to drive many DSLR's. I could envision a Raspberry Pi intermediary controlling the acquisition of images from a DSLR, storing them on the solid-state drive, and then relaying them via wireless network to a remote computer.
Another similar use might be the control of a Foucault tester or an interferometer. A simple hardware interface to motors for positioning the tester could be controlled from the Raspberry Pi. The system could also control a DSLR for gathering image data for test reduction. Use your imagination. There must be literally hundreds of ATM uses for an embedded system like the Raspberry Pi.
I was able to order a Raspberry Pi from eBay last month and hope to be building a project with it later this year. Of the many projects that come to mind, I just need to choose one that is achievable by a beginner. So far, all I have done is connected up to a monitor, power, and my wireless home network and played with the base functionality. I have found it easy to work with and have loaded several standard Linux packages for it including GIMP and gPhoto2.
Table of Contents
Blog Post - Datedate of entry
Blog Postdate of posting
category-tagThis is a sample blog post. It serves as a placeholder for a future short article. Blog postings here can cover any number of subjects related to amateur telescope making, astronomy, space science, or some only peripherally related DIY activity. To seed this website, a number of my writings will be transcribed here from both public astronomy forums as well as posting I have made to my local club's private discussion forum. Each blog post is tagged with the categories into which it best fits. The categories are linked back to the Blog Topical Index. In this way, the reader of a posting can quickly jump to other postings covering similar subjects.