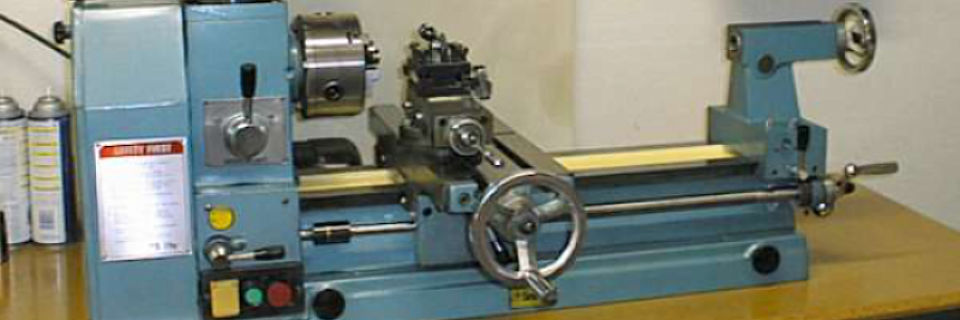
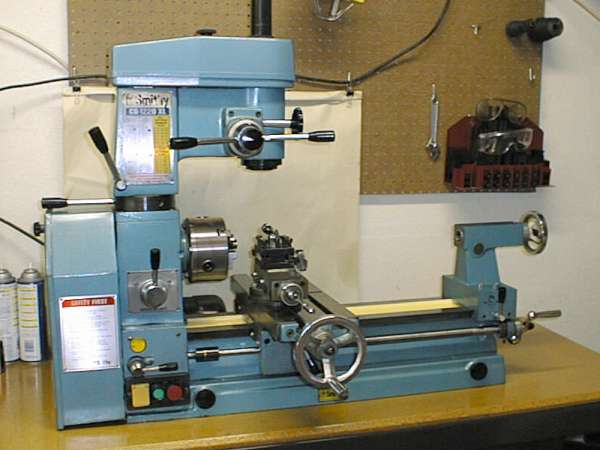
The Smithy CB1220XL Review
A Compact Combination Lathe-Mill-Drill
John D. UptonApril 15, 2001
If you are cramped on workshop space or on a tight budget, a 3-in-1 combination metalworking machine may fill the bill. While not as versatile as a separate lathe, milling machine and drill press, these machines are capable of performing all the functions required for machining a wide variety of precision parts for your telescope projects. Read further for the details.
Note: This article describes the older model of the Smithy CB1220XL. The current model, called the Midas 1220XL, now features English dials and lead-screw and a half-nut for easier threading operations. I have been told that an upgrade to these features may be offered in the future for the older model that I have.
I have long been interested in metalworking; more so than woodworking, though I am learning to enjoy that activity also. Over the years, I have had the pleasure to occasionally have access to machine shop equipment for working on some of my projects. I had long wanted a small metalworking shop of my own where I could machine small parts for my telescope projects. Finally in 1996, I decided that the time had come to look seriously at getting a small lathe and possibly a milling machine to use in my garage whenever I wanted.
As I began to look at my own shop space and machining requirements, I realized that anything I ended up purchasing would be much less than I would like. It is a reality most of us face -- too little money, too little space, and too large dreams. I knew that my own choices would be governed more by space than anything else. The options I had were:
- Buy only a medium sized lathe and use my drill press for light duty milling.
- Buy only a medium sized lathe and add on a small tool post milling attachment.
- Buy a separate small bench-top lathe and milling machine.
- Buy a medium sized three-in-one combination lathe / mill / drill.
- Buy a new home with large workshop and equip it with full sized used machines.
I immediately (and regretfully) eliminated the last option. Reading the USENET newsgroup rec.crafts.metalworking for a few months helped me eliminate the first option also. Many folks with much more metalworking experience than I presented evidence and opinions that milling on a drill press is not a viable long term option. The side loads on the spindle bearings can become too high and cause premature wear and ultimately failure. In addition, it was pointed out that drill chucks are also not made for the heavy side loads encountered while milling. The chucks have been known to disintegrate, sometimes violently, when used in this way. This knowledge eliminated option one on my list.
The second option on my list has been used by many for years and is generally recommended as a good way to get started with light milling. The main limitation is that the maximum length of cut is governed by either the milling attachment or the lathe's cross-slide, depending on the type of setup. Not knowing exactly how large some of my milling cuts might be, I was reluctant to commit myself to milling only on the lathe.
After thinking about the kinds and sizes of parts I would be making on the machine(s), I eliminated the third option rather quickly. Small bench-top machines of the type produced by Sherline enjoy an admirable reputation. I just felt they would be a bit too small for many of my purposes.
After more or less eliminating the other choices, I was left with looking at the compromises of a three-in-one machine. In general, the rec.crafts.metalworking newsgroup membership has a low opinion of these machines. The reasons most often cited are: all the machines are imported; many have metric dials; many are incapable of performing threading operations or make it very difficult; many have a fixed, restrictive milling head spindle height; most have very small lathe spindle hole sizes; most have a limited distance between centers; all can require "dramatic" setups for even simple machining operations; all require you to do a lot of work to change over from a turning operation to a milling operation; and none are as rigid as a large lathe or milling machine. Thus the usual advice is to find the extra space somehow and buy large used American machine tools.
These are all very valid arguments against a three-in-one machine. I too, would love to have a 6000 pound super-rigid combination 14"x40" quick change lathe and 12"x48" knee mill that fits into an area four feet wide by five feet high by two feet deep -- and costs less than $2000. It just isn't going to happen... Since I was not attempting to set up a production shop, many of the concerns were not completely valid for my situation. If it takes a half hour to change over from lathe to mill operation, it only detracts from my hobby time. I enjoy working in the shop, even if the time isn't 100% productive. In terms of tool rigidity and horsepower, I can overcome those obstacles by taking smaller cuts. The final accuracy is the same, it just takes me longer than a machinist doing work for hire on larger, more powerful machines.
The three-in-one machine limitations that remain as compromises for the hobbyist are centered around size and the machine's feature list. This is where you must choose between cost and function. Try to envision as many of the possible uses for your machine as possible and use the information to rate the prospective machines you find.
In the lower cost hobbyist portion of the machine tool market, there are four main competitors with three-in-one machines. These are Grizzly Industrial, Harbor Freight Tools, Shoptask (now ShopmasterUSA), and Smithy. There may be others, but these are the companies most often mentioned in this market.
Soon after gathering all the specifications, I had narrowed my choice to Shoptask and Smithy. An important aspect of my purchase choice was going to be service after the sale, if needed. I was not able to get any more details on the Harbor Freight and Grizzly machines than appears in their respective catalogs. (I like dealing with Grizzly. Their customer service is usually quite helpful, but the lack of detailed specification on their 3-in-1 machine forced me to drop them from consideration.)
I studied the specifications for the Shoptask and Smithy machines carefully, comparing all the features and ranking the features I thought most important. From reading the specifications, I began to form a view of how the machines would perform in various aspects of my use. My final decision came down to the following key factors. I considered each feature important to me and gave the edge to one or the other machines.
- Dual Motors - lathe and mill powered by separate motors for additional flexibility. => Shoptask
- Lathe Size - maximum turning size for lathe (17" vs. 12"). => Shoptask
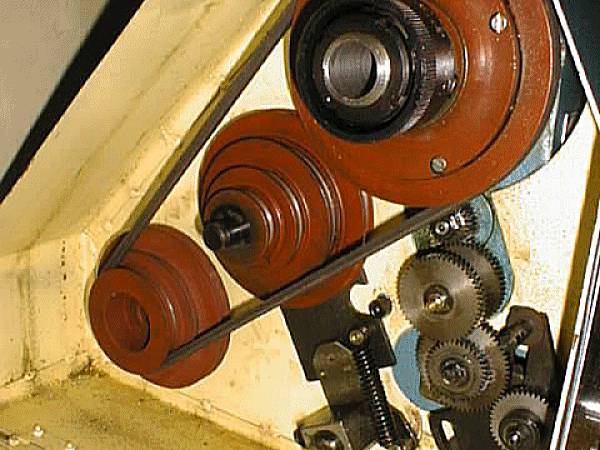
- Milling Height Flexibility - adjustable range of mill spindle height. => Smithy
- Machine Rigidity - how rigid (perception) are the lathe and mill. => Smithy
- Customer Service - how available was customer service to answer pre-sale questions. => Smithy
After a lot of thought, I decided on the Smithy for a couple of reasons. Perhaps foremost was my conversations with the companies. The Smithy folks did not seem to mind answering specific questions regarding their machine. They took the time to answer all my questions thoroughly, offering practical machining advice at the same time. The Shoptask person I spoke to seemed to want to breeze through the questions I had and either take an order or get off the phone. (My impression was that this was a very small business and the representative thought I was taking too much time in trying to research my decision.) I felt a little uneasy about the kind of service and advice I might receive after the sale with Shoptask. They now run an online discussion forum which should alleviate that concern these days. If the company representatives cannot answer a question, other users probably can.
The second reason for choosing the Smithy machine was based on reading comments on the RCM newsgroup. Owners of the Shoptask described the difficulty in using the mill to advantage because of the fixed milling head height. On jobs requiring little clearance, the work had to be placed on specially constructed risers in order for the milling cutter to reach the part. I felt that the Smithy mechanism for raising the milling head would allow for easier set-ups at the possible cost of reduced rigidity. (Set-ups on any of these combination machines often requires some ingenuity anyway -- the Smithy just seemed like it would be a bit better.)
Finally, in spite of the much heavier weight of the of the Shoptask, I was a little concerned about overall machine rigidity. This was a subjective notion on my part. In the absence of seeing the two machines being used side by side, I felt that the added lathe spindle throw on the Shoptask might add flexure. Similarly, I was concerned that the longer mill head extension over the lathe bed (a distinct advantage) would lead to added flexure while milling.
While cost was not the deciding factor, I agonized over purchasing the more expensive Smithy machine. I had already decided to follow the often given advice to allow the machine cost to total about half of my budget. This allows for also purchasing many of the accessories and additional tooling required to do more than the simplest of projects. Choosing the Smithy meant I would sacrifice some of my tooling budget. Some tooling purchases would have to wait until later.
After procrastinating for a couple of months I finally ordered the Smithy CB1220XL. The company nearly always offers special deals and changes them from month to month. While shopping for a 3-in-1 machine, get on each company's mailing list. When a good offer comes along, then you can place your order. My machine took about three weeks to arrive. Smithy ships to the nearest Consolidated Freight terminal to your location. You must arrange to have the machine delivered or pick it up yourself. Plan on factoring this additional cost into your purchase price. In addition to the shipping charges from Smithy, it cost me another $100 to have the system delivered on a lift gate truck the final 35 miles to my home.

I chose to purchase a workbench from Sears for the machine. It is advertised as an automotive bench and could be configured with a steel top and plenty of storage drawers. I also prepared a 3/4" MDF top to put on the workbench. This has proven to work pretty well. The workbench has proven to be very sturdy and rugged in use. Though I haven't installed it yet, I had a drip pan custom fabricated at a local air conditioning service company. They routinely make drip pans for household air conditioning systems and did a nice job in making a 3/4" deep pan that nearly covers the workbench top. I have not fitted my machine for a cutting coolant system, so haven't yet installed the drip pan.
Un-crating the machine went quickly and easily. The shipping crate was very heavily constructed. Unlike some other low end 3-in-1 machines, the Smithy came to me relatively clean and ready to set up. It did not have large quantities of "cosmoline" to clear away. I found no signs of rust or any shipping damage on the machine. I followed the instruction manual to strip some parts off the machine to lighten it for lifting onto my workbench. The tailstock, mill head, and carriage were removed. The stripped machine weighed about 250 pounds and was manually lifted into place on the workbench by three people with little effort.
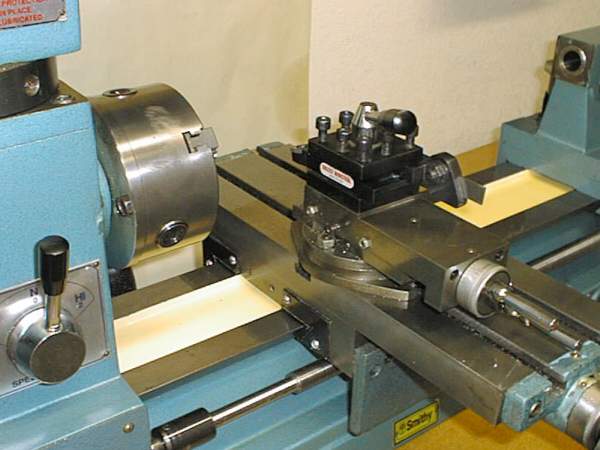
The Smithy CB1220XL, like many of its competitors comes with only the most basic of tooling. My machine came with a 5" three jaw chuck, two dead centers, a drill chuck and mandril with drawbar, an mill holder with two end mills, tilting drill vise, and a set of indexable carbide tool bits and inserts. At the time of purchase, I also ordered a 6" four jaw chuck, 6" rotary table, a milling collet set and other miscellaneous tooling. I have subsequently added a boring head, toolmaker's vise, set-up clamp set, 1-2-3 blocks, and many other accessories to the tooling. All told, I now probably have tooling that has cost more than the cost of the base machine. I am told this is normal and you should plan from the beginning on spending at least as much on tooling as the base machine. Over the years, you will undoubtedly collect and make even more.
When I first started out with the CB1220XL, I found that my limited experience on other lathes did not translate directly into instant results. I struggled somewhat with the Smithy when I first started. One of my major stumbling blocks was due to excessive backlash and the metric dials on the machine. (The newer machines have English dials.) I found that I could not make cuts to the same accuracy I had done on larger lathes. I was quite frustrated for some time.
After talking to the Smithy support staff, I made two changes. First of all, I adjusted much (but not all) of the backlash out of the carriage and cross-feed using the procedures documented in the manual. This helped a lot. My second problem was traced to having to constantly convert from metric to english units and back while making a part. I often lost manual count of the number of turns I had made on the hand-wheels and consequently ended up cutting too much or too little. The Smithy support staff suggested using a dial indicator and mini-mag holder to do my measurements with. This completely solved the problem of converting units and counting crank turns. The purchase of a couple of relatively cheap 2" dial indicators and mini-mag holders has resulted in my ability to machine even complex parts quite accurately. The only machine dial I continue to use is the compound slide holding the tool-post.
The Smithy has demonstrated ample power in most of the operations I have performed. Aluminum, brass, cold rolled steel, and tool steel (drill rod) all machine with ease when using cutting depths I am comfortable with. The only power problem I have encountered was in machining an unknown alloy of stainless steel. During cutting and parting operations with this material, the clutch which couples the motor to either the lathe or mill section kept popping to the neutral position. This problem would not occur on a machine with dual motors, though it would probably be replaced by having the motor stall or drive belts slip. Much of the problem I had might be due to lack of experience in machining stainless steel. The problem I encountered was that too shallow a cut caused work hardening and too deep a cut caused the lathe clutch to disengage under the very heavy load. After a few hours of working to find the intermediate ground, I finally finished the part. I believe I need more experience before attempting another stainless part.
I have only needed to use the lathe for a few threading operations thus far. Most of my threading needs have been such that I could use taps and dies held in the tailstock while threading the end of the part being worked. A threading tool makes these operations very easy. (I purchased an "EZ-Threader" very cheaply from Smithy during one of their over-stock sales. It had an MT-2 taper but an MT-2 to MT-3 adapter was all that was needed to put it to use on my machine.)
Lathe threading on my older model machine is something of a scary process. Since the older machines do not have a half-nut, threading up to a shoulder means making most of the cut and then quickly shutting the lathe power just in time for the tool to stop right before gouging into the shoulder at the end of the cut. The tool is then backed out slightly and the machine reversed until it reaches the starting point again. The tool is advanced a bit deeper and another cut is made in the same way. I've done it successfully each time by being very, very cautious, but would jump at the chance to retrofit my older machine with the half-nut capability found on the latest model CB1220XL machine.
I have had no problems with manually changing the threading gears. Since I have not done a lot of direct lathe threading, I have found little need for a quick change gearbox. I simply leave the machine set to a relatively slow feed for doing power fed roughing cuts. I usually do the final cut with a slow manual feed.
I have found milling on the Smithy quite easy. I have encountered no problems with machine power or flexture of the mill head assembly. Again, I do not take industrial size cuts, but the machine does all I ask. Possibly the best milling feature of the Smithy is the adjustable mill head height. This feature lessens the times that you have to assemble strange raised setups to reach your cut.
The relatively short spindle stroke on most mill-drills is both a disadvantage and a blessing. The advantage is that of greater rigidity compared to a spindle with greater travel. Unlike a knee mill, the spindle of a mill-drill often forces you to mount your work on risers in order for the cutter to reach. If the milling operations call for multiple operations using differing tools, you may find that the limited travel causes much grief. One example of this problem is drilling or boring a large hole in a work piece. Because of the usual difference in length between the spot or center drill bit, larger drill bit, and boring head, it may not even be possible to use all at one setup because of limited spindle travel.

Regardless of your intended use of your combination machine, one of your first tooling purchases should be a setup kit for milling. These kits are relatively low in cost and include almost everything you will need for most milling operations. They include T-nuts, step blocks, and clamps in various sizes. I also visited my local industrial bolt supplier and purchased five 3/8" bolts of each length from 1/2" to 6" along with a dozen washers. These bolts and the clamp set have allowed me to do every setup I have needed. For extra flexibility, I have also added a set of 1-2-3 blocks. For my own hobby uses, I have been satisfied with using (mid-priced) import tooling. I have avoided the absolute bargain-basement tools seen in some catalogs. I have been quite happy with the quality of both the Smithy and Grizzly tooling that I have.
One particularly nice tooling addition I have made is the purchase of an indexable carbide lathe bit holder from Grizzly. Its part number in the Grizzly catalog is G7028 / G7029. I really like this holder and the inserts. It provides much better cutting action and finish than the traditional indexable tools sets sold by Smithy and others. The only other purchase I would like to make is a quick change tool-post and holder set.
Like many others, I have also added a few home-made tooling accessories to the machine. One of the more useful was a collet adapter allowing the use of milling collet holders in the spindle bore for precision turning of standard sized round stock like drill rod. I also built a replacement tool-post holder so that I could use standard round shank boring bars for the lathe as well as milling operations.
In summary, a combination lathe-mill-drill can be a useful addition to a home shop for hobby use. This is especially true if shop space is at a premium. If you have plenty of space, buying used full size equipment may be the best approach. I don't think I would recommend use of a combination type of machine in a production environment, but they are great for most home shop uses. While I chose the Smithy, your choice should take into consideration your own requirements. Each of the major 3-in-1 machines has its own set of advantages and drawbacks. Only by carefully evaluating your uses can you decide which might be best for you.
You should approach such a major purchase in an organized, systematic way. Write down what you want to build with the machine. Try to imagine some very specific project parts. How large are they? What materials will you be working with? Research the machines that are available from different suppliers. After looking at some of the advertisements, write down the features you think may become important in your own projects. Write down any specialized tooling requirements your projects may need. Decide on a budget making sure you include enough for an initial set of tooling so you can actually build something after the machine arrives.
Now, with your lists in front of you, go through the brochures for each machine and rank them against your feature and tooling lists. After evaluating each machine, you will have to make your choice. Usually, there will be no clear winner. Like the machines themselves, your choice will a compromise. No machine will be perfect for all uses, but any machine is better than none.