Computer Control Of A SynScan Mount
Control Your SkyWatcher Or Orion Mount From A PC
John D. UptonMarch 14, 2018

Connecting your SynScan (SkyWatcher or Orion) telescope mount to a PC is not very difficult once you decide on a particular set of features, methodology, and hardware you wish to use. In this article, your choices for making the connection will be outlined and detailed connection methods described. These methods are suitable for both visual use as well as astrophotography.
Connecting a SynScan telescope mount to a computer for control can give the user a number of additional useful features over using the supplied hand controller. Foremost among these new capabilities is the ability to simply click on an object shown in a sky mapping program on the PC and have the telescope move to that object. There are multiple methods for allowing a PC to control a SynScan mount. The fact that multiple methods exist seems to often lead to a lot of confusion for many first time users. I have noted that there are often requests for help posted on online astronomy forums from new users trying to make a connection work.
Unfortunately, because of the multiple connection methodologies, answers are often muddled as multiple respondents answer only a different small part of the question without describing full context. (It sometimes reminds me of the old parable of multiple blind men trying to describe an elephant. Each description is technically correct but when combined, no one would understand just what an elephant looks like.) Getting multiple partial answers to questions of running a SynScan mount from a PC often leads to even more confusion on the part of the person requesting help. They are unable to get a working connection due to a mixing, matching, and combining of the partial information they receive.
In this article, I hope to clarify the methods of connecting a SynScan mount to a PC by outlining some of the more common methods that are easy to implement. Each method will be presented in a separate self-contained section. While this article will present multiple methods, the reader must keep in mind that they must choose one method only for any given observing session and follow it without regard to the other methods also described here. The three main methods will detail all the steps needed to make a functioning connection. Again, mixing in any steps from other methods will likely not work and in some cases, such improvisation can damage your equipment. You should pick a method that appears to give the features you need and follow it exactly without adding steps seen in the other method procedures.
Some SynScan Mount Basics
Before getting into the various methods for connecting a SynScan mount to a computer for control, it is best to have a basic understanding of which parts do what in a SynScan mount. First, let’s think about the electronics inside the mount body. Inside is the motor control electronics card. Its job is to run the stepper motors for the RA (Right Ascension) drive axis and the DEC (Declination) drive axis. Upon command, it can move the motors a certain number of steps in the desired direction for each axis. When driving the motors, it can control the rate at which step pulses are sent to the motors and thus, the mount slew speed. It can report status concerning the number of steps taken to arrive at its current position as well as other mount status parameters. The electronics card responds to a special command set when communicating with its outside world. In this article, I will call this command set the "Motor Control Command Communications Protocol".
The HandControl contains the “smarts” of the GoTo system. It connects to the mount through a communications port and cable. It interprets user input button pushes and then sends commands to the motor control electronics in the mount to make the mount move. The HandControl handles all set-up parameters such as location, time, and date as well as other parameters. It also handles building an internal “model” of the sky during alignment. (A model is simply a set of data which can be used to correct for polar alignment errors in the setup of the mount and minor error tolerances in the manufacturing of the mount itself.) (Note that the motor control card in the mount has no knowledge of RA, DEC, sky alignment models, or anything else stored in the hand control. The motor controller only steps the motors when told to do so by the hand controller.) The HandControl communicates with the mount body using the Motor Control Command Communications Protocol.
In addition to the mount-body-to-HandControl communications port, the HandControl also has a port for communicating with a PC. It can receive commands from the PC and report the status of the mount in terms of current location and other parameters back to the PC. The command language used to communicate with the PC is quite different from the command language used to communicate with the motor control electronics card inside the mount body. The HandControl interprets the high level commands being sent by the PC and translates them to a new set of low level commands that are sent to the motor controller inside the mount. This difference in language between the two ports of the hand controller are important to keep in mind when we connect to a PC. For the rest of this article, I will call this communication language between the HandControl and the PC the "HandControl Command Communications Protocol".
The computer from which we want to run the SynScan mount needs software to make control possible. Today, this is done using the ASCOM platform on Windows systems. (Control is also possible using the INDI platform available for multiple operating systems but those control methods are beyond the scope of this article. This article will be limited to discussing ASCOM control on a Windows PC.) Before any control from a PC is possible, the ASCOM Platform must be installed on the PC. In addition, one or more ASCOM Drivers specific to SynScan mounts must then be downloaded and installed in order to drive the mount. Two different ASCOM drivers are available depending on your needs. They will be described as we go through the connection details for the multiple methods of PC control.
Finally, the PC will also need a program to do the actual control of the mount. This is called an ASCOM Client program. It may be a planetarium program that shows you a map of the night sky, it may be a program which automates an astrophotography session, or it may be any other sort of program which needs to drive or receive status information to or from the mount (such as current RA and DEC of where the mount is pointed). A few common programs that are used as ASCOM Clients are: Cartes du Ciel, Stellarium, The Sky X Pro, SkyTools3 Pro, SGP (Sequence Generator Pro), PHD2 Guiding, CCD AutoPilot, APT (Astrophotography Tool), and many others.
Let’s look at our connection options.
How Can We Connect?
There are three main methods for connecting a SynScan mount to a PC using Windows ASCOM. There are also a number of variations on these three methods but the differences are relatively minor. The main methods will be described in detail in this article and some of the common variations for each will be mentioned as we go along. All three methods use the ASCOM telescope communications standard. Because of that, the ASCOM Platform software must be installed on the PC from which we wish to control the telescope mount. The ASCOM Platform and drivers are free for use.
In addition to the base ASCOM Platform, a driver must also be installed. We will be using one of two drivers depending on the exact method chosen. The ASCOM Platform serves to provide a common form of communications interface between software running on the PC and the driver which handles the specifics of how to talk to the mount hardware. Each piece of astronomy hardware (mount, camera, focuser, etc.) needs a different ASCOM driver (usually supplied by the hardware manufacturer) to interface between the ASCOM Platform software layer and the connected hardware. (In addition, sometimes a low level hardware driver must be installed. This low level software gets installed automatically in most cases for using a SynScan mount.)
The three main methods of connecting a SynScan mount to a PC through ASCOM are summarized below. The methods differ primarily in terms of which ASCOM Driver is used, the HandControl configuration, and the cable type for connection to the PC. For each of these three methods of connecting, I have assigned a rather arbitrary name to the method. There is no standard for this, I simply invented a name to keep the methods of connection separate in this article.
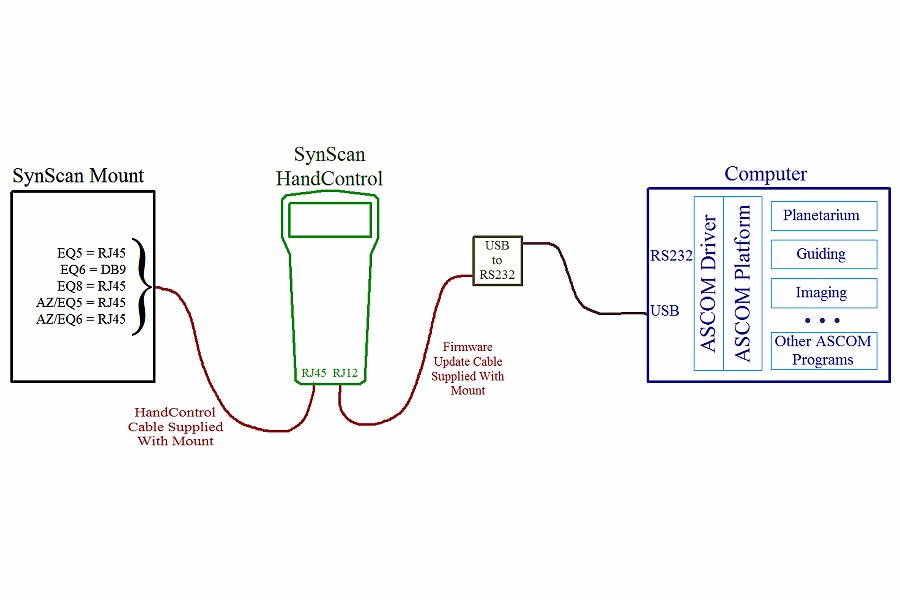
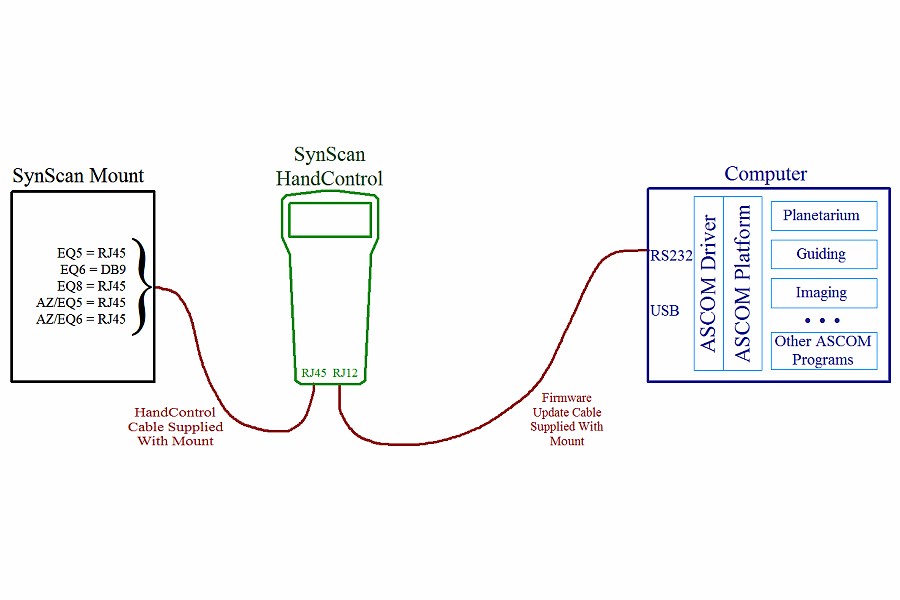
- Basic ASCOM Control Connection
- Connection: Mount -> HandControl -> PC
- Cabling: HandControl Mount Cable, Firmware Update Cable, Standard USB-to-Serial Cable
- PC Driver: SkyWatcher ASCOM Driver
- HandControl Mode: Normal
Using this connection mode, a planetarium program such as Cartes du Ciel or Stellarium will track the position of the mount as it moves around the sky and will allow GoTo control once the mount has been aligned and is ready for operation. (For simplicity, I will refer only to Cartes du Ciel but feel free use whichever planetarium program you like.) To use the Basic ASCOM Control Connection mode, you start up the mount as if it is not connected to a computer. Set your Location, Time, Date, Time Zone, etc. in the HandControl menus and then do your star alignment. You can skip a multi-star alignment and use the One Star Align method if you are well polar aligned. Otherwise a two to three star alignment will generally give better results.
Once Cartes du Ciel and the mount are connected via software, you can use Cartes du Ciel to go to objects using point-and-click or you can watch the cursor in Cartes du Ciel track the position of the telescope as you point to objects via GoTos from the HandControl. This type of connection gives you the basic functionality for moving around the sky under computer control. It also allows any other ASCOM client programs to know where the telescope is pointed at all times. For visual observing that may be all you need. GoTo accuracy, slew speed, tracking speed, and so forth are all under control of the values stored in the HandControl.
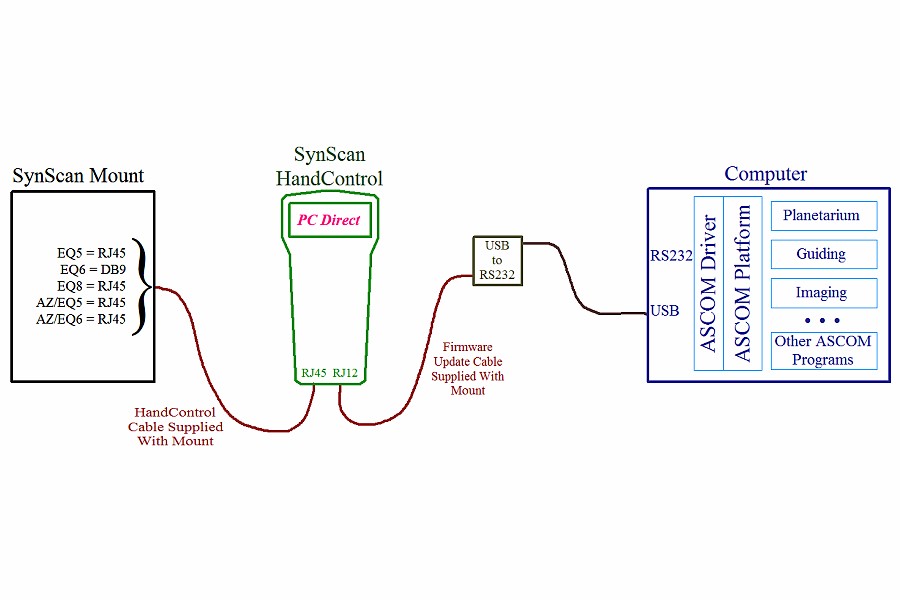
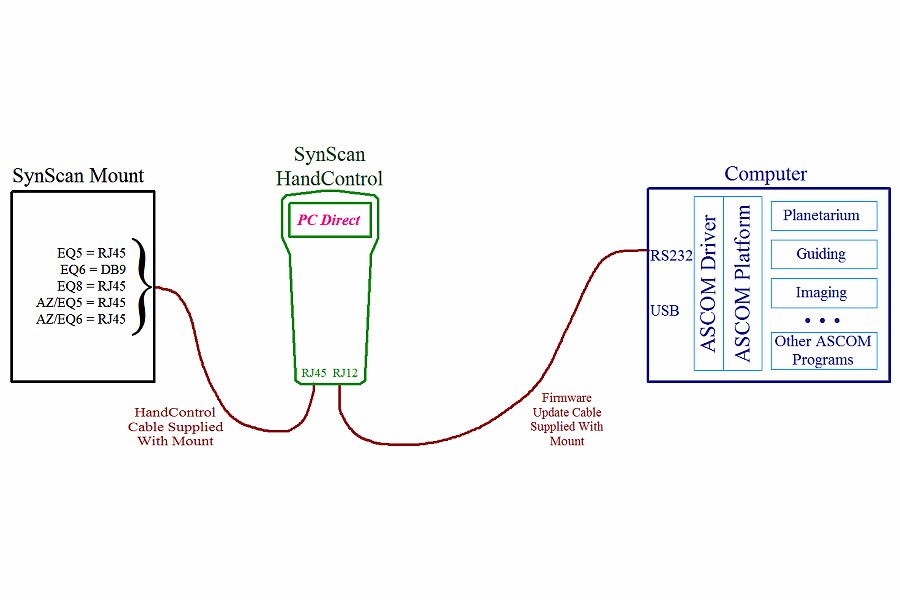
- Enhanced ASCOM Control Connection Using EQASCOM/EQMOD
- Connection: Mount -> HandControl -> PC
- Cabling: HandControl Mount Cable, Firmware Update Cable, Standard USB-to-Serial Cable
- PC Driver: EQASCOM HEQ5/6 ASCOM Driver
- HandControl Mode: PC-Direct
In this mode, Cartes du Ciel will track the position of the mount and will allow GoTo control. You do not need to set any of the parameters in the HandControl at power up time. Just take all the defaults and get to a point where you can select "PC Direct Mode". Start EQMOD running and make sure that the communications port is correctly set. Set up your location information in EQMOD. In Cartes du Ciel, connect to the mount via ASCOM using the selection for "EQMOD ASCOM HEQ5/6". Now, you can start your alignment process using Cartes du Ciel and EQMOD. (There are a number of ways to do this. I use Cartes du Ciel to do a GoTo the alignment star, center it and then do a sync. I start off with EQMOD in "Append on Sync" mode. After doing a few stars on each side of the meridian, I switch EQMOD to Dialog mode to just use the alignment data without adding more stars.)
Once Cartes du Ciel and the mount are connected, you can use Cartes du Ciel to go to objects using point-and-click. This type of connection gives you all the functionality of EQMOD. GoTo accuracy, tracking speed and such are all under control of the EQMOD driver. The Hand Controller, although physically connected, does not participate in the functionality of the system. Once it is put into PC Direct Mode (sometimes called Pass-Through Mode), it no longer translates SynScan HandControl Command Communications Protocol to Motor Control Command Communications Protocol. The ASCOM driver on the PC must use only Motor Control Communications Protocol. Only the EQMOD ASCOM driver speaks this protocol directly from the PC. When used in PC Direct Mode, the HandControl unit only acts as a bulky RS232-to-TTL level serial communications converter. (It also serves as a hardware voltage level converter. The mount's internal electronics can be damaged by the voltages of an RS232 communications cable.
Some users have reported communications reliability problems while using EQMOD through the HandControl in PC Direct Mode. It is generally recommended that once the HandControl is placed into PC Direct Mode, no buttons on the HandControl should be used. All control should be done from the PC. I have not had problems running using this method for connecting via EQMOD. I have also not had problems with using the directional slew buttons on the HandControl when using v3.36 or higher HandControl firmware. If you try this connection method through the HandControl and experience communications problems between the PC and mount, you should move to the next method described below - Advanced ASCOM Control Connection Using EQASCOM/EQMOD even though it requires purchasing a special hardware connection cable.
- Advanced ASCOM Control Connection Using EQASCOM/EQMOD
- Connection: Mount -> PC
- Cabling: TTL-Level USB to Serial Cable or TTL Signal Level Interface Adapter
- PC Driver: EQASCOM ASCOM HEQ5/6 Driver
- HandControl Mode: Unit Is Not Connected At All
In this mode, Cartes du Ciel will track the position of the mount and will allow GoTo control. You do not need to connect the Hand Controller at all. A special cable is all that is needed. Start EQMOD running and make sure that the communications port is correctly set. Check that your location information is correctly set in EQMOD. Everything else will be done just like the Enhanced ASCOM Control Connection method described above. All features are available as described in the Enhanced ASCOM Control Connection method.
Loading ASCOM and ASCOM Device Drivers
This article will use one of two ASCOM Drivers. Since they are relatively small pieces of software, you might consider downloading and installing both. That will allow you to experiment with multiple methods of connection as outlined here. (Just don't mix up steps used in one method with steps from another as it will either not work or could possibly damage your mount.) Be sure to first install the ASCOM Platform software.
The first ASCOM driver is the one written by SkyWatcher for all SynScan mounts. It will work equally well with SkyWatcher and Orion branded mounts. It may be downloaded from the ASCOM Standards Website. While it works best with mounts running later version of the mount (HandControl) firmware (versions v3.38 / v4.38 and later), it will also work for connecting mounts running older firmware with some features being unavailable. As will be discussed later, this driver talks to the HandControl using the SkyWatcher V3.0 communications protocol.
The second ASCOM driver is EQASCOM / EQMOD. This driver is written by enthusiasts of the SynScan mounts and is supported via a Yahoo User Group. The latest version of the driver may be downloaded from the Files Area of that Yahoo Group. The EQMOD driver talks to the SynScan mount using the SynScan Motor Control Command Communication protocol. For this reason, there are set-up differences for use as will be seen when we describe using two of the three connection methods.
In each of the three connection methods described below, I will use the combination of software I use. These include Cartes du Ciel (a planetarium / sky mapping program), PHD2 Guiding (the auto-guider control program), and Sequence Generator Pro (the imaging control and automation program). You can substitute your own favorite program for each of these functions. Some of the details of the dialog boxes encountered during the set-up procedure will differ but you should be able to follow along.
It's time to try a connection.
Basic ASCOM Control Connection Method
The first connection method to be described here is a little simpler than the next two. For the purposes of this article, I will call this the “Basic ASCOM Control Connection”. This method uses a simple ASCOM Driver to add computer control to the functions of the HandControl. In this mode, you will be using both the computer and the HandControl to run the mount. The HandControl will be used to initialize some settings and will be used for certain utility functions such as Parking the mount at the end of a session.
GoTo commands can be initiated from either the HandControl or a planetarium program running on the PC. Manual slewing of the telescope or centering an object in the field of view can be done using the HandControl. When using the mount for astrophotography, the mount can be connected to a guiding program such as PHD2 Guiding and an image acquisition automation program such as Sequence Generator Pro, as well as the planetarium program. By connecting to a guiding program, it will always know where the mount is pointed in the sky. The guiding program can use this information to fine tune calibration settings based on the declination of the current target and which side of the meridian the telescope is pointed. When the mount driver is connected to an image acquisition program, the program has the ability to control the mount during plate solve centering operations, do short slews to a nearby star field for automated focusing, and even slewing from one target after another during a night of automated imaging.
Below are the steps for connecting Cartes du Ciel, PHD2, and Sequence Generator Pro using the SkyWatcher ASCOM Driver:
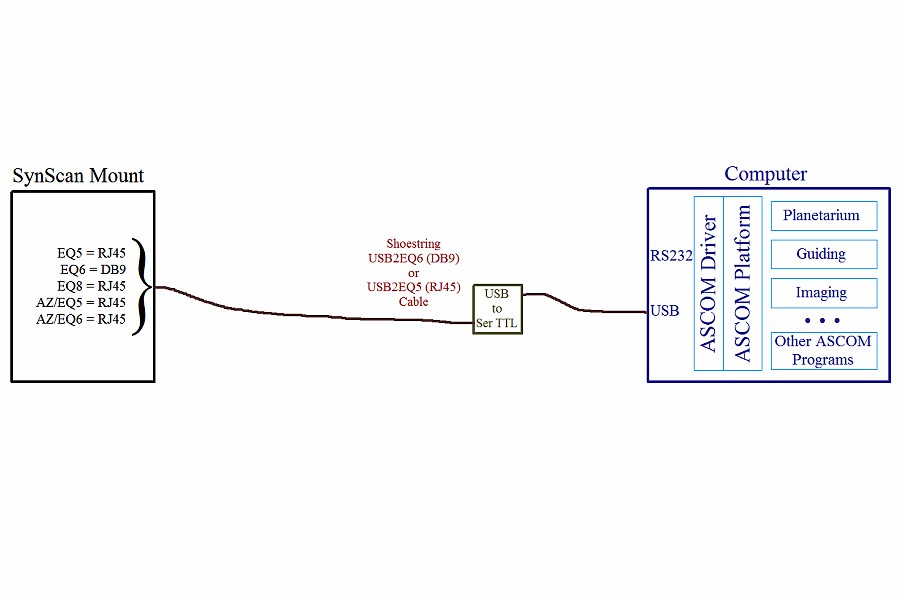
- Step 1) Cable up the mount, HandControl, USB-to-RS232 Adapter, and computer. Connect the HandControl to the mount using the standard supplied HandControl cable. Next, connect the HandControl to the USB-to-RS232 Adapter using the Firmware Update cable supplied with the mount. (This cable will have an RJ12 on one end which plugs into the HandControl and a female DB-9 connector on the other end which plugs into the USB-to-RS232 Adapter.) Finally, plug the USB-to-RS232 adapter into a free USB port on the computer (or powered USB hub, if used). Refer to Figure 1a or 1b above for a connection diagram. Use Figure 1a if you are using a USB-to-RS232 adapter / cable. Use Figure 1b if your computer has an available native RS232 Serial Port.
- Step 2) Ensure the mount is in its normal Home Position and then turn on power to the mount.
- Step 3) In the HandControl, go through the start-up settings for entering accurate Location, Date, Time, Time Zone, etc.
- Step 4) Select and perform a One, Two, or Three Star Alignment procedure using the HandControl. Do NOT put the HandControl into PC-Direct mode when using the SkyWatcher ASCOM driver to connect. You want to stay in normal HandControl operational mode when using this connection method through the SkyWatcher ASCOM Driver otherwise PC control will not be possible.

- Step 5) Start the Cartes du Ciel planetarium program on the computer.
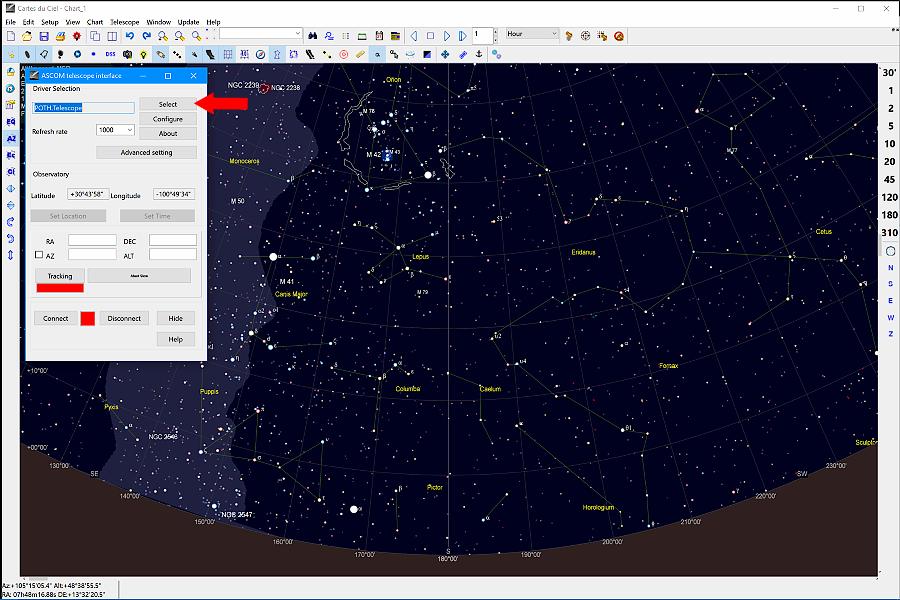
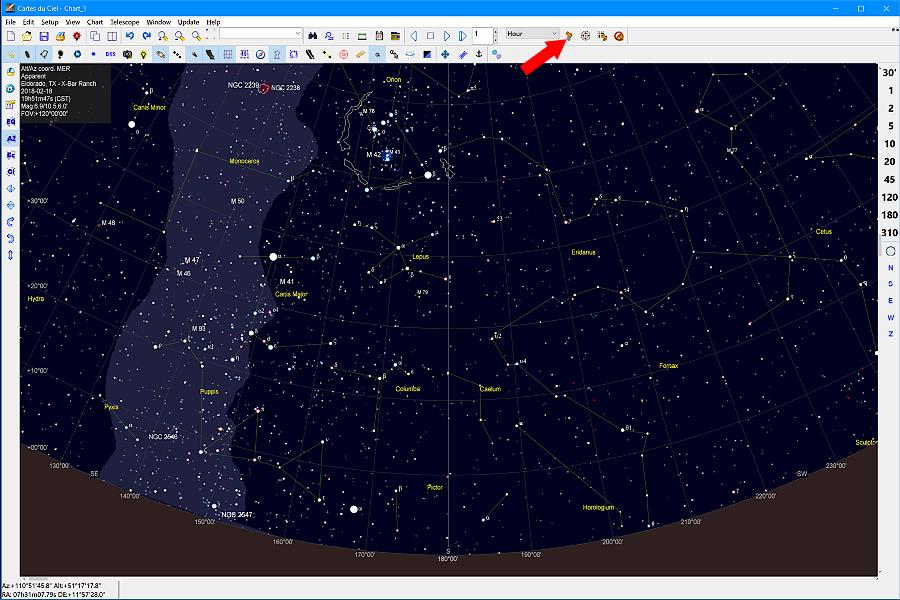
- Step 6) Select the Telescope Icon on the Cartes du Ciel Toolbar or use the menu entry Telescope | Control Panel as shown in Figure 4 at right. The Cartes du Ciel ASCOM Telescope Interface dialog box will open.
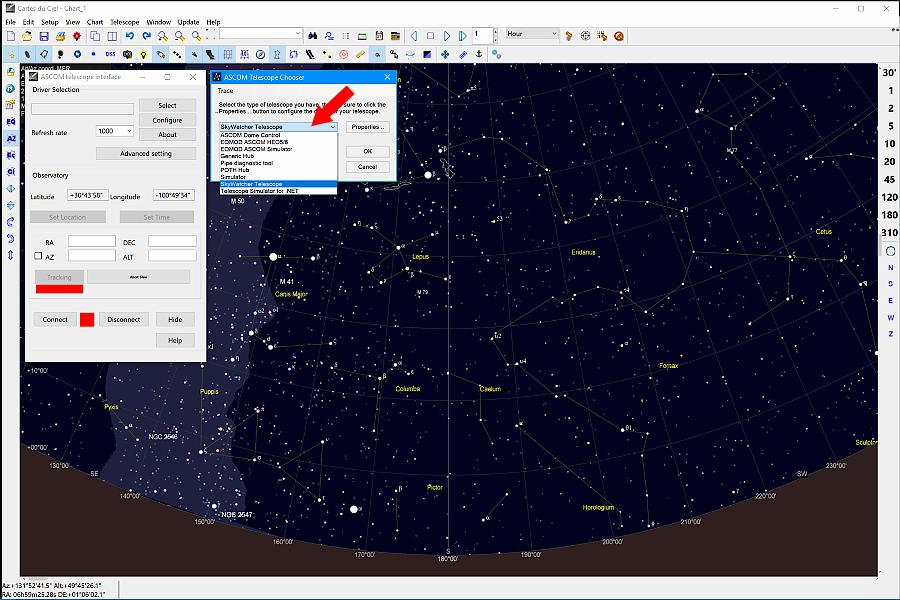
- Step 7) In the Cartes du Ciel ASCOM Telescope Interface dialog, click the Select button as shown in Figure 5. This will open the ASCOM Telescope Chooser dialog. Select the drop-down list and choose the SkyWatcher Telescope driver as illustrated in Figure 6 below.
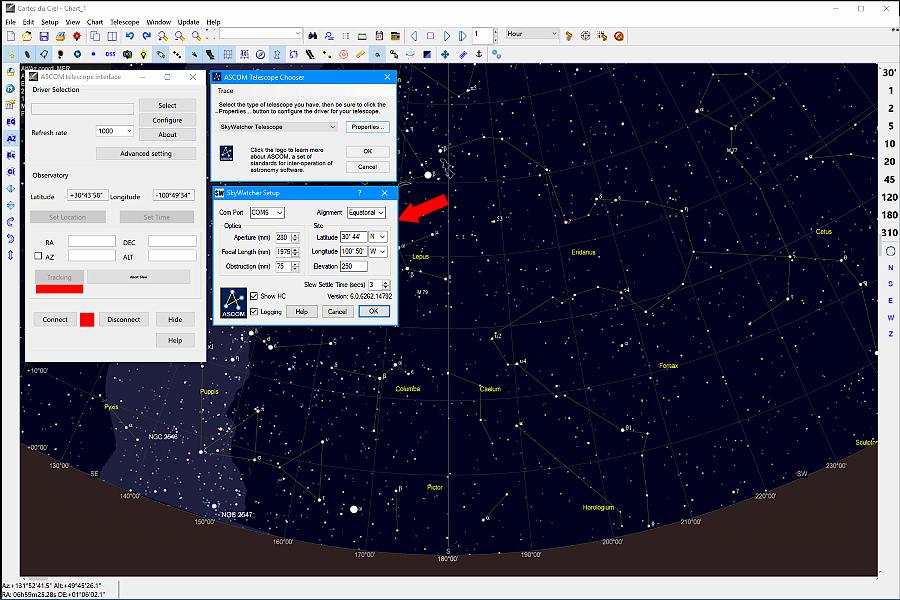
- Step 8) Having selected the SkyWatcher Telescope from the drop-down list, now click on the Properties button and the SkyWatcher Setup dialog will open as depicted in Figure 7. Fill in all the appropriate data values for your situation.
- Step 9) Verify that your communications port and mount type settings are correct as shown. Also verify your Location information as stored in the driver. It must match the values for latitude and longitude used in your planetarium program. Once everything is entered or verified, click the OK button. The SkyWatcher Setup dialog will close and take you back to the ASCOM Telescope Chooser dialog. Here again, click the OK button. The ASCOM Telescope Chooser dialog will now close leaving only the Cartes du Ciel ASCOM Telescope Interface dialog box open.
- Step 10) The Cartes du Ciel ASCOM Telescope Interface dialog box should show that SkyWatcher ASCOM driver is selected by showing that SkyWatcher.Telecope is the active interface. Now you can click the Connect button in the dialog. This will start the usage of the SkyWatcher ASCOM driver. Click Hide on the Cartes du Ciel ASCOM Telescope Interface dialog box to get it out of your way for the rest of the evening. If you need to bring it back, you can click on the Cartes du Ciel toolbar icon again as shown in Figure 4 above.
At this point, you should have something that looks similar to the default view in Cartes du Ciel as shown in Figure 4 above except that the planetarium program is now connected to the telescope mount.
There may be no immediate overt indication that anything special has happened at this point. Cartes du Ciel should probably pick up the current location of the telescope but if it doesn't, you can do a GoTo to a bright star using the HandControl. You may notice the planetarium program window scrolling to show the location of the telescope. (You can select the menu item Telescope | Track Telescope to ensure the cursor follows the telescope's movements and the window scrolls accordingly.) Once the GoTo is complete, center the target star in the field of view and then select that same star in Cartes du Ciel and press the Sync button on the Cartes du Ciel Toolbar. It will ask you to verify that the telescope is actually pointing there. Confirm that and you are ready to use Cartes du Ciel to drive the mount.
- Step 11) At this point, Cartes du Ciel is connected to the SkyWatcher ASCOM driver and can drive the telescope mount. You can use the HandControl to manually slew the telescope if desired and for centering objects. The Cartes du Ciel screen will track the telescope position. (Cartes du Ciel will always make the cursor follow the telescope but will not scroll the screen unless the Telescope | Track Telescope menu option is selected.) Since the planetarium program can also drive the mount, you can use it for GoTo commands. To GoTo a target, click on the object of interest in Cartes du Ciel. Next click the Slew icon in the toolbar. (You can also slew the telescope using the Slew command in the right-click context menu after selecting the target.)
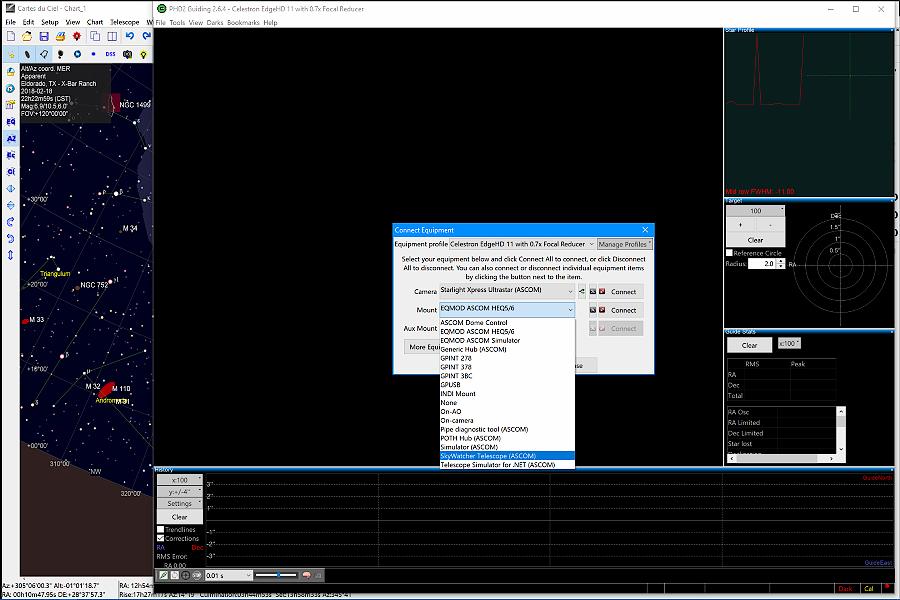
- Step 12) If you wish to use PHD2 Guiding, bring up the application and select the Connect Equipment button. In the Connect Equipment dialog, use the chooser drop-down to select the SkyWatcher ASCOM driver in either the Mount or Aux Mount boxes as shown in Figure 8 at right. (If you are using ASCOM Pulse-Guiding, make that selection in the Mount box. If you are using ST4 guiding with a cable between the mount and the guide camera, select On Camera for Mount, and also select the SkyWatcher ASCOM driver in the Aux Mount box.) Once you click the Connect button, PHD2 Guiding will be able to send guide commands to the mount.
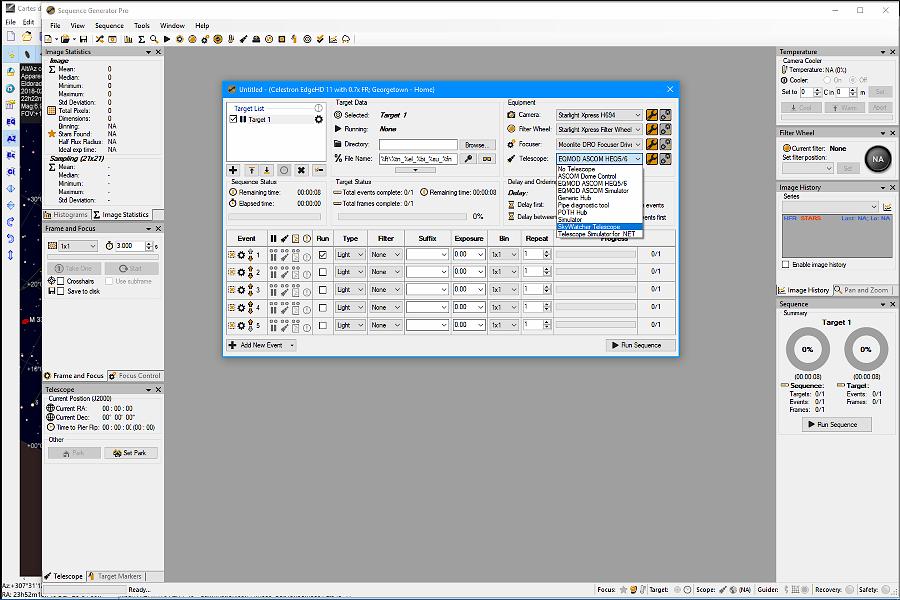
- Step 13) If you wish to use Sequence Generator Pro, bring up the application and select the Telescope drop-down button. Choose the SkyWatcher ASCOM driver for the telescope mount as shown in Figure 9 above. Click the Connect button to connect the mount. Sequence Generator Pro will now also be able to control mount slews and automated plate solve centering. It will also be able to slew away from your current target for focusing and then slew back to resume imaging. Finally, if you build a sequence with multiple targets, Sequence Generator Pro can move from one target to another as it completes an imaging session.
- Step 14) To shut everything down you should reverse the order of operations:
- a) Park the telescope using the Hand Controller.
- b) Disconnect the mount in Sequence Generator Pro.
- c) Disconnect the mount in PHD2 Guiding.
- d) Bring up the Cartes du Ciel ASCOM Telescope Interface dialog box again by clicking the Telescope Icon on the Cartes du Ciel Toolbar and click on the Disconnect button.
- e) With all ASCOM client programs on the PC disconnected, you can now close Cartes du Ciel The SkyWatcher ASCOM driver will automatically close itself after all using applications have disconnected and closed.
This should get you going for using Cartes du Ciel, PHD2 Guiding, and Sequence Generator Pro with your SynScan mount via the SynScan Hand Controller and the SkyWatcher ASCOM driver.
Enhanced ASCOM Control Connection Using EQASCOM/EQMOD (Through The SynScan HandControl) Method
The next method for connection we will discuss uses a different ASCOM driver and provides additional functionality over what is available using the Basic ASCOM Control Connection (via the SkyWatcher ASCOM Driver) discussed in the previous section. We will now move to using the EQMOD ASCOM Driver to interface the mount to the PC.
The EQMOD ASCOM Driver is a part of a larger set of software tools called the EQMOD Project. In addition to the EQMOD ASCOM Driver, sometimes referred to as EQASCOM, there are add-on software packages that add even more features like Sky Tours (EQTOUR), Mosaic Control for Astrophotography (EQMOSAIC), and others.
Even the basic included functionality of the EQMOD ASCOM driver exceeds the capabilities of the SkyWatcher ASCOM Driver. EQASCOM includes GPS support, polar alignment assistance, enhanced multi-star alignment models with the ability to save the sky model for permanently mounted telescopes, spiral search capability around a starting position, multiple parking position capability, Periodic Error Correction recording / variable speed PEC playback, Custom Guiding Rates, and more. EQASCOM also provides support for (wireless or wired) GamePad controllers to make slewing control easier from the finder / eyepiece position.
With this rich feature set and sophistication, comes some complexity in setting up your mount for computer control. There are multiple ways to enable use of EQMOD / EQASCOM with your mount and PC and that adds some confusion. This section and the next will show two completely different ways to use EQMOD. Choose one or the other as you wish but be careful to follow the connection methods as outlined independently of other sections of this article.
My method shown here will differ from what other users may use. Unlike other common ASCOM Drivers, there are two methods for starting the EQMOD ASCOM Driver. The first is to allow the ASCOM Client program to start the EQMOD ASCOM Driver when it connects. Just like the description in the previous section for Basic ASCOM Control connections using the SkyWatcher ASCOM Driver, Cartes du Ciel can automatically start EQMOD when a communications connection is made. For EQMOD, however, there is a second method. You can use the EQASCOM_Run script to start the driver before any ASCOM Client needs to connect. After using EQMOD, you then have to manually shut down EQMOD after all the ASCOM Client programs have finished. I find it easier (and more natural?) to let the ASCOM Clients shut down EQMOD when the last one disconnects as it is one less thing I have to do. I prefer to let Cartes du Ciel start EQMOD for me when it connects to the mount and also allow it to close EQMOD for me when I am finished for the evening. That is the method I will show here.
Below are the steps for connecting Cartes du Ciel, PHD2, and Sequence Generator Pro using the EQMOD ASCOM Driver through the HandControl:
- Step 1) Cable up the mount, HandControl, USB-to-RS232 Adapter, and computer. Connect the HandControl to the mount using the standard supplied HandControl cable. Next, connect the HandControl to the USB-to-RS232 Adapter using the Firmware Update cable supplied with the mount. (This cable will have an RJ12 on one end which plugs into the HandControl and a female DB-9 connector on the other end which plugs into the USB-to-RS232 Adapter.) Finally, plug the USB-to-RS232 adapter into a free USB port on the computer (or powered USB hub, if used). Refer to Figure 2a or 2b above for a connection diagram. Use Figure 2a if you are using a USB-to-RS232 adapter / cable. Use Figure 2b if your computer has an available native RS232 Serial Port.
- Step 2) Ensure the mount is in its normal Home Position and then turn on power to the mount.
- Step 3) In the Hand Controller, accept the default settings for Location, Time, Time Zone, etc. Do not start a Star Alignment. You do not need to set up any of the normal user entries in the HandControl since they will be ignored once EQMOD is started and takes control of the mount. EQMOD will use its own copy of location and uses the PC's time and date information. You may simply click through all the defaults presented to you by the HandControl.
- Step 4) Select PC Direct Mode from the Utility menu of the HandControl.

- Step 5) Start the Cartes du Ciel planetarium program on the computer.
- Step 6) Select the Telescope Icon on the Cartes du Ciel Toolbar or use the menu Telescope | Control Panel as shown in Figure 10 at right. The Cartes du Ciel ASCOM Telescope Interface dialog box will open.
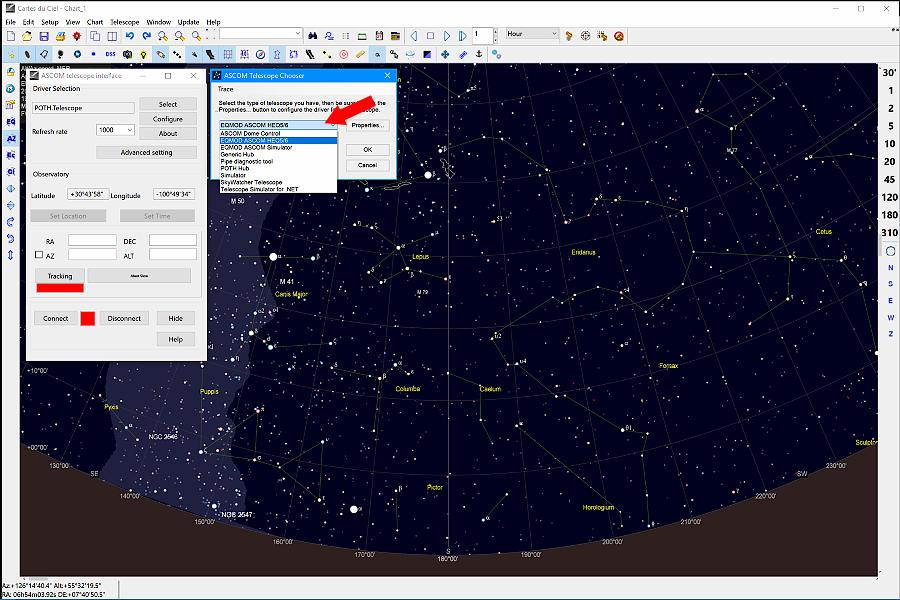
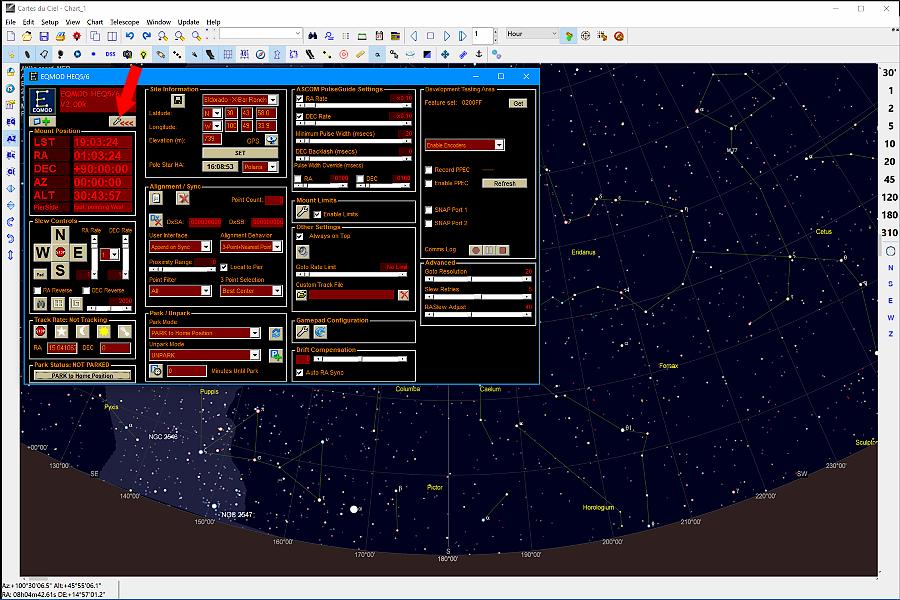
- Step 7) In the Cartes du Ciel ASCOM Telescope Interface dialog, click the Select button as shown in Figure 11. This will open the ASCOM Telescope Chooser dialog. Select the drop-down list and choose the EQMOD ASCOM HEQ5/6 driver as illustrated in Figure 12 below.

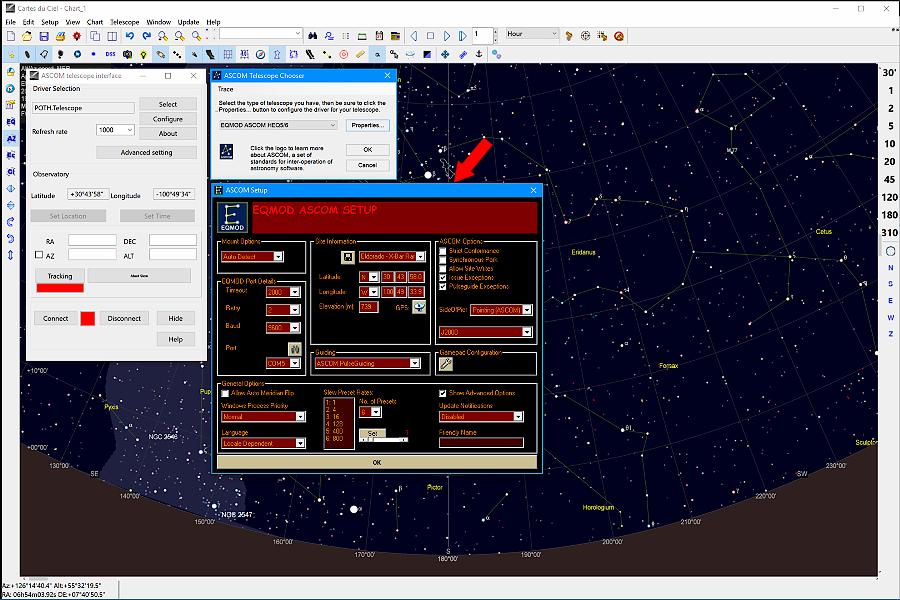
- Step 8) Having selected the EQMOD ASCOM HEQ5/6 entry from the drop-down list, now click on the Properties button and the EQMOD ASCOM Setup dialog will open as depicted in Figure 13. Fill in all the appropriate data values for your configuration.
- Step 9) Verify that your communications port and mount options settings are correct as shown. Also verify your Location information as stored in the EQMOD driver setup. It must match the values for latitude and longitude used in your planetarium program. Once everything is entered or verified, click the OK button. The EQMOD ASCOM Setup dialog will close and take you back to the ASCOM Telescope Chooser dialog. Here again, click the OK button. The ASCOM Telescope Chooser dialog will now close leaving only the Cartes du Ciel ASCOM Telescope Interface dialog box open.
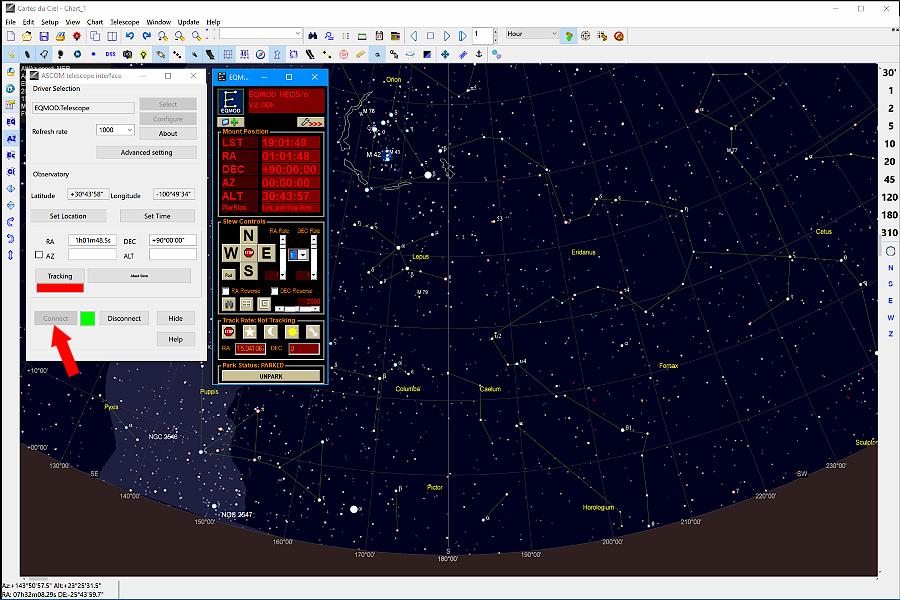

- Step 10) The Cartes du Ciel ASCOM Telescope Interface dialog box should show that the EQMOD ASCOM driver is selected by showing that EQMOD.Telescope is the active interface. Now you can click the Connect button in the dialog. This will start the usage of the EQMOD ASCOM driver. Cartes du Ciel will start the EQMOD ASCOM Driver for you. The EQMOD Control window should open as seen in Figure 14. Click Hide on the Cartes du Ciel ASCOM Telescope Interface dialog box to get it out of your way for the rest of the evening. If you need to bring it back, you can click on the Cartes du Ciel toolbar icon again as shown in Figure 10 above.
- Step 11) At this point, Cartes du Ciel is connected to EQMOD and can drive the telescope. You should use the EQMOD control window buttons or a GamePad to manually slew the telescope if desired and for centering objects. The Cartes du Ciel screen cursor will track the telescope position. (If you want Cartes du Ciel to automatically follow the telescope everywhere, select the Telescope | Track Telescope menu option. This will force Cartes du Ciel to scroll the screen as required to follow the telescope around the sky.) (Cartes du Ciel will always make the cursor follow the telescope but will not scroll the screen unless this option is selected.)
- Step 12) Click the right caret arrow button (">>>") as shown in Figure 15. This will open the EQMOD Control window showing more options that are available. Refer to the EQMOD User Guides to learn more about using and making the most of EQMOD.

- Step 13) Now, if you wish to use PHD2, bring up the application and select the Connect Equipment button. In the Connect Equipment dialog, use the chooser to select EQMOD ASCOM HEQ5/6 in either the Mount or Aux Mount boxes as appropriate. (If you are using ASCOM Pulse-Guiding, make that selection in the Mount box. If you are using ST4 guiding with a cable between the mount and the guide camera, select On Camera for Mount, and also select EQMOD ASCOM HEQ5/6 in the Aux Mount box.) (I sometimes use ST4 as shown in my screen-shot.)
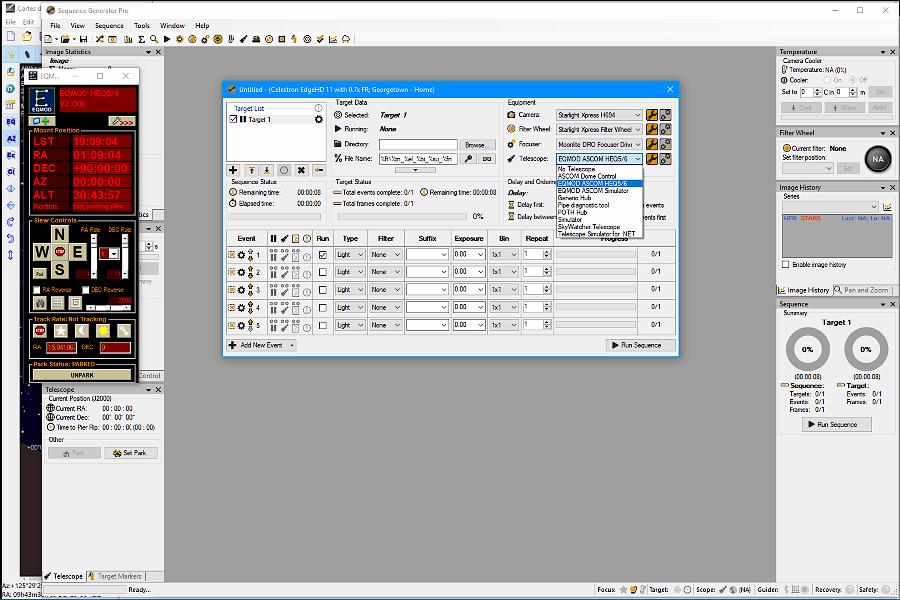
- Step 14) If you wish to use Sequence Generator Pro, bring up the application and select the Telescope drop-down button. Choose the EQMOD HEQ5/6 ASCOM driver for the telescope mount as shown in Figure 17 above. Click the Connect button to connect the mount. Sequence Generator Pro will now also be able to control mount slews and automated plate solve centering. It will also be able to slew away from your current target for focusing and then slew back to resume imaging. Finally, if you build a sequence with multiple targets, Sequence Generator Pro can move from one target to another as it completes an imaging session.
- Step 15) To shut everything down you should reverse the order of operations:
- a) Park the telescope with the EQMOD Park to Home button. Wait for the telescope to finish Parking.
- b) Disconnect the mount in Sequence Generator Pro.
- c) Disconnect the mount in PHD2 Guiding.
- d) Bring up the Cartes du Ciel ASCOM Telescope Interface dialog box again by clicking the Telescope Icon on the Cartes du Ciel Toolbar and click on the Disconnect button.
- e) With all ASCOM client programs on the PC disconnected, you can now close Cartes du Ciel The EQMOD ASCOM driver will automatically close itself after all using applications have disconnected and closed.
This should get you going for using Cartes du Ciel, PHD2 Guiding, and Sequence Generator Pro with your SynScan mount via the SynScan Hand Controller and the EQMOD ASCOM driver.
Advanced ASCOM Control Connection Using EQASCOM/EQMOD (With Special EQDirect Cable) Method
The last method for connection we will examine also uses the EQMOD ASCOM Driver but eliminates the use of the SynScan HandControl. In this case, special hardware is required to connect the SynScan mount to the PC. This additional hardware takes the form of a special cable or adapter built specifically for the purpose.
Recall that the SynScan HandControl performs two key functions when it is being used to connect to a PC. When in normal mode, it can translate the communications language spoken by the SkyWatcher ASCOM Driver into the language used by the SynScan Mount Control card inside your mount. In addition, the HandControl translates voltage levels between an RS232 port at the PC into TTL level voltages used by the HandControl port on the mount. This voltage level translation is very important because the RS232 Interface Standard allows voltages up to plus or minus 25 volts for communications. The actual specification calls for anything between +/- 3 volts to +/- 25 volts. When using the EQMOD ASCOM Driver, the HandControl is no longer needed for language translation so it is put into PC Direct mode (communications pass-through mode) since EQMOD already speaks the Motor Control language. However, The HandControl is still performing its voltage conversion role to protect the mount from the RS232 voltage levels of the PC.
Any negative voltage fed directly into your SynScan mount can spell instant death for the electronics card inside. One of the jobs of the HandControl is convert the +/- 3-25 volt RS232 signals to a range of 0-5 volts which the mount can safely receive. If we wish to connect the SynScan mount directly to a PC without using the HandControl, we must have something in between to provide that voltage translation / protection function. Such a device comes in two general forms. You can use a cable module that simply changes +/- RS232 interface voltages to 0-5 volt range or you can have a cable that converts USB directly to a serial TTL RS232-like interface that uses 0-5 volt voltages.
As mentioned in the previous section, my method for starting the EQMOD Driver shown here will differ from what other users may use. Unlike other common ASCOM Drivers, there are two methods for starting the EQMOD ASCOM Driver. The first is to allow the ASCOM Client program to start the EQMOD ASCOM Driver when it connects. Just like the description in the previous section for Basic ASCOM Control connections using the SkyWatcher ASCOM Driver, Cartes du Ciel can automatically start EQMOD when a communications connection is made. For EQMOD, however, there is a second method. You can use the EQASCOM_Run script to start the driver before any ASCOM Client needs to connect. After using EQMOD, you then have to manually shut down EQMOD after all the ASCOM Client programs have finished. I find it easier (and more natural?) to let the ASCOM Clients shut down EQMOD when the last one disconnects as it is one less thing I have to do. I prefer to let Cartes du Ciel start EQMOD for me when it connects to the mount and also allow it to close EQMOD for me when I am finished for the evening. That is the method I will show here.
Below are the steps for connecting Cartes du Ciel, PHD2, and Sequence Generator Pro using the EQMOD ASCOM Driver without going through the HandControl. The HandControl is not used at all for this connection method. These steps are almost exactly the same as the previous Enhanced ASCOM Control Connection description. The key difference is that in this method, the SynScan HandControl is not used at all. Disconnect it from the mount and put it away. You will be using one of the special EQMOD compatible cables to directly connect the mount to they PC.
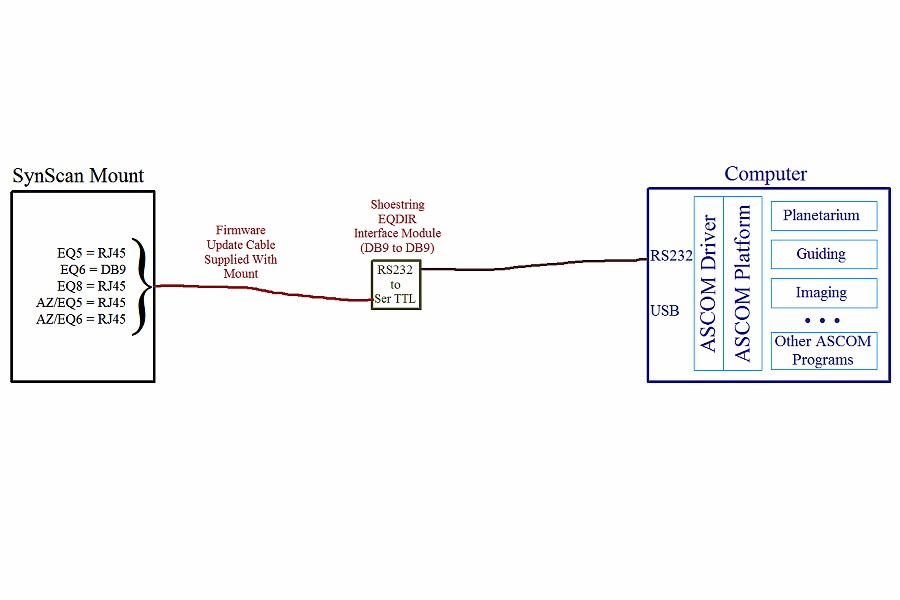
- Step 1) Cable up the mount and computer. Remove the HandControl from the mount and store it away. Refer to Figure 3a or 3b above for a connection diagram. Use Figure 3a if you are using a Shoestring Astronomy USB2EQ6 or USB2EQ5 (or equivalent DIY) cable. Use Figure 3b if your computer has an available native RS232 Serial Port and you are using a Shoestring Astronomy EQDIR adapter module.
- Step 2) Ensure the mount is in its normal Home Position and then turn on power to the mount.


- Step 3) Start the Cartes du Ciel planetarium program on the computer.
- Step 4) Select the Telescope Icon on the Cartes du Ciel Toolbar or use the menu Telescope | Control Panel as shown in Figure 18 at right. The Cartes du Ciel ASCOM Telescope Interface dialog box will open.
- Step 5) In the Cartes du Ciel ASCOM Telescope Interface dialog, click the Select button as shown in Figure 19. This will open the ASCOM Telescope Chooser dialog. Select the drop-down list and choose the EQMOD ASCOM HEQ5/6 driver as illustrated in Figure 20 below.

- Step 6) Having selected the EQMOD ASCOM HEQ5/6 entry from the drop-down list, now click on the Properties button and the EQMOD ASCOM Setup dialog will open as depicted in Figure 21. Fill in all the appropriate data values for your configuration.
- Step 7) Verify that your communications port and mount options settings are correct as shown. Also verify your Location information as stored in the EQMOD driver setup. It must match the values for latitude and longitude used in your planetarium program. Once everything is entered or verified, click the OK button. The EQMOD ASCOM Setup dialog will close and take you back to the ASCOM Telescope Chooser dialog. Here again, click the OK button. The ASCOM Telescope Chooser dialog will now close leaving only the Cartes du Ciel ASCOM Telescope Interface dialog box open.

- Step 8) The Cartes du Ciel ASCOM Telescope Interface dialog box should show that the EQMOD ASCOM driver is selected by showing that EQMOD.Telescope is the active interface. Now you can click the Connect button in the dialog. This will start the usage of the EQMOD ASCOM driver. Cartes du Ciel will start the EQMOD ASCOM Driver for you. The EQMOD Control window should open as seen in Figure 22. Click Hide on the Cartes du Ciel ASCOM Telescope Interface dialog box to get it out of your way for the rest of the evening. If you need to bring it back, you can click on the Cartes du Ciel toolbar icon again as shown in Figure 18 above.
- Step 9) At this point, Cartes du Ciel is connected to EQMOD and can drive the telescope. You should use the EQMOD control window buttons or a GamePad to manually slew the telescope if desired and for centering objects. The Cartes du Ciel screen cursor will track the telescope position. (If you want Cartes du Ciel to automatically follow the telescope everywhere, select the Telescope | Track Telescope menu option. This will force Cartes du Ciel to scroll the screen as required to follow the telescope around the sky.) (Cartes du Ciel will always make the cursor follow the telescope but will not scroll the screen unless this option is selected.)
- Step 10) Click the right caret arrow button (">>>") as shown in Figure 23. This will open the EQMOD Control window showing more options that are available. Refer to the EQMOD User Guides to learn more about using and making the most of EQMOD.
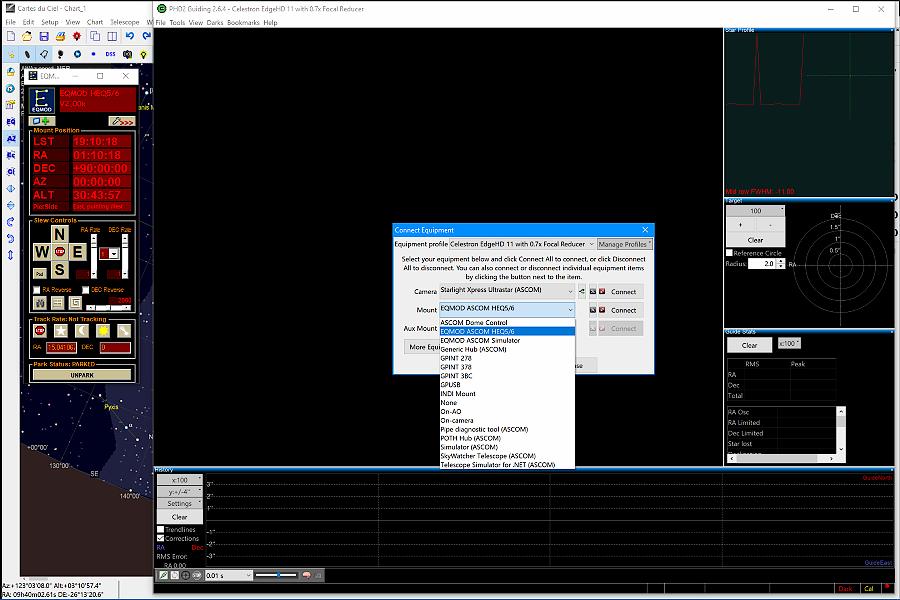

- Step 11) Now, if you wish to use PHD2, bring up the application and select the Connect Equipment button. In the Connect Equipment dialog, use the chooser to select EQMOD ASCOM HEQ5/6 in either the Mount or Aux Mount boxes as appropriate. (If you are using ASCOM Pulse-Guiding, make that selection in the Mount box. If you are using ST4 guiding with a cable between the mount and the guide camera, select On Camera for Mount, and also select EQMOD ASCOM HEQ5/6 in the Aux Mount box.) (I sometimes use ST4 as shown in my screen-shot.)
- Step 12) If you wish to use Sequence Generator Pro, bring up the application and select the Telescope drop-down button. Choose the EQMOD HEQ5/6 ASCOM driver for the telescope mount as shown in Figure 25 above. Click the Connect button to connect the mount. Sequence Generator Pro will now also be able to control mount slews and automated plate solve centering. It will also be able to slew away from your current target for focusing and then slew back to resume imaging. Finally, if you build a sequence with multiple targets, Sequence Generator Pro can move from one target to another as it completes an imaging session.
- Step 13) To shut everything down you should reverse the order of operations:
- a) Park the telescope with the EQMOD Park to Home button. Wait for the telescope to finish Parking.
- b) Disconnect the mount in Sequence Generator Pro.
- c) Disconnect the mount in PHD2 Guiding.
- d) Bring up the Cartes du Ciel ASCOM Telescope Interface dialog box again by clicking the Telescope Icon on the Cartes du Ciel Toolbar and click on the Disconnect button.
- e) With all ASCOM client programs on the PC disconnected, you can now close Cartes du Ciel. The EQMOD ASCOM driver will automatically close itself after all using applications have disconnected and closed.
This should get you going for using Cartes du Ciel, PHD2 Guiding, and Sequence Generator Pro with your SynScan mount connected directly to the computer via an EQMOD-compatible cable / adapter and the EQMOD ASCOM driver.
Summary
This article has attempted to describe in some detail three methods for interfacing your SynScan mount to a computer. Doing so is of great benefit for those using the mount for astrophotography. It can have benefits even for some aspects of visual observing at the cost of needing a laptop near the telescope while observing.
I must stress one last time the importance of treating each method as a single tutorial for connection. You should not improvise by using steps 1 through 5 of the Basic method and then using steps 5 and 6 of the Enhanced method and so forth. Choose a connection method based on your needs and available hardware / software and follow the tutorial steps for that one method from start to finish. Haphazard intermixing of steps or improvising hardware connections will often not work at all and worse yet may result in physical damage to your mount or computer.
In final summary, when connecting your SynScan mount to a PC for ASCOM control, you have the option to use one of two distinct ASCOM drivers:
- SkyWatcher ASCOM Driver -- Uses only cables / hardware supplied with your mount and provides basic control functionality.
- EQMOD ASCOM Driver -- May require a special cable (purchased separately) depending on the exact configuration you choose. (Use of the special cable is the preferred method when using this driver.) Use of this driver brings many advanced features not otherwise available.
These two drivers have differing levels of features which they enable. Both work well. Each may have advantages or disadvantages for your particular situation.
Finally, there are several overriding rules which must always be followed when connecting your SynScan mount to a computer:
- Never connect a standard RS232 Interface cable directly to your mount. You may permanently damage the electronics of the motor control card inside the mount.
- When using the SkyWatcher ASCOM Driver, you must connect through the HandControl and the HandControl must be left in normal operational mode. Do not use "PC Direct mode".
- When using the EQMOD ASCOM Driver, the HandControl must be in PC Direct Mode if it is used to interface between the mount and the computer.
These seemingly complicated connection methods will become clear after following the connection procedure once or twice. Soon it will be second nature and any initial apprehension will be forgotten. If you take a little time to learn why and how these methods differ, you will soon be helping other beginners get the most out their SynScan mounts.
For further reading, another tutorial on the Web fills in a lot of details on using Stellarium as your ASCOM Client. In addition, software setup details not covered here are available for those who run into problems. Be sure to check out this tutorial also:Light Vortex -- Setting up an Equatorial Mount on ASCOM with EQMod, Stellarium and Cartes du Ciel.
If you find any errors here, please alert me. I have tried to follow along on my own Atlas / EQ6 and HDX110 / EQ8 mounts as I did the screen shots, so hopefully I have not made any huge errors. If I need to clarify some portions, suggestions are welcome.
Clear skies and happy observing...